Part 1 - The TL;DR ADHD VersionThis help article was written with the intent to help those that may be running into performance issues with Magic: The Gathering Arena. This is not intended to be a fix, this is only to help give some possible improvement in performance, hopefully enough to make some of your experience go from "Unplayable" to "It is tolerable now". For those that want more info, even if you are not tech-savvy, I will be writing a Part 2 of why this is all happening, what it means, and why it's important in easy to understand wording. Note that before you start reading this, don't let the legth of the article scare you. Depending on which hardware you have, you will be skipping 2/3 of these sections! Terms and what stuff does A few terms to understand while you read this article are:
The CPU thinks about all the stuff behind the scenes, then sends it to the GPU to show you what it's doing. Everything you see on the screen, such as your web sites, your text document or your YouTube video that you're watching is processed by the CPU then sent to the GPU to draw on the screen for you to see. As far as gaming is concerned, the CPU thinks about all the complex things Arena is doing, such as how the card is moving across the screen and what it's doing, such as making an animated effect, etc. It then sends this information to the GPU which processes it and draws it on the screen. The end result is you seeing a cool card flipping out of your hand onto the battlefield and a big creature animating out of it. They work together to make all of this happen. Even though cards are a 2D object (they're just cardboard), you need to realize that they are running in a complete 3D rendered virtual environment. This takes a lot of power to make happen. If your computer is not up to the task, it's going to run very slow because the CPU and GPU just can't process all of the data fast enough to make it appear smooth on your screen while you play. Because of this, it is only able to process and show you only a few frames at a time, and then just skips all the rest in an attempt to catch up. This is what gives you low Frames per Second (or FPS). 60 FPS is what you want to aim for, but I found that anything steadily over 25 FPS seems perfectly playable, albeit not very crisp or sharp looking. The more we can go over 30 FPS, the smoother and more fluent it becomes. My goal here is to get your closer to 25-30 FPS if we can. Anything over that is just icing on the cake for you. I go much more in depth in Part 2 of this article if you care to read it. If not, continue on to some possible performance improvements. How To Improve Performance I am only going to go over a few basic changes that nearly anyone can do. There are a lot more advanced options out there, but most of it is not really necessary and will only add to your issues. Don't fall down the path of bad advice on the internet and disable and delete half your Windows files. That kind of advice will only make things worse and will not fix your game being slow. I do this for a living, and see people bringing me computers all the time that won't boot and run slow because they followed bad advice on the internet to attempt to fix their problems. These quick performance tweaks are quickly reversible with a few clicks and have no permanent ill effects on your computer. One requirement is that if you are using a laptop is that you absolutely must have it plugged in in order to have maximum performance. A fair warning, setting everything to maximum performance will really heat up a laptop quickly. Please play on a hard flat surface. If you are on a couch, or bed, please set a large book or magazine or other hard flat object under your laptop. Fabrics will block the vents and cause your laptop to overheat. Another fair warning is that if any of these GPU driver updates or changes cause your computer to crash, then you have other things going on that are a lot worse than trying to make your game run faster. If this happens, you should seek local help in getting your computer working again. I take no responsibility for anything that happens to your PC, you have been warned. This help article will be broken down into 4 sections:
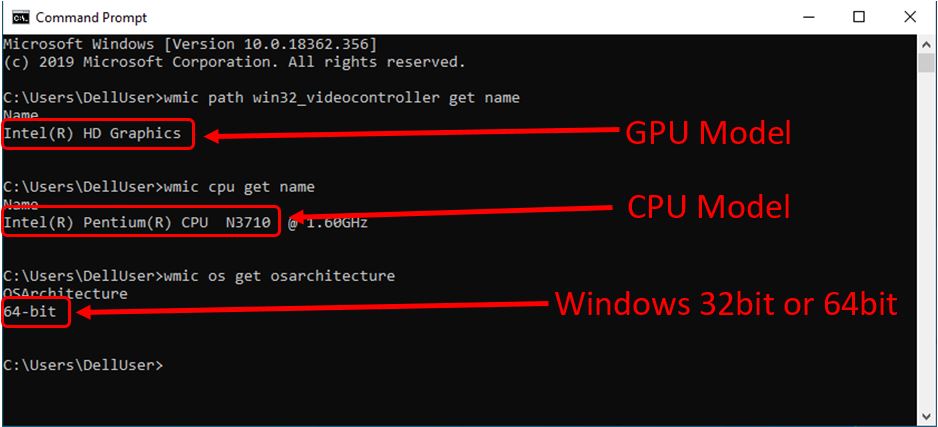
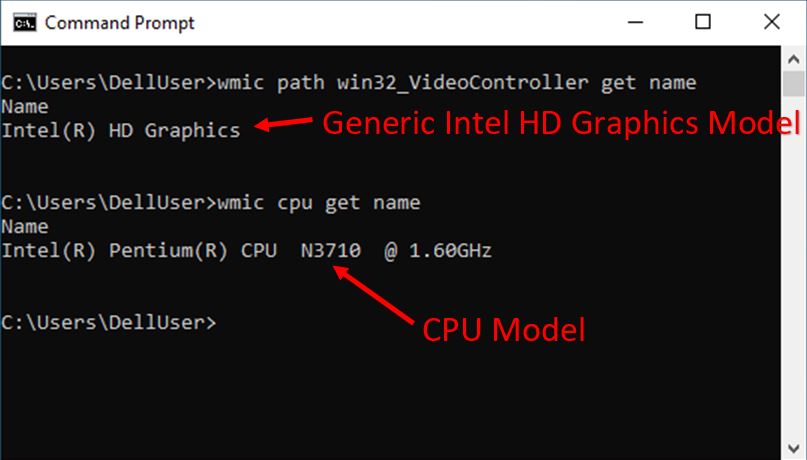
I will only focus on the easy and free options in this article. Step 1 (0f 5) - Find CPU and GPU Model Number Lets start by updating your GPU drivers first. There may or may not be any updates for your GPU depending how old your PC is. You will need to find out what your GPU is first, and maybe your CPU, depending on what you have, and whether your Windows version is 64bit or 32bit. To get this information without too many clicks, you can hit your Windows key, and type "command", then hit Enter. It will open a command prompt. At the prompt, type in the following:
This will output two separate lines with the model of your CPU and the model of your GPU. Write these two lines down. As you can see in the screen above:
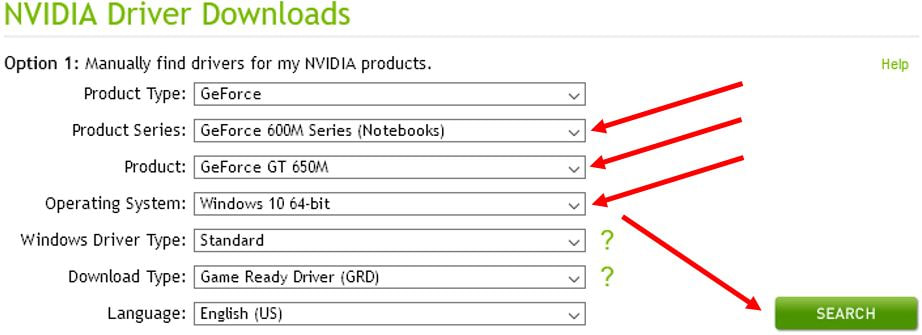
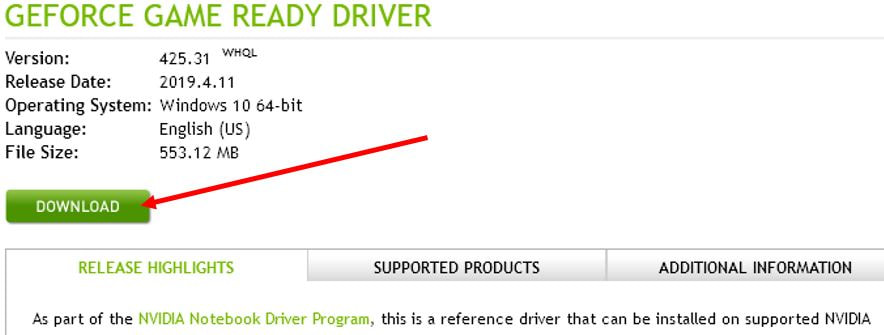
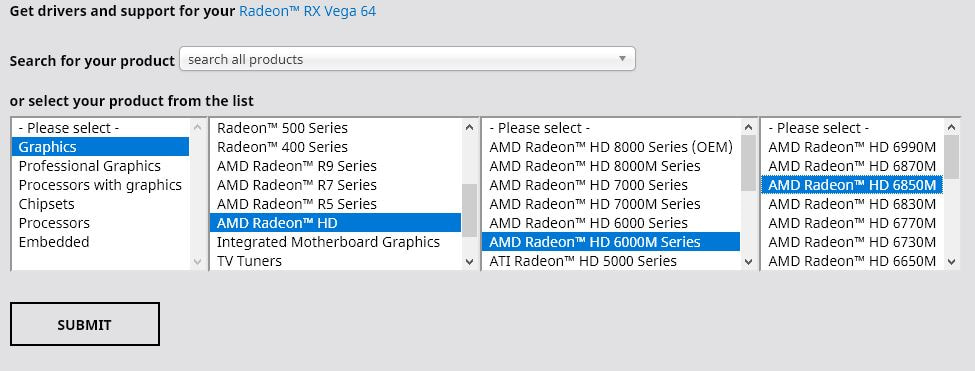
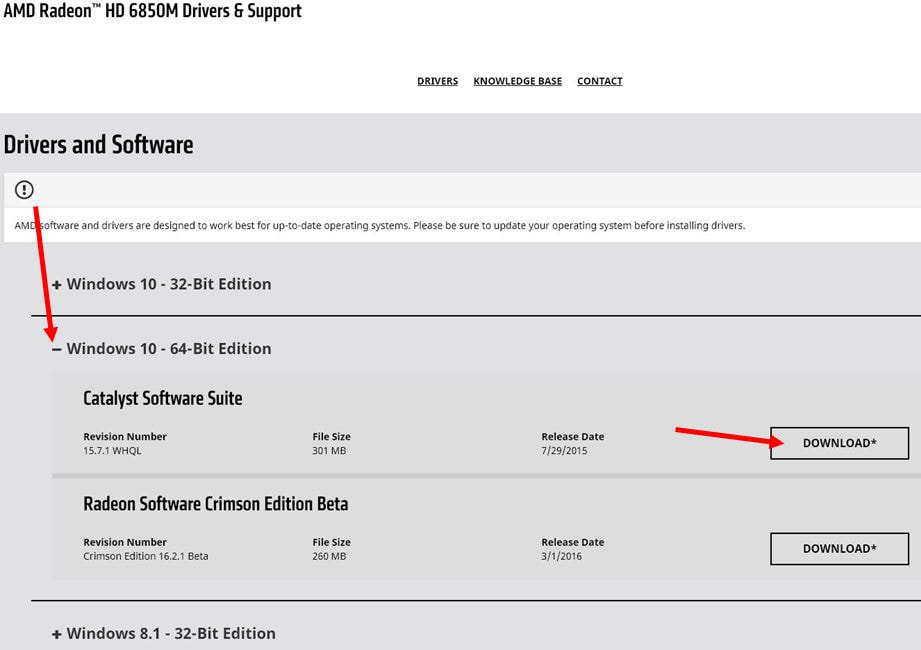
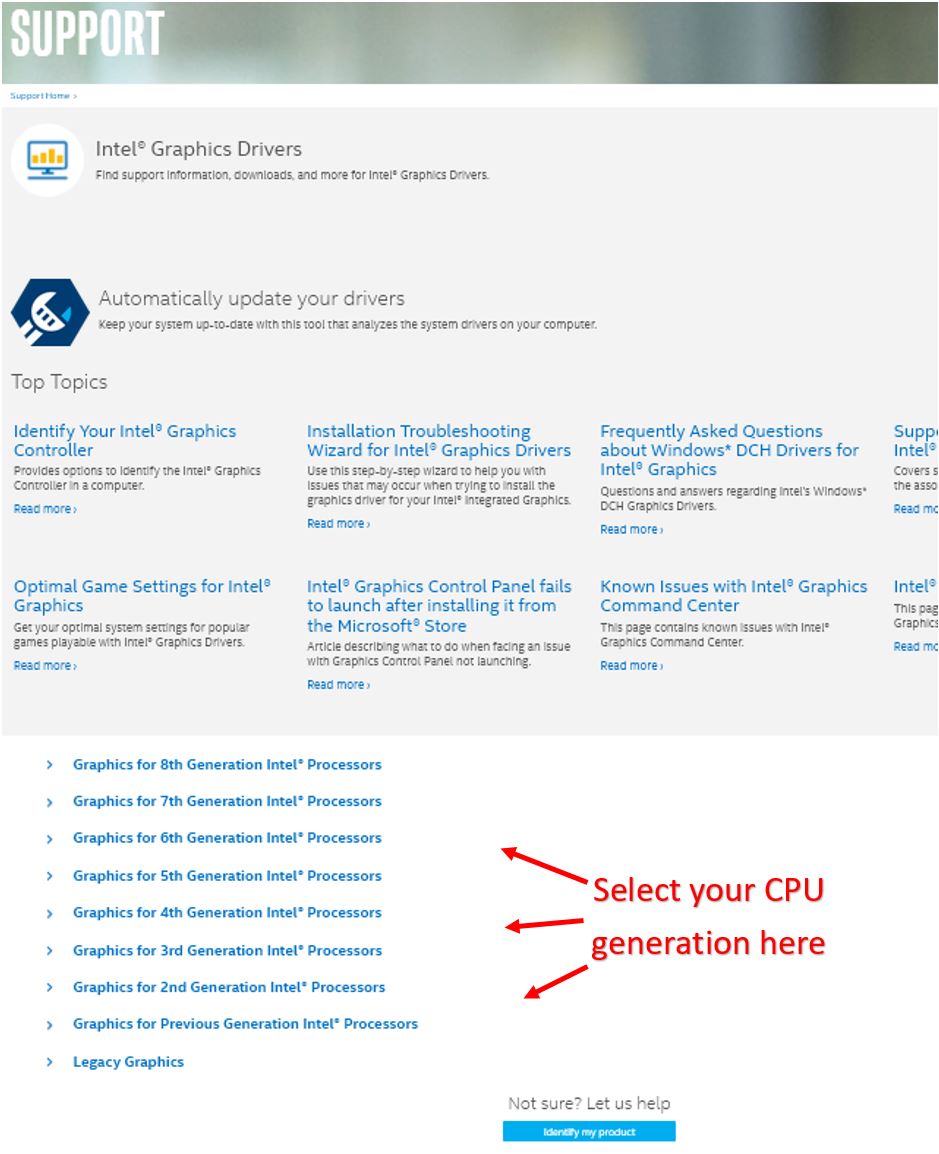
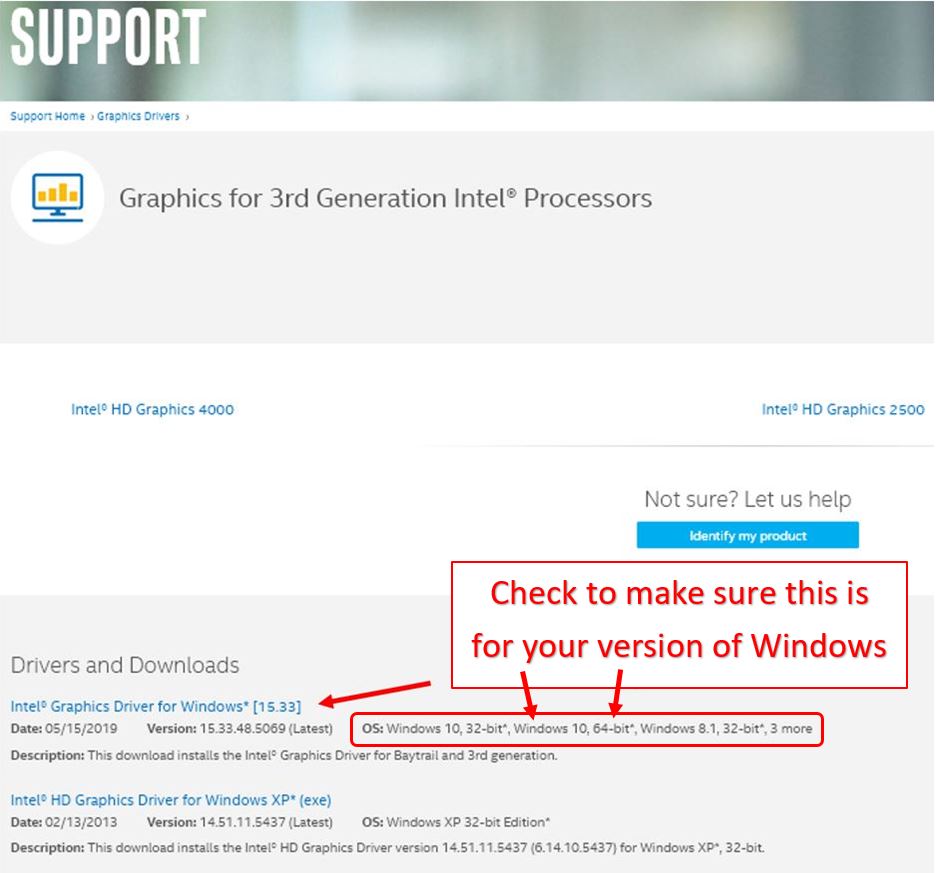
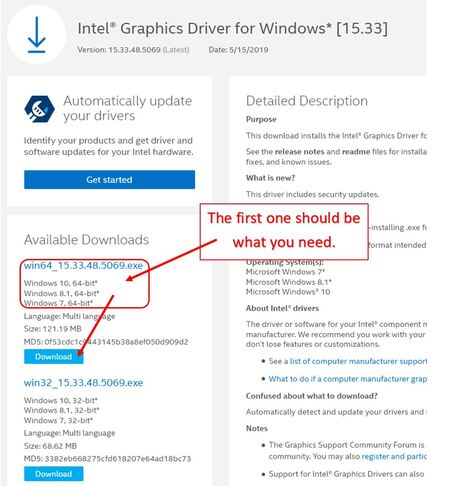
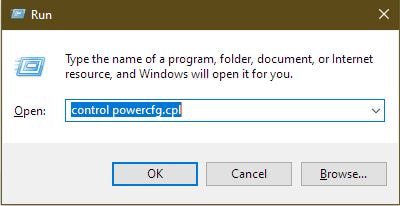
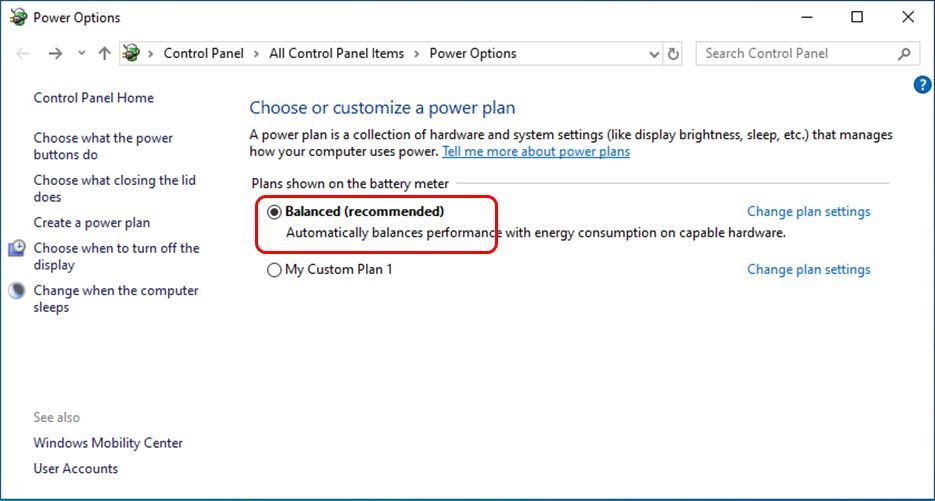
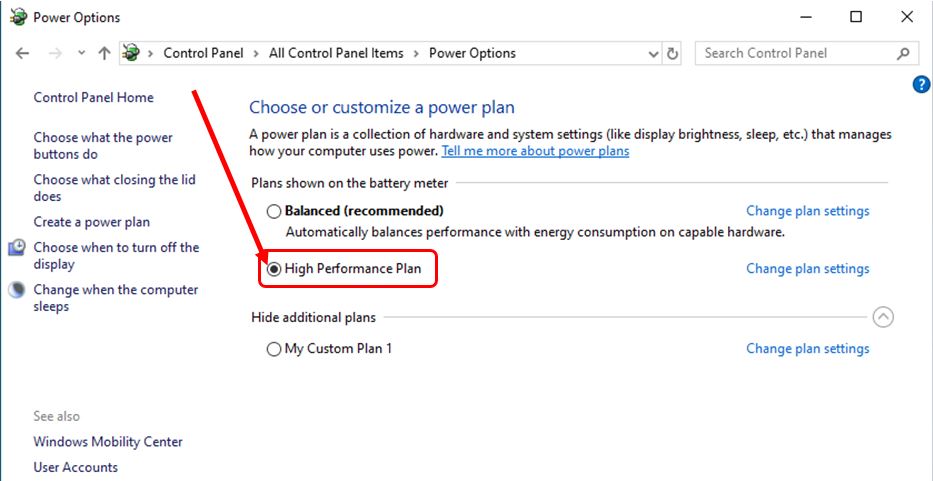
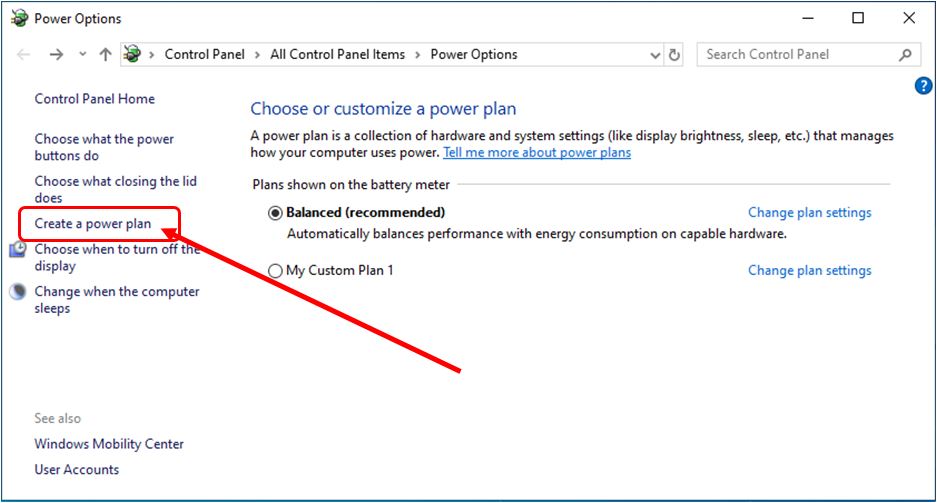
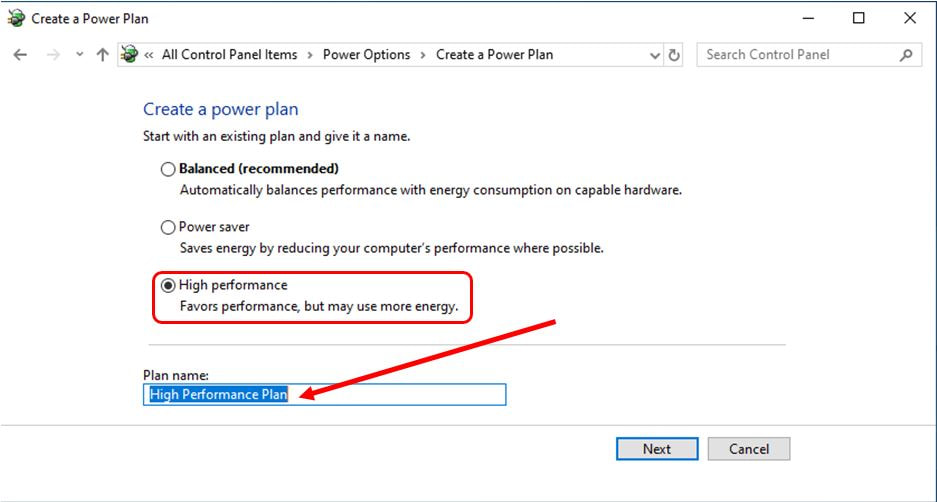
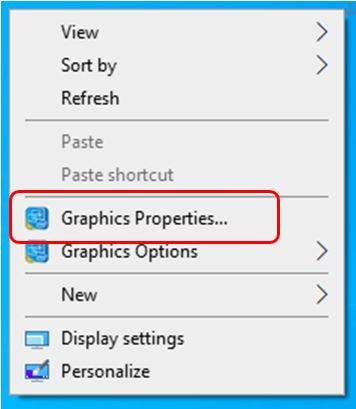
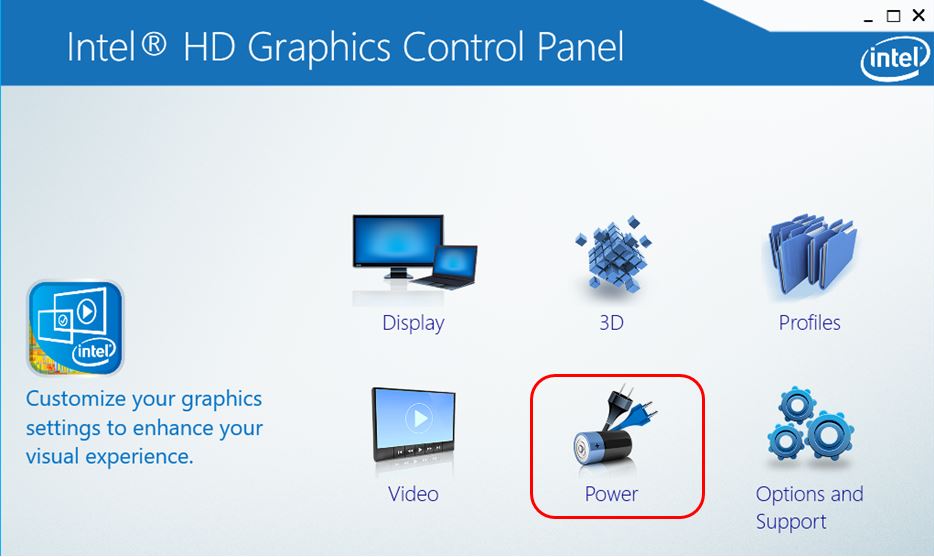
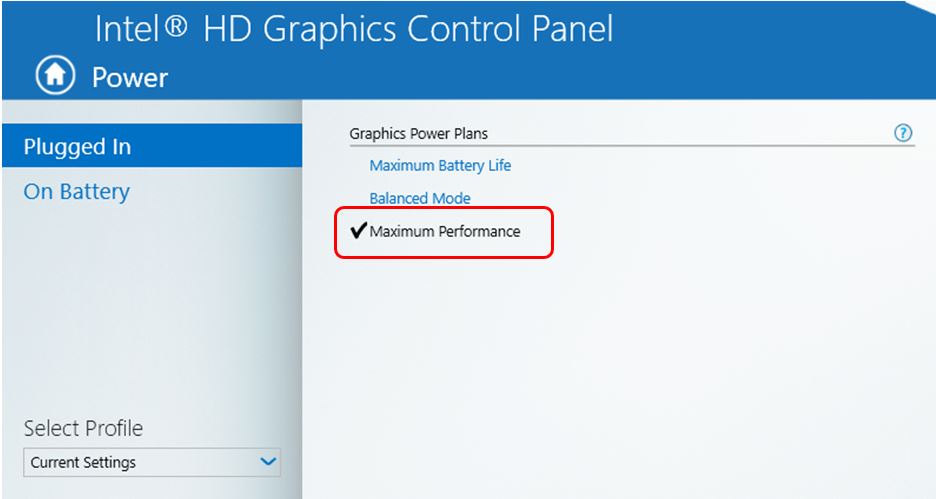
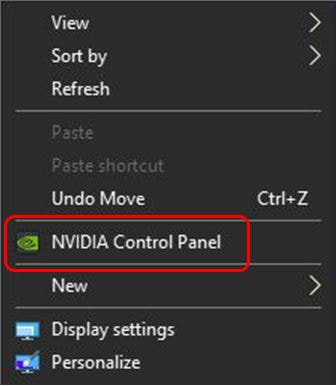
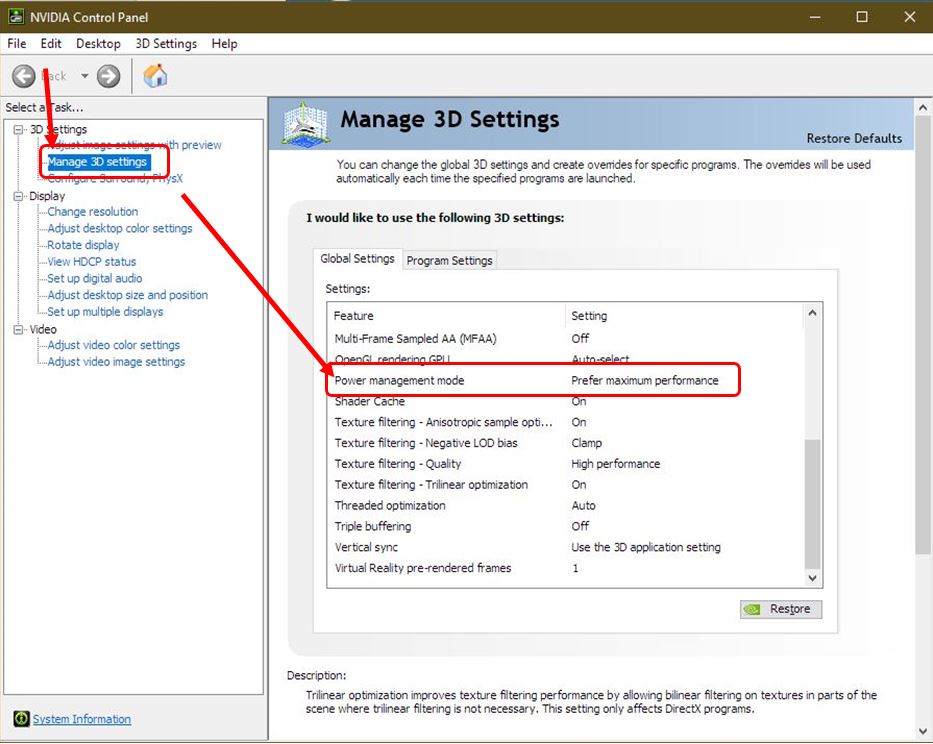
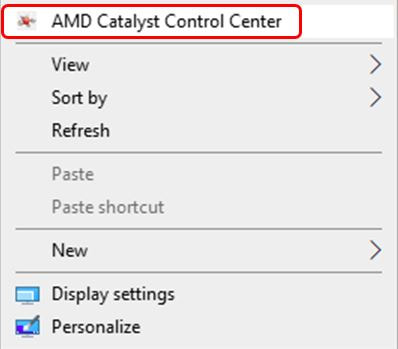
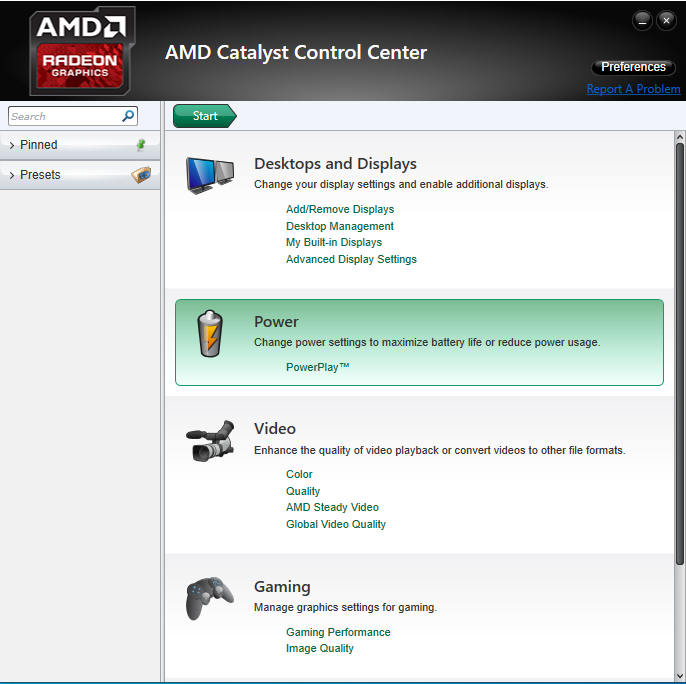
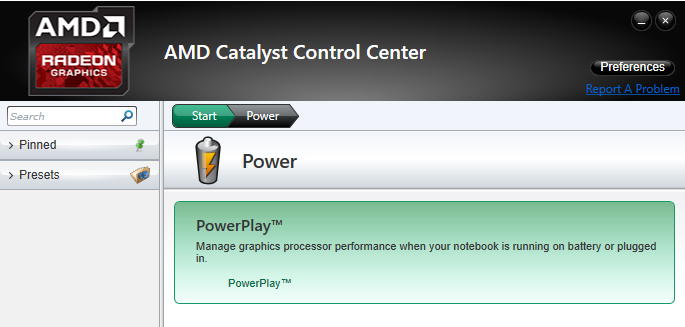
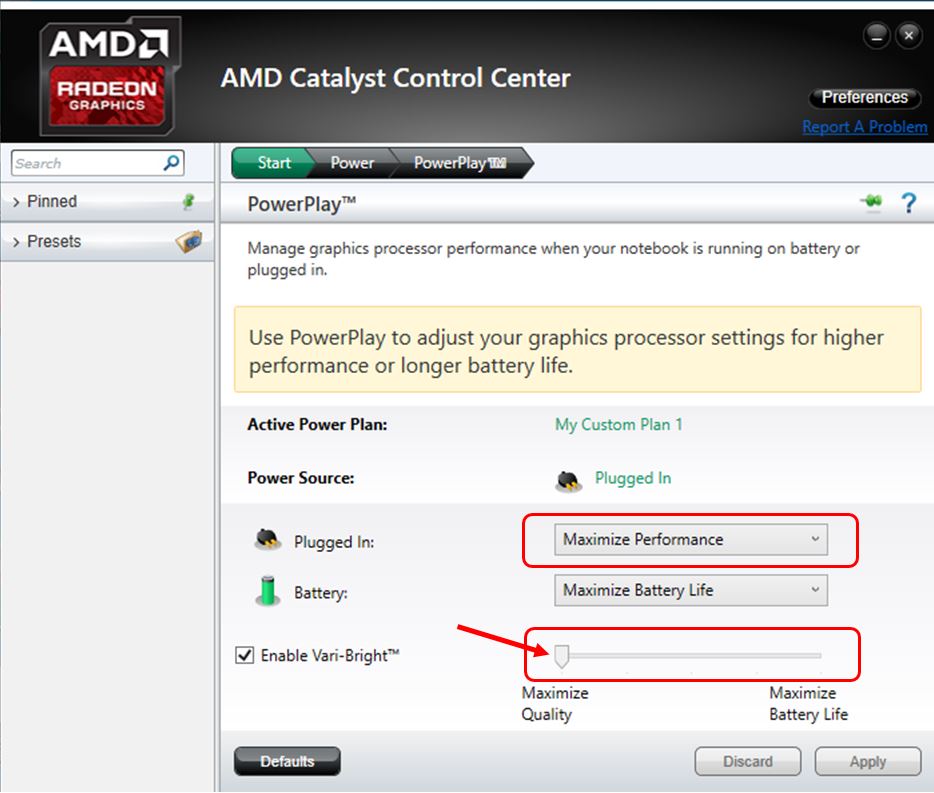
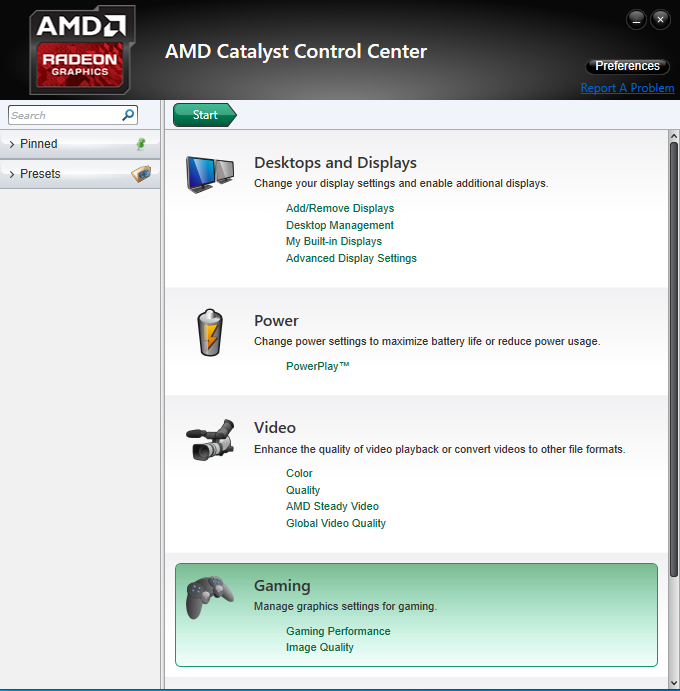
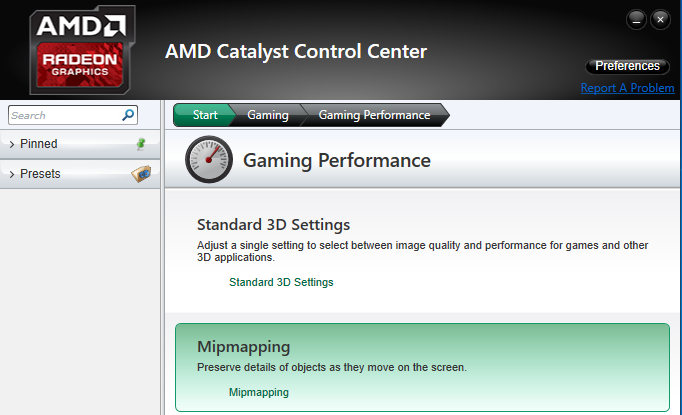
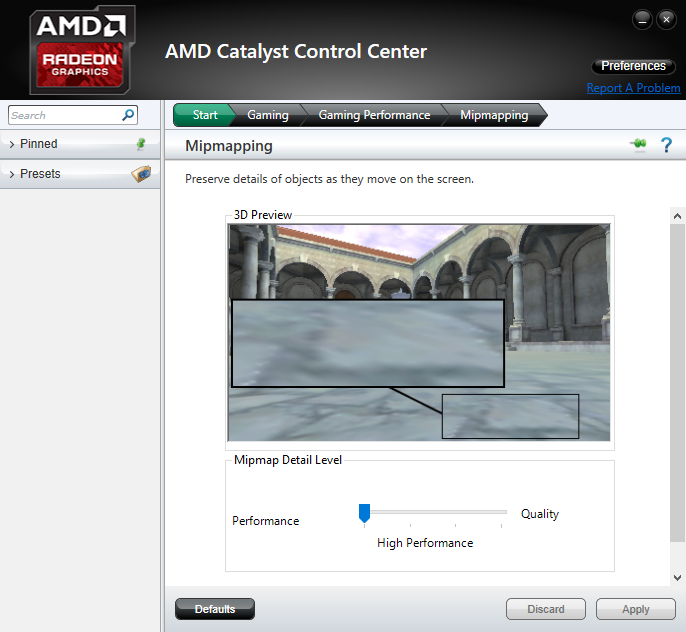
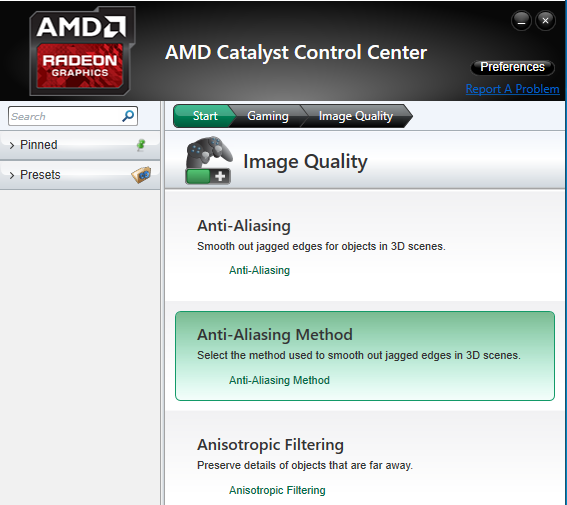
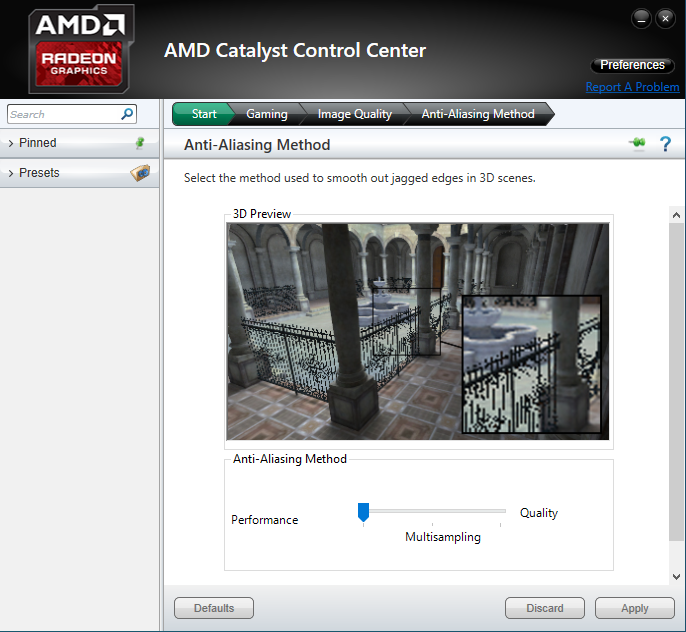
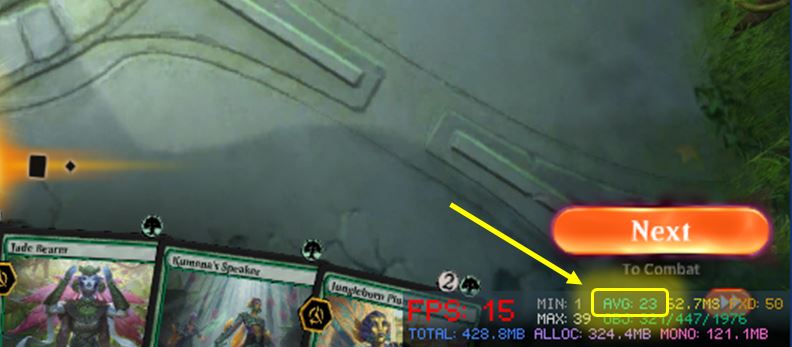
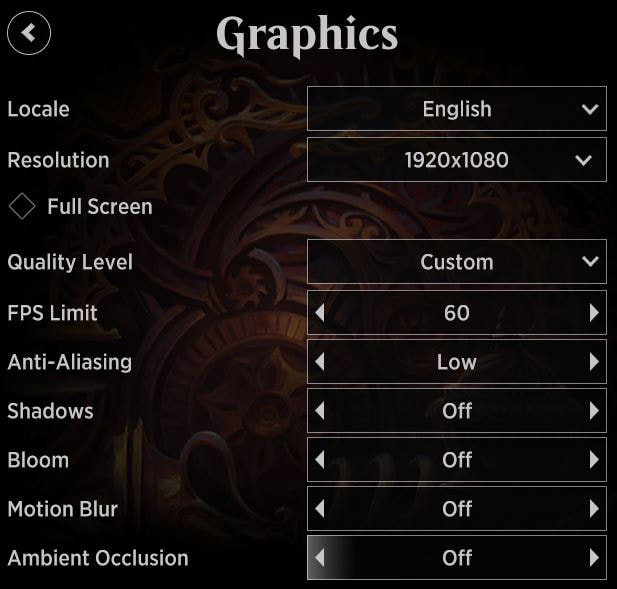
Now that we have this information, we can move on to updating our GPU drivers. Step 2 (0f 5) - GPU Driver Update nVidia Driver Update For those with nVidia GPUs, you can click HERE to go directly to nVidia's driver download site. From here, use the drop downs menus to select your exact GPU model, then click Search On the next page, you should be presented with a Download button. Download the driver and install it. Reboot your PC when it has completed. Skip down to Step 3. AMD Driver Update For those with AMD GPUs, you can click HERE to go directly to AMD's driver download site. Once here, use the sliding boxes to select your exact GPU model, then click the Submit button. On the next page, find the correct download for your version of Windows and click the Download button. Download the driver and install it. Reboot your PC when it has completed. Skip down to Step 3. Intel Integrated Graphics For those with Intel Integrated Graphics, you may need to do a bit more work to find your driver update. In the first step above when you looked up your GPU model in the command prompt, if it gave you the exact model number, you can skip ahead and go right to the download instructions. If it didn't specify a model number, you will need to do a bit more digging to figure this out. Often it just says "Intel HD Graphics" and does not give you a model number. If this is the case, you will need to look at the CPU Model number you wrote down earlier in Step 1. The CPU listed here is a Pentium N3710. The first number in the model number will be the generation that it is. In this example the number is 3, so this is a 3rd Generation Intel CPU. This information will be needed in the next step. Click HERE to visit the Intel Graphics Drivers support page On this page, scroll down and click the appropriate generation link. Next select the appropriate driver for your version of Windows. On the final screen, again look for the appropriate download option for the version of Windows that you have. Typically the top one is the one you need. Note that it says Windows 10 64 bit, this will also include Windows 7 in the same download. On the final screen, again look for the appropriate download option for the version of Windows that you have. Typically the top one is the one you need. Note that it says Windows 10 64 bit, this will also include Windows 7 in the same download. Click the Download button. Download the driver and install it. If you get a message about you already having the latest driver, then you can cancel the install and continue on to the next step. Reboot your PC when it has completed. STep 3 (0f 5) - Windows Power Settings Now we need to change the Power Plan in Windows. For the Windows power settings: On your keyboard, press the Windows Key + R This should bring up the Run box. In the Run box, type in control powercfg.cpl and click OK. It should open the Power Options in the Control Panel. Note that it defaults to Balanced. You will need to change this to High Performance. Select High Performance and close the window. You may skip down to Step 3 to change your GPU Power Settings. If you don't see High Performance in the list of power plans, you will need to create one. Click the Create a power plan link to the left. Next select High Performance Give it a name in the field below. I called mine High Performance, you can call it whatever you like. When you are finished, click Next, and you should now have a High Performance power plan to select. Make sure your new High Performance power plan is selected and close the window. WARNING: When you start up Arena or any other program that takes a lot of power to run, if using a laptop, it may heat up very quickly, and the fans may spin up very quickly and run loud. Please make sure your laptop is on a hard, flat surface so it has adequate cooling. Cloth surfaces, such as a bed, couch or your lap, may block air flow to the cooling system under or around the sides of the laptop. This can cause it to overheat and shut down, or cause it to slow down to the point it's running even slower. I take no responsibility for your computer overheating or becoming damaged. STep 4 (0f 5) - GPU Power Settings Next we will look over settings to change for the GPU driver software that you have. Remember which one you have, it will be either Intel, nVidia or AMD, and skip to the appropriate section below. Intel GPU Power Settings For those of you with Intel integrated graphics, please follow this section. If you have AMD or nVidia GPUs, then skip this section and look for the appropriate heading below the GPU that you have. Right-Click on your desktop, and select Graphics Properties. Note that it should have a little blue icon exactly as you see below. Only this specific option will launch the correct Intel graphics screen to edit in the next step. Next, it should open the Intel HD Graphics Control Panel. Click on the Power icon. Select Maximum Performance. Click the Apply button at the bottom of the window and then close the window. Skip ahead to Step 5 for Arena Graphics Settings. nVidia GPU Power Settings For those with nVidia GPUs, please do the following. If you have an Intel or AMD GPU, then please see the appropriate Graphics Settings sections above or below this section for your specific GPU. Right-click on your desktop, and select NVIDIA Control Panel Navigate the menus on the left to find Manage 3D Settings Scroll down on the main window and change Power management mode to Prefer maximum performance. Once you have made this change, close the window and skip to Step 5 for Arena graphics settings. AMD GPU Power Settings For those of you with AMD GPUs, you will follow this section. If you have an Intel or nVidia GPU, you will need to look for the appropriate section above for your GPU's settings. Right-click on your desktop and select AMD Catalyst Control Center If your screen does not look like the one below, then click the Preferences button on the top right, and select Standard View. It should then take it out of advanced mode and show you the more simplistic settings that you will see on the following screenshots. Select Power Select PowerPlay Change the Plugged In drop-down to Maximize Performance Slide the Enable Vari-Bright slider to the left to Maximize Quality At the top of the AMD Catalyst Control Center, click on the green Start arrow button This will bring you back to the main screen. Next, click on the link for Gaming Performance, found under the Gaming section. Next click on Mipmapping On the Mipmapping screen, slide the slider all the way to the left for High Performance. Click back on the green Start menu arrow at the top again. Back on the Main Menu, click on the Image Quality link in the Gaming section. Next click on Anti-Aliasing Method Slide the slider all the way to the left to Performance. That's it for the AMD GPU settings. Lets move on to Step 5 and change a few Arena graphics settings. Step 5 (of 5) - Arena Graphics Settings Launch Arena and go into the Graphics Settings You can find the settings located in the upper right corner of the screen after clicking on the gear icon. You will want to test with the same thing on the screen. The game will run slower the further along you get since there are more cards and animations happening. So test either when you keep your hand, or test when you're 5-6 turns in and there's a bunch of stuff on the battlefield. Sparky will time out your game after a while, so maybe every couple of minutes, just click something. I typically Attack All, then cancel, then Attack All again, then Cancel, it keeps the game active while I can play with all of the graphics settings. Also, turn on this little diagnostics tool from inside MTG Arena. To do so, simply press Left Shift and the Period key. You will see an FPS meter in the bottom right hand corner as seen below. NOTE: After making a change in the Graphics settings, you will need to reset the average for the FPS meter. To do this, just turn it of, and back on again by simply pressing Left Shift + Period keys for off, then press again for back on. This is important to show the change in average FPS, otherwise it's still averaging your FPS from previous settings which will be incorrect for what you are looking for. Set everything to the following settings as seen below. Then start up a game in Practice mode so you can play with all the settings. The above settings should be optimal for many people. Here's what everything does to help you tweak your own settings.
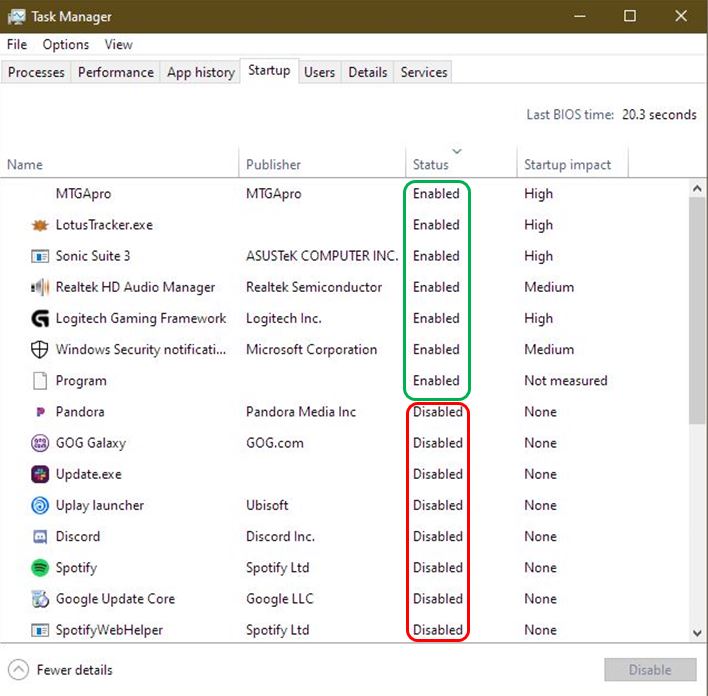
I saw a 2-5 FPS improvement from doing all of this. If you start lowering your resolution, you will see in creases from 2-30 fps immediately. The main improvement on the really slow PCs is just going to be lowering your resolution. Going from, say 1920x1080 down to 1366x760 gave an additional 7fps going from 22fps to 29fps and making it very playable at those settings. You will need to find the right combo of resolution and windowed vs full screen mode. Once you find an acceptable resolution, then change Anti Aliasing from Low to High and see if your computer can stomach the extra processing or not. If not, simply turn it back off. What Else can I do that's free? Your PC may be running a tun of stuff in the background that's killing your performance too. This is not hard to disable, but you need to know what you're doing first, so perhaps seek help for some of these suggestions. Disable Arena Trackers I found that untapped.gg, one of the most popular options, made Arena runs 4fps slower on slow PCs. You may want to turn this off. Also, if you are running more than one tracker, keep in mind that all of them are trying to read Arena's log data all at the same time, meanwhile Arena is trying to also write more log data. This kills your disk performance, and wastes processing power. Task Manager Startup Items Check your Task Manager Startup tab You don't need 80% of what runs in there to be running all the time. Disable all the obvious things an reboot. All of those things will run perfectly fine when you click on their icons. They don't need to be running all the time when you aren't using them. Simply right-click on the Enabled wording after each item, and select Disabled. Once you've gone through this list, reboot. Your PC will probably boot up noticably more quicker too. Turn off Streaming Overlays Apps like OBS, Discord, FRAPS and more are all constantly processing all the data going on all the time while you're playing. These absolutely kill performance. You should be running a powerful computer to be running these while gaming. If you don't have a powerful computer, or even if you do, try closing them all and seeing if things improve. PC Upgrade Options So, I only see a few FPS improvement after all that, now what?
Well if that didn't get you much improvement, I am sorry to say, you will need to spend some money next. This will help determine if you should spend any money or just get a new computer. RAM Upgrade How much RAM do you have? If the answers is less than 8GB, you may want to upgrade your RAM. I saw an average of 4-9 FPS improvement going from 4GB to 8GB RAM. It also cut the game's load screen and match load screen time in HALF! 4GB RAM is anywhere from $10-20 on Amazon, eBay, etc. Upgrading from 4GB to 8GB was the single largest gain in performance for any of these slow PCs that I tested. SSD Upgrade I only tested on Solid State Drive upgrade on one slow laptop. I saw a 1fps improvement across the board, so this really has no effect once the game itself is loaded. Now, the game did load even half as fast as it did with extra ram, and the match load screens were also halved from even the ram upgrade. But once the game started, there was only a 1fps improvement. This is an awesome upgrade for anyone not on an SSD, but not necessary if you're only looking for Arena performance improvement while actually playing the game. SSD's start at $30. Video Card Upgrade For those with Desktops using Integrated Graphics (Intel HD Graphics or similar), you will see a significant improvement by adding in a dedicated video card. WotC's recommended card starts at an nVidia GTX 560, which is still quite old, but can easily be found on eBay for under $30.
6 Comments
Shawn
7/10/2020 08:36:52 pm
Ok I havnt tried any of this yet ( being honest), but thank you for taking the time to make this in-depth game specific troubleshooting guide. Well done dude, I’m gonna go try it now, hopefully it works!
Reply
GrampaB
1/15/2021 01:08:27 pm
I appreciated this article, and have implemented many changes based on advice and info you provided in it.
Reply
Key22551
2/16/2021 06:53:21 am
GrampaB! I faced you in MTG Arena a few times and lost all of them. Could you give me any advice please. Also, I'd like to add you, if possible.
Reply
Kalabalik
10/12/2021 10:33:57 pm
Is the "left shift + period" diagnostics tool built into the game? I can't seem to get it to work on my computer (it doesn't show up at all)
Reply
4/7/2022 08:39:50 am
Excellent article! Your post is essential today. Thanks for sharing, by the way.
Reply
Leave a Reply. |
Categories
All
Archives
August 2022
|
- Home
-
Abandoned Travels
-
Abandonments
>
- 2014-2015 >
-
2013
>
- CMX Construction
- Orange House 01
- Fertilizer Plant
- Egg Plant
- Box Plant
- Ellaville Bridge Revisited
- Gold Kist Farms Silos
- Lafayette House 03
- Columbia House 01
- Columbia Barn 01
- Cash's Towing
- Coastal Revisited
- Suwannee Shack
- Hernando House 01
- Lafayette House 02
- Lafayette House 01 Revisited
- Lafayette Chimney Revisited
- Lafayette Quarry Revisited
- Williston Urbex
- Elljay Garage
- 2012 >
- 2010-2011 >
- Travels >
- Nature >
- Water >
-
Abandonments
>
-
Games
- Food
-
VATS Sucks
- Stuff
- About

 RSS Feed