Free 2 Play and You! Since launch, and of this writing (8/21/22) I am at Paragon 154 on my Barbarian. I’ve probably done a bit of grinding now and then on certain days when I was trying to reach a goal of something early, but otherwise, I try to stick to just doing all of the daily items each day and stopping there. This will keep the game fun and a healthier play style that won’t take up all of your time. I am currently running in a Shadow clan, so some of the items in my daily routine will be for Shadow clans only. The Immortal clans also have a set of extra daily activities as well, which I don’t know at this point, but will add in the future if we pick the Immortals at some point for our clan to follow. I usually log out each play session at Rakkis Plaza Waypoint in Westmarch. This gives me the best starting point before I run off to do my daily quests and activities. My current daily routine is focused on boosting my stats as much as I can for free, thus I am focusing on certain items and ignoring other items completely. Better stats = more powerful character = play at higher levels = get better gear/rewards/etc  My Daily Routine Setup
Depending what items are showing in the Codex as 2x Featured events, do those first, then do the others in whatever order you want. Bounties are often at 2x battle points when I log in to play, so I do those as quickly as I can before it changes to something else. If the event you are doing has a 2x battle point bonus in the Codex, make sure you immediately claim them when you have completed your goal. They rotate periodically, so you don’t want to wait to claim that particular activity as you may lose out on the bonus. Go Forth! Now that I have things to do, I go forth and doeth them!
Invites for anything
Events
Back In Town… Once I have finished playing for the day, I spend some time doing maintenance. This includes visiting most of the vendor and checking a few menus for various achievements or other rewards that were granted while playing. I kind of do most of these in one big loop for efficiency sake. Fading Embers and Runes
Legendary Items Identifier
Charms Charms and Skill Stones are basically P2P items in Diablo Immortal. Don’t get caught up in spending resources trying to get these perfect. It’s not going to happen. Grand charms are a waste for F2P players and can only be effectively upgraded by spending money. Instead, focus on creating grand charms, converting them to skill stones, and then selling them for platinum! Charm Craftman
Gems
Shadow Activities Contracts
In Conclusion...
This may seem like a lot, but I can complete most of this in about an hour on most days. Extra events and challenges will add time, but the main daily events take about an hour a day. I hope this helps in figuring out what to do as a free player. I know once I got a routine down, it really helped me focus and get things done quicker. Remember, only play to have fun. It’s not worth the grind if you’re not enjoying it. I will try to update this article as I find new tips and tricks for us F2P players!
0 Comments
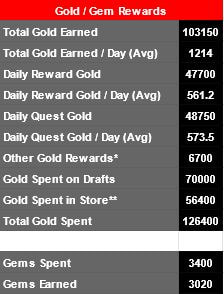
Real World Costs Part 2: What do Items Cost? From the previous article on conversion costs, we know how much each currency unit costs in real world money, we can dive into figuring out how much things cost in the game. While some of these items may not seem like a lot of money based on your budget or gameplay style, what will confuse many people and cost them more than they thought they wanted to spend is all of the currency converting.Orbs? Platinum? Hilts? With no real world currency value attached to these items, you won’t think about spending actual money. You’re just using in-game currency at that point. Because of this you may spend more than you thought. These types of in-game currency practices are done on purpose to trick you into spending more. If you are good with numbers and know what you’re getting into, spend away if that’s your thing. If you don’t fully understand all the various currency conversions and what things actually cost in real world money, then it’s best you stay away from spending any real world money on any game. Below is a list of all (I think I got them all) items I could find that had some kind of monetary value. 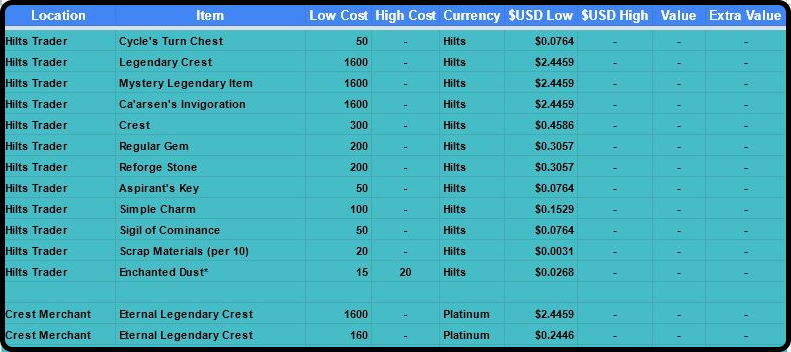 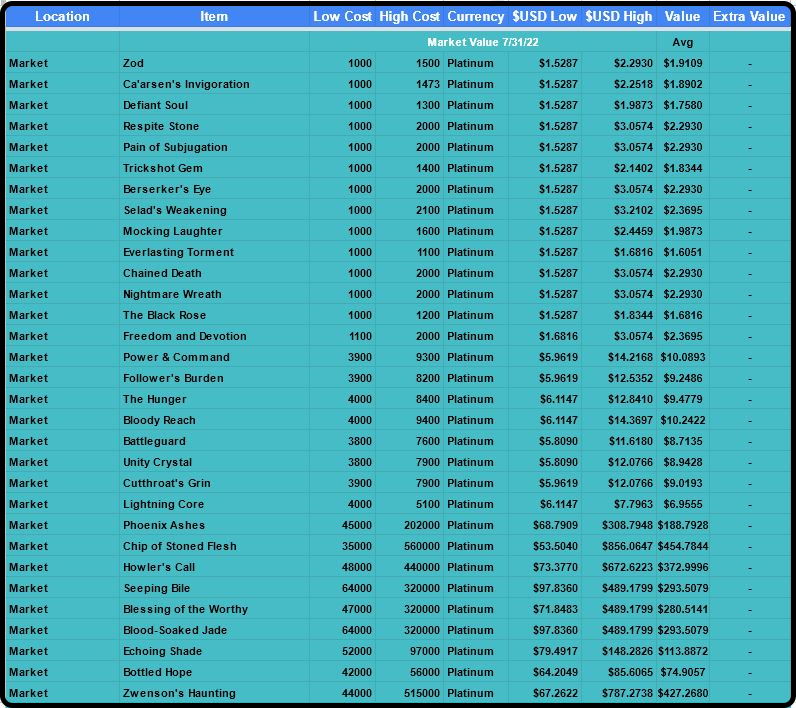 I am still working on the Bundles and Services, as there are a few items in there that you can't buy or trade from any other method. These items are included in bundles and advertised with extra value over the items we can calculate, so I'm working to figure that out still.  Real World Costs Part 1: Conversion Rates Conversion Rates First and foremost let's explain the conversion rates. To figure out real world costs, we will be converting $USD→Orbs→Platinum→Hilts For the purpose of this article, all monetary values will be in $USD. Orbs When spending real money in the Diablo Immortal Shop (Shop for short), you will first need to purchase Eternal Orbs (orbs for short). From here you will be able to purchase a few high end items from the Shop, and then convert the rest to Platinum for other things. As of this writing (7/24/2022), orbs currently show for sale in the following amounts below: 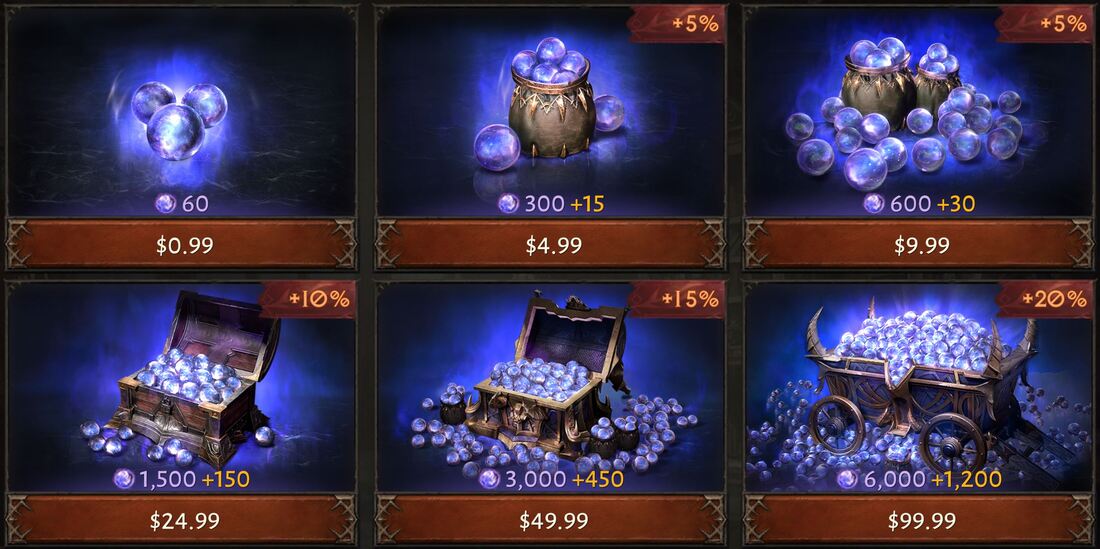 After averaging each different bundle with its discount, we find that an orb costs $.015 Platinum Next we move down to Platinum, or just plat for short. Plat is only used to purchase items in the Market. Platinum has one easy to convert rate across it’s range. 50 orbs = 500 plat 1 orb = 10 plat 10 plat = $.015 1 plat = $.0015 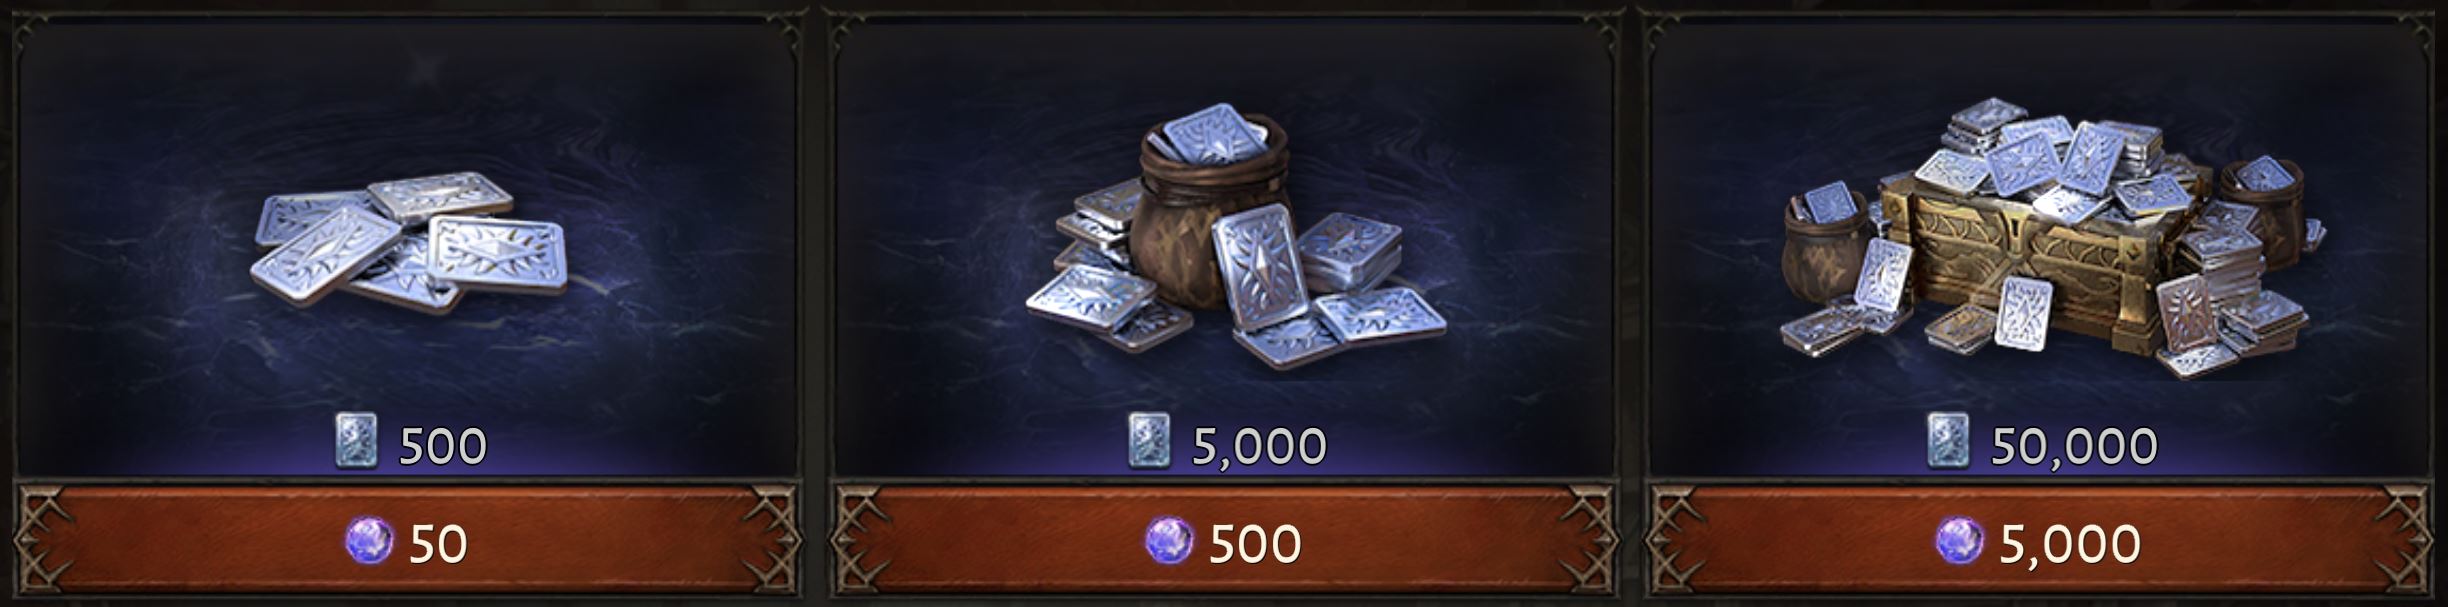 Platinum is obtained by completing various activities in the Codex or by selling items in the Market. Hilts Next we have hilts, which are earned for free from various activities, events and by just playing the game. Hlts are only used to purchase items from the Hilts Trader. This conversion seemed a bit of a stretch, but then I was able to confirm it with a direct comparison between the Hilts Trader and the Shop afterward. I always like to have multiple points of conversion for rates that are not as straightforward. At the Hilts Trader, 1 charm is 100 hilts, so 5 charms would be 500 hilts. So far we have: 5 charms = 500 hilts At the Charm Craftsman, converting 5 charms into a grand charm, and then converting it to a skill stone costs 500 plat. So now we have: 5 charms = 500 hilts = 1 grand charm = 500 plat 500 hilts = 500 plat 1 hilt = 1 plat = $.0015 To check that this calculation is actually valid, we can also use this information to verify it. In the Shop, 1 legendary crest costs 160 orbs. At the Hilts Trader, 1 legendary crest costs 1600 hilts. We can use this information to compare between the value of Orbs, which we know, and also using what we think is the value of hilts from the conversion above. 160 orbs = $2.24, using the original conversion from $USD to orbs 1600 hilts = $2.24, using the method above Gold Gold has no monetary value at all. It’s used for upgrade costs of items and gems as well as used for gambling at the Rarities and Antiquities vendor. I thought I might be able to link gold to charms from gambling for jewelry, but jewelry was only neck and fingers, which charms are neither, even though it shows a charm in that section on the vendor. Fading Embers and Runes Fading Embers is yet one more currency used to trade with Cellik, the Fading Embers and Runes trader. Fading Embers are used for crafting legendary gems, one of the most expensive items in the game. Since you can sell crafted gems, then fading embers and runes also have some value as well, but it would be difficult to determine this value. Since the market goes up and down on value for various gems, and some gems are worth more than others, but still created using the same runes, it would again be difficult to put a value on these items. Conversion Rate Chart Here is my spreadsheet chart of the conversion rates that I calculated out. I will update this if things change over time. Sometimes during a game's first few updates, the conversion rates and money markets in the game may fluctuate until settling in for the long haul. 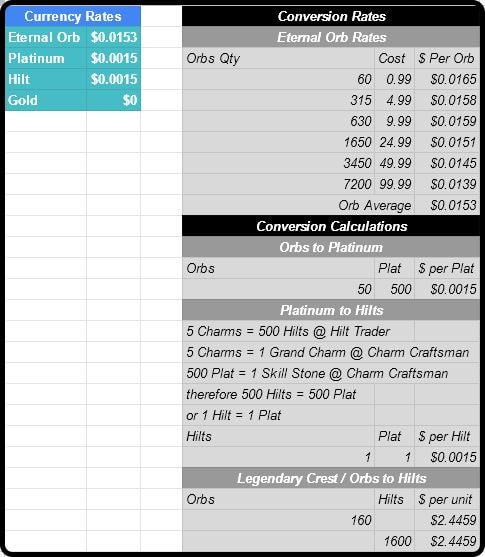 Welcome to Article 2 of 2, catching up on the last few sets that I got behind in writing about. I'm still running strong with my Walls deck, currently sitting at 70% win rate for daily Quick Play in the Historic Queue. No, this deck does not hold up on the ladder, but for daily play, it's doing excellent. I can't comment on the AFR or MID sets for gamplay itself, as I have long forgotten anything from that time, but currently the main two sets I run up against that I can't win against are the deathtouch decks (unless I have Tetsuko in my opening hand) or this new Minion of the Mighty Surprise Dragons set of decks that is super popular at the time of this writing. I always concede on deathtouch, and unless I have a flyer or two out to block with, I have been conceding immediately as soon as Minion of the Mighty is played. In the past month, a lot of my losses are just me conceding against the minion of the mighty deck, which sucks but I guess a loss is a loss against a super cheaty trick deck like that. I could play it, and it does look like fun, but it looks too linear for me. I'll stick to my Walls deck. Other than that, this deck has been treating me pretty well still. I have been playing it almost exactly one full year now with only a minor change or two. I even spend some gold to finish blinging this deck out as well. I got the cosmetics for every card that has one. It's been great fun. I do see the mirror match of this deck every few days, and it comes down to who has the larger creatures out first and who goes first. 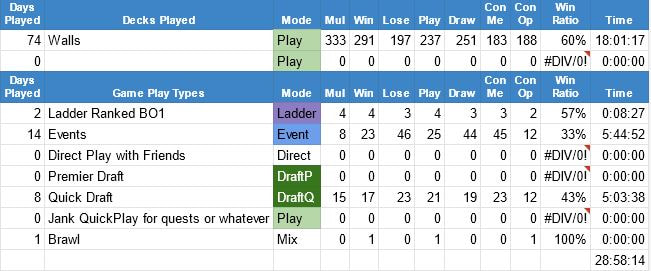 AFR 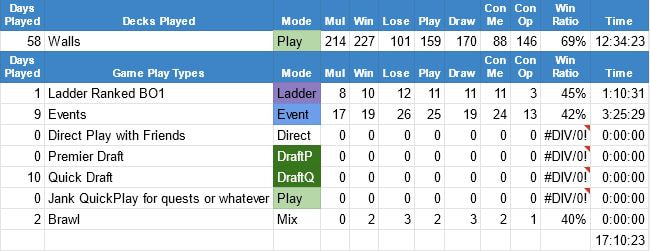 MID 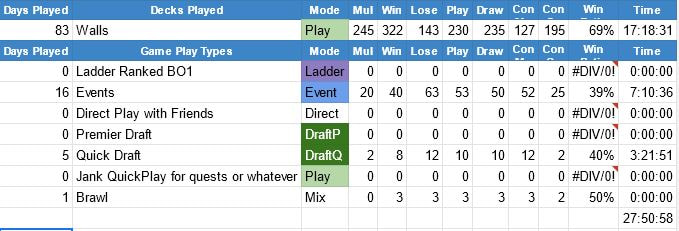 VOW You can see this does pretty well against the current Historic Quick Play meta. I'll continue to play it until it proves ineffective. Next are the rest of the stats...  AFR 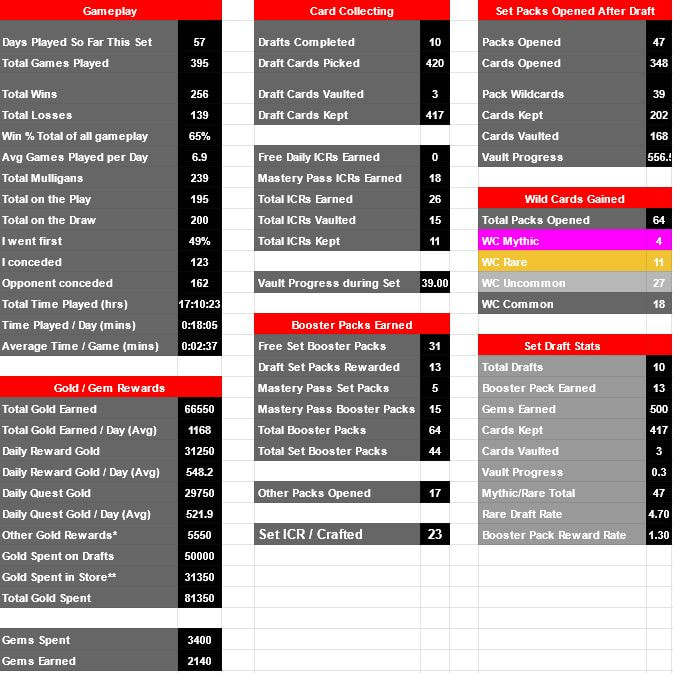 MID 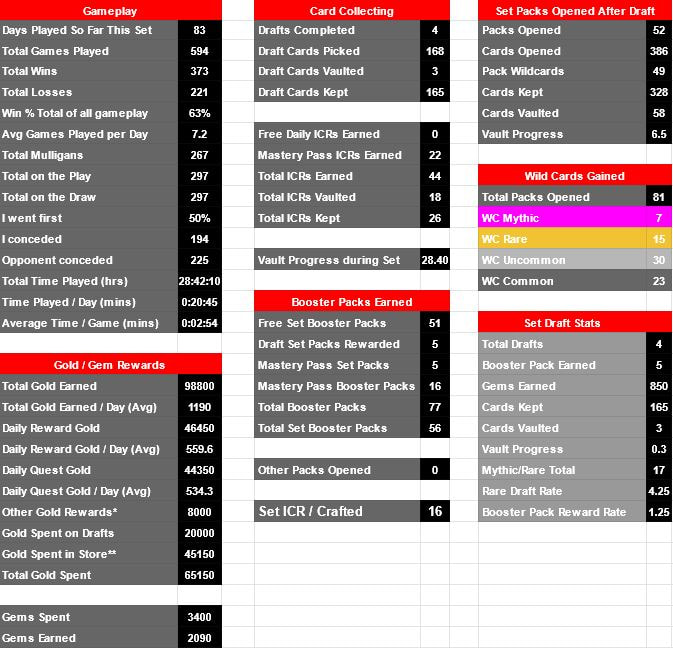 VOW As you can see, I track a lot of stats. Most of this is automated at this point, so I just enter in daily numbers as I play each game. I typically just play to 4 wins a day, usually early in the morning, and keep my daily quests from cluttering up. I've also continued to play each of the Midweek Magic events as well, though rewards are less useless or exciting now that the FNM@ Home packs rewards are no longer a thing.
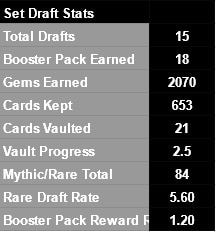
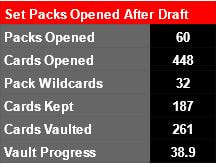
I hope you found these stats interesting. I know I always do. You don't realize how much of something you do until you start to track it all. The numbers can be amazing sometimes, even on the most mundane tasks or activities. I am very much looking forward to the next set, Kamigawa: Neon Dynasty, as it holds a lot more interest for me in it's art style and themes (Cyberpunk!), creature types (more ninjas!) and other stuff. I haven't felt motivated enough these past few sets to write any stat articles, so I apologize for those of you who actually read these. Whoever you are, please leave me a comment or drop me an email so I know someone finds these interesting or if there's some other stat you would like to see tracked. This article is one of two, focusing on my collection growth over the last few sets. I keep track of all of these regardless of the article writing aspect. I think it's more of an addiction of stats than anything else. It's a ton of work to keep track of all of this info, and some days I just don't want to, but I've been doing it long enough now that I almost can't stop. I really didn't find much interest in the past few sets, and with my historic deck holding strong at a 70% daily win rate, I really have no need to upgrade it or change decks, thus I really don't need any cards for game play. I didn't draft much and I only opened free packs and obtained free ICRs. The collection growth took a big hit, but I don't really feel I'm missing out on much with all of the wild cards I hold now. Here's what I've been hoarding the past year: Booster Packs All booster packs were free, earned through set mastery, mastery pass, codes and draft rewards. I did not purchase any packs for this set. These packs were tracked independently from the draft, so all numbers reflect what can be expected if you only opened 60 booster packs for the current set and nothing else 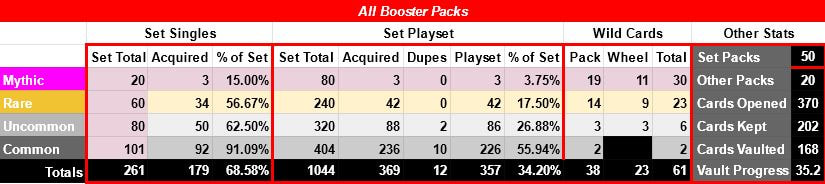 AFR 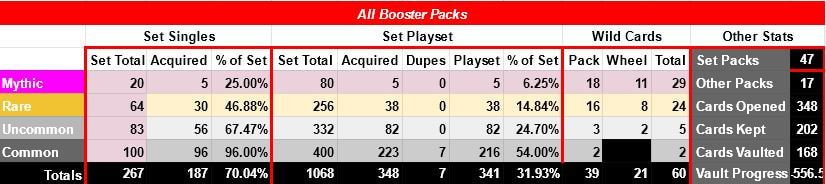 MID 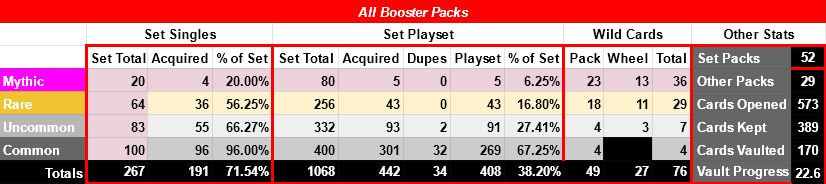 VOW The stats for AFR and MID were a little off for vault progress, cards vaulted and cards kept (note they are the same). I had a note next to these columns stating that the tracking data was still all broken during that time, so those couple of stats are off. The rest is accurate and was all hand tracked. The VOW stats are all fine, as the tracking data was working again by this point. Moving on... Draft Stats Since these sets weren't too exciting to me, I didn't do much drafting. As mentioned above, I didn't really need the cards. I decided to spend gold instead on more cosmetics.  AFR 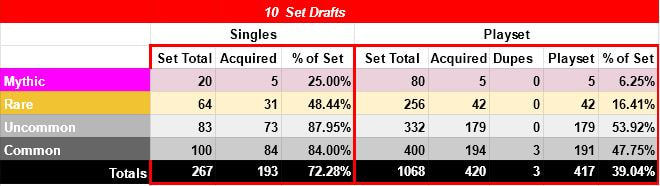 MID  VOW ICR / Crafting I didn't need much with my working daily driver deck, so anything crafted was for experimenting with or an event or something I did. Keep in mind the VOW ICR's are still coming, so I'll probably obtain another week's worth from the mastery pass.  AFR  MID  VOW Total Collection Stats Here are all totals from all stats combined.  AFR  MID  VOW
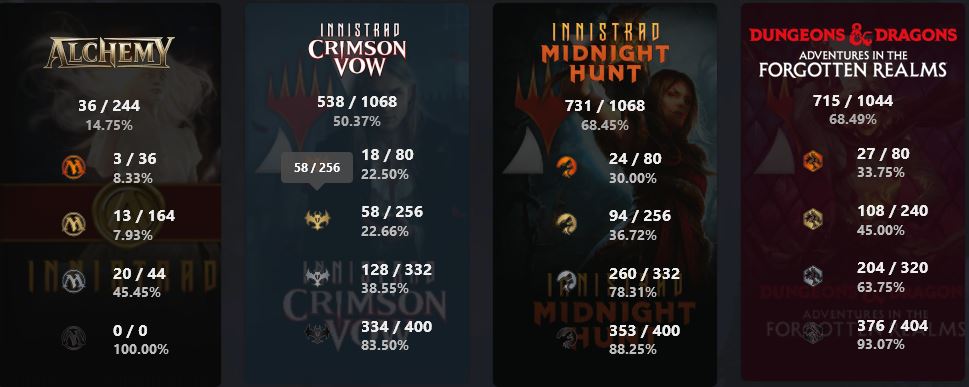 The numbers from the tracker stats vs my hand tracked stats will be a little off due to opening packs on a couple of other accounts I manage while the tracker was still running. But you can see they're pretty close :) I am not tracking the Alchemy collection stats as I don't really care about any of those cards. In Conclusion... Well that catches us all up on my collection stats over the last 3 sets. I am really excited for Kamigawa: Neon Dynasty and will most likely be drafting and collecting a bunch of this set.
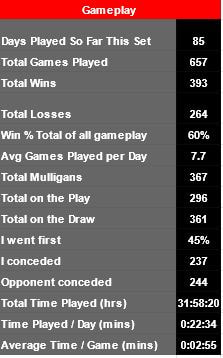
I know this article is late, being a month into the release of Forgotten Realms, but I still wanted to get it written and out there since I greatly enjoy stats. Halfway through Kaldheim, I was destroyed by a totally off-meta surprise win deck. I liked it so much that I figured out how to build one of my own. As of this writing, it's been nearly two set releases and I am still playing the same deck. What is this fun deck? I just call it "Walls". You can read more about it HERE . There's a couple variants of it, but I've found mine works well enough to leave it alone. There's also been no new additions to it in the past few sets, so I just keep on keeping on. Anyway, I am still enjoying this deck, it's still fast and fun to play and the win rate is still acceptable enough to keep rolling with it. Spreadsheet Updates Since I didn't post a post-gameplay stats for Kaldheim, some of the new spreadsheet changes were missed. Since then I have added a dashboard that is fed data from each of the various pages in my spreadsheet. It gives me a nice clean look of all the data in one single place. 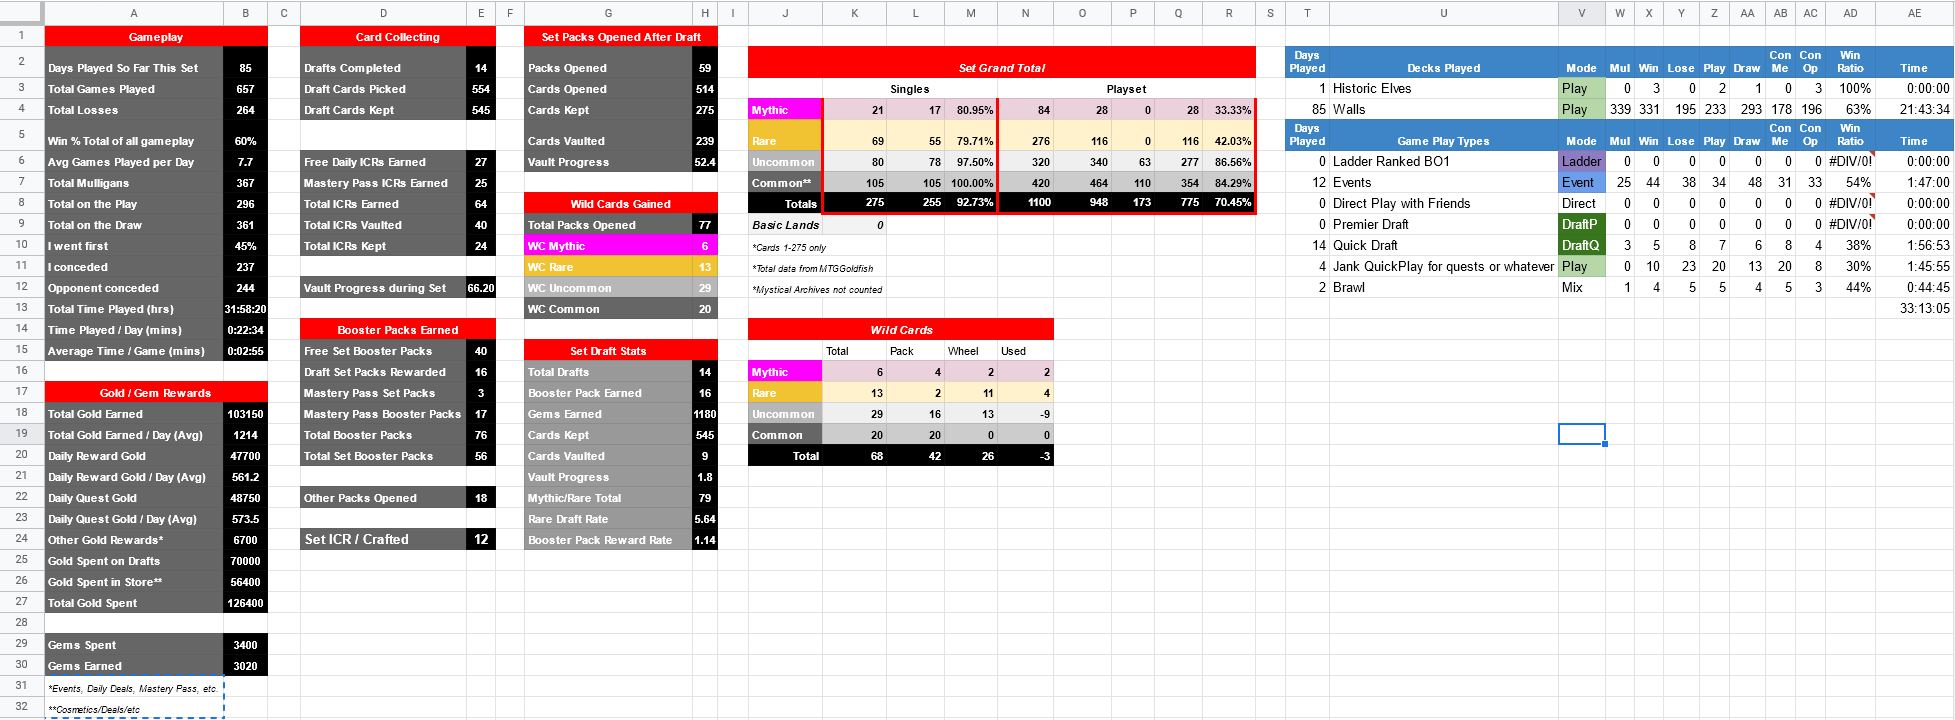 This is what my dashboard looks like. The following screenshots are all clips from this dashboard. One major change I had to add to this set's spreadsheet was a Mystical Archive draft/collection sheet. This was kept separate from the regular draft sheet since the MA cards aren't actually part of the Strixhaven main set. I basically just copied my collection total sheet, and modified it for just MA cards. The MA cards were not calculated into any of my Strixhaven card totals. You can find more of all of this info in the Strixhaven Post Collection stats article. Gameplay Stats All stats recorded via hand after each match and double checked using MTGAHelper. My customized spreadsheet then calculated the rest and all of the running totals. My only goal was 4 wins per day, and keeping the daily quests from backing up. I completed every event, including FNM @ Home and all other extracurricular free events that were offered. Gameplay dates range from 4/15/21 to 7/8/21. 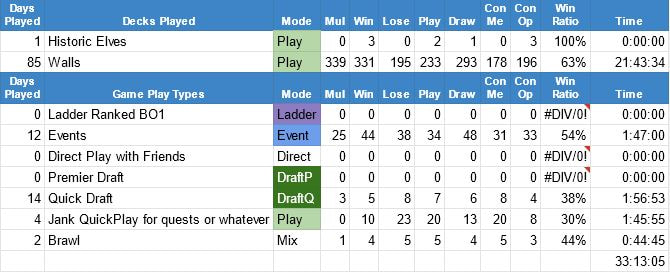 I was pretty happy with my 63% win rate for the Walls deck. I'm still playing it a month into Forgotten Realms. The total time was about an hour less, I think one of the events overlapped one of my other items like Brawl or something. The next table shows actual game play time. You can see I didn't really play any other decks.
Collection Stats
I hope you enjoyed looking over these stats as much as I enjoyed recording them and working on my spreadsheet.
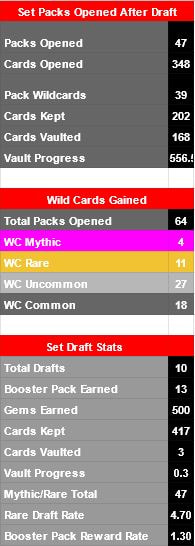
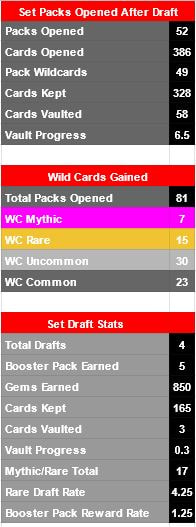
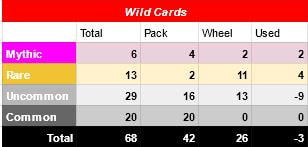
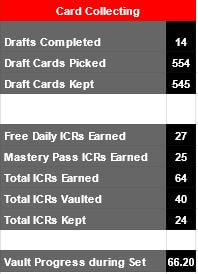
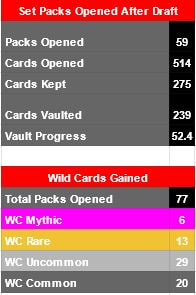
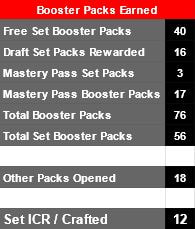
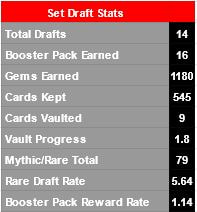
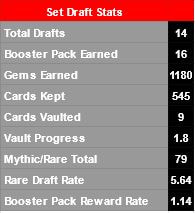
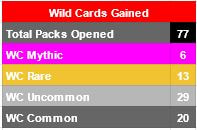
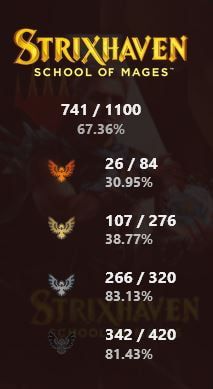
If you have any questions or comments, feel free to contact me. Strixhaven was not a set I really had much interest in. While I liked the Harry Potter movies, I am not a super fan. I've only see the seen the series one and a half times. I also hated college to the point that I dropped out to pursue a more meaningful trade. So all of that said, this set really wasn't very exciting for me with all of it's school spirit, classroom activity and Harry Potter related themes. I thought I would like it more because of Harry Potter, but that didn't end up being the case. For the cards themselves, another set went by with nothing I really needed. My daily driver Walls deck was still holding strong with a decent enough win rate to not bother changing it or trying something else with the current meta. More on that in my Strixhaven post game play stats article coming at the end of the set. This lead up to the draft experience. Once quick draft went live, I started cashing in my gold to open those packs, pick my cards and see if I could win any games just from rare and collection drafting only. After mostly losses, and seeing that much of what I picked wasn't heavily favored creatures in fewer colors of the pie chart, I decided to just skip playing the rest of my drafts and just go for the cards only. This set seemed to be more about spells and such rather than creatures. I enjoy more creature based decks than playing a bunch of spells. Once I started to coast over the peak of the collection gathering and get into start of heavy duplicate territory, I gave it a hard stop on drafting and then cracked all my Strixhaven booster packs. Here are the results of all Strixhaven drafts and all Strixhaven booster packs. Wildcard totals will reflect older set packs obtained from the mastery pass. A note on the Mystical Archive cards. These were tracked separately and not included with any of these stats. This will account for a lower total collection count since quite a few MA cards were drafted and there was at least one in every STX booster pack. Strixhaven Booster Packs All booster packs were free, earned through set mastery, mastery pass, codes and draft rewards. I did not purchase any packs for this set. These packs were tracked independently from the draft, so all numbers reflect what can be expected if you only opened 60 booster packs for the current set and nothing else  Strixhaven Draft Stats I completed 14 quick drafts. I did not do any premium drafts for this set. Draft stats do not include any booster pack rewards.  Strixhaven ICR / Crafting Stats I only crafted one uncommon from this set in order complete a deck for the standard singleton event. All others were obtained as ICRs from regular play, free events and as mastery pass rewards.  Total Strixhaven Stats This includes all data from Strixhaven cards collected via all methods above. Wild card stats include 59 set booster packs18 older booster packs. 
Mystical Archive But what about the Mystical Archive? I included separate stats for this since it was not actually part of the Strixhaven main set. 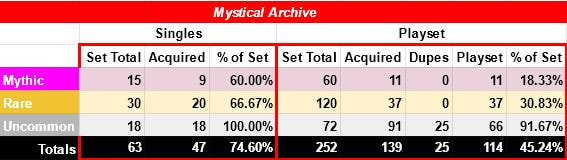 Stats keep improving... I fixed a few flaws in my stats spreadsheet, had to add a completely separate tracking chart for the Mystical Archive and continued to improve on the dashboard.
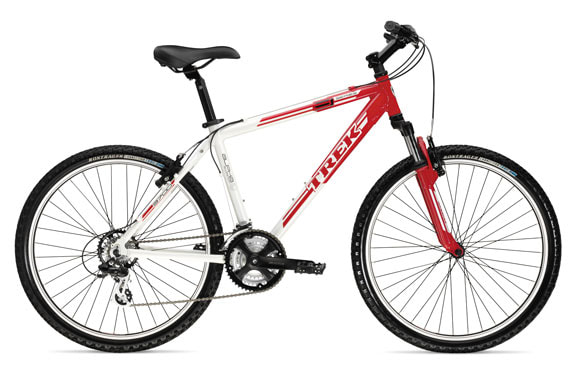
More on the stats tracking improvements in the Strixhaven post game play stats article coming soon. A couple of months back I decided it was time to start riding my bike again. I need to drop some pounds and keep active. Plus I really enjoy riding. I have a few bikes I'll make future articles on, but the short story is back in the early 2000's I had an old used 90's? Trek 800 MountainTrack mountain bike that I bought as my first real bike for $100 off Craigslist. I got the opportunity to take it on my first mountain bike trail sometime later on a very cool trail near Wetumpka, AL and absolutely loved it.
Recently I decided to start riding again, so I picked a paved road path I could ride from my home and not have to drive anywhere. If I made it convenient, I would go more, I told myself. This was fun for a while. Then I wanted to go faster. I swapped my off road tires out for road bike skinnies. I immediately gained 2mph on my top end and it was a much easier feeling ride, rougher, but less resistance on the road. Now, when I wanted to go on a mountain bike trail, I was stuck having to swap wheels with my old Trek 800, which had the same size wheels and had off road tires. The gearing was a bit different, so the chain slipped somewhat on the highest gears. The price of convenience.
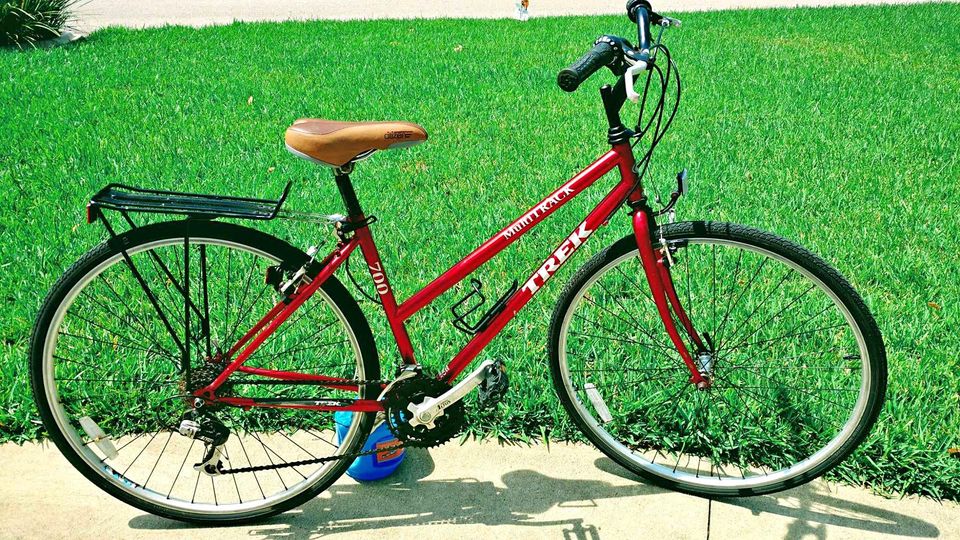
So, back to my wife not having a proper bike. She said she would ride a bike more if it was more comfortable to her. Makes sense. I spent an entire week scouring Facebook Marketplace and Craigslist, as well as local bike shops and even Amazon. I didn't want a cheap Walmart bike, so I was determined to find an older, but in good shape used higher end bike brand. After about a week of expanding my search radius, asking dozens of people to please measure the frame size, and getting dozens of "Sorry, It's already sold!" or finding out it was too small, I finally found a nice Trek MultiTrack 700. It's from the late 90's in a nice high gloss metallic red that was in decent shape about an hour away from me. I made the 2 hour round trip and paid $125 for it. It's a little rusty in a few spots internally, but shifts and rides super smooth. It's a hybrid style with 700c wheels.
So, I have a bunch of bikes now, and I'm really into riding again. I'll be posting up some of my more interesting adventures that I go on with some photos and write ups of the more scenic, interesting or technical trails.
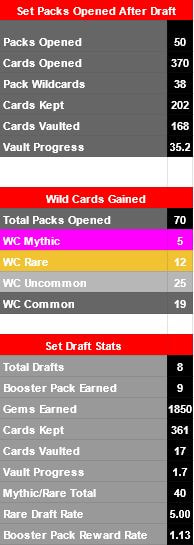
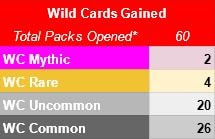
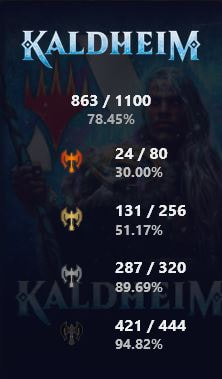
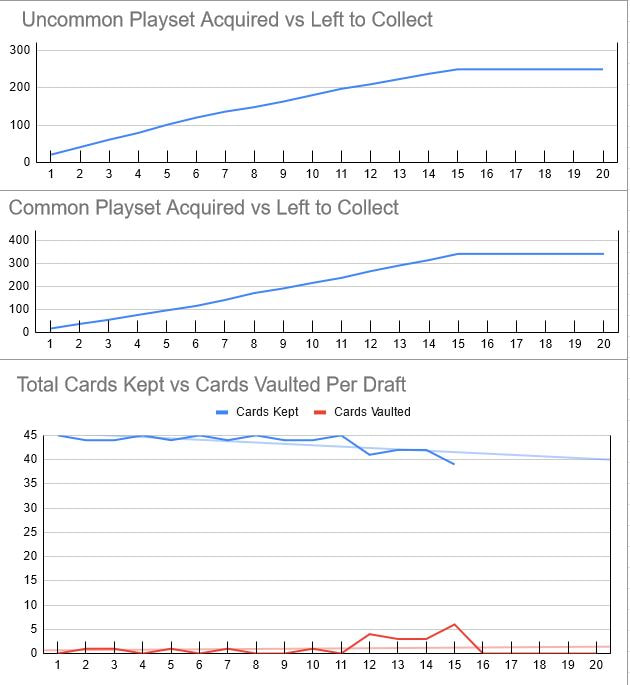
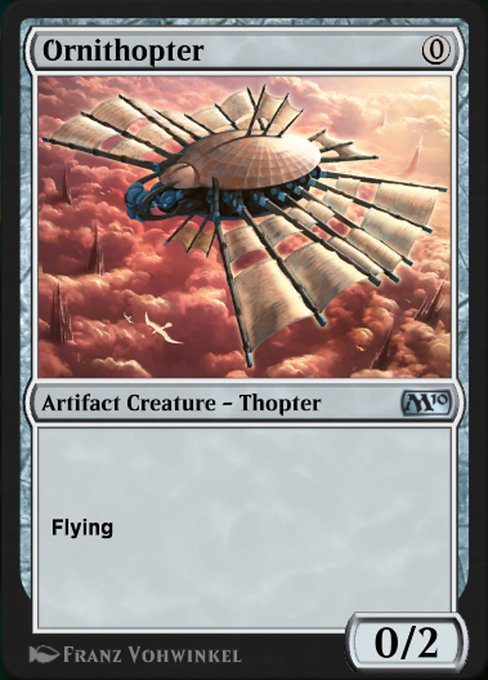
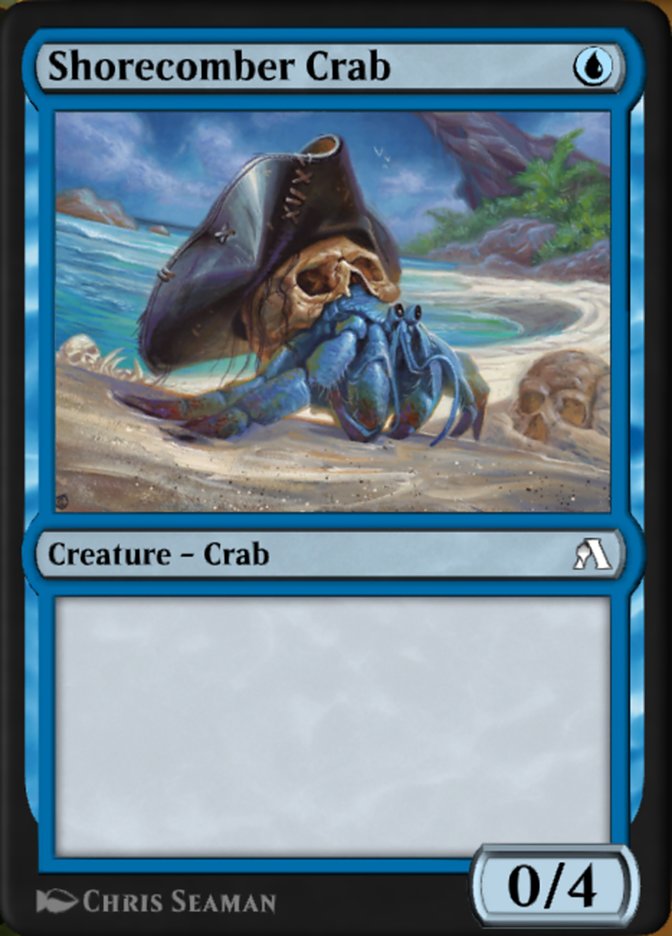
Thanks for reading! See you on the trails! This set had me excited from the first spoilers. I like Vikings! I like building decks with Elves! The showcase art was amazing! I wasn't so crazy about the broken cards, but we have those in every set. I continued playing nothing but Historic, plus all FNM @ Home events and any other free event. I didn't feel the Festival events were worth the cost since I don't play with any of the showcase cardstyles they had for rewards. There was maybe one or two I might play with, but currently have no plans to build decks around those. My current Historic deck that I started playing during Kaldheim was Historic Elves. I went ahead and crafted 4x Elvish Warmaster as the only card I absolutely had to have. Once quick drafts went live, I grabbed a few of the new deathtouch creatures and built a Golgari Deathtouch Elves deck, using a couple of Fynn cards I got, and had wanted, once I saw them being played. I even snagged the Fynn showcase cosmetic. About halfway through my draft experience, I was just playing for my daily wins when I got absolutely wrecked on turn 3 by this completely harmless deck full of nothing but 0-power creatures. I realized I must have this deck, it looked fun, cheap (not many rares) and pretty unassuming. I crafted a few Ornithopters, Shorecomber Crabs, and Assault Formations. I probably crafted more cards than I usually do per set, but they were cheap, I have an abundance of wild cards, and I had a lot of fun playing these decks. Aside from these crafted cards, I collected via the usual methods of quick drafting, opening free arena booster packs and whatever the mastery pass gave me. I was able to still get a free mastery pass via previous gem winnings from past set(s). Once I had completed drafting for this set, I decided to go ahead and open all the Kaldheim packs, track them, and continue opening/tracking only the Kaldheim packs until I wouldn't be getting any more (via the mastery pass). I still have 16 packs to open, but they are from older sets. This data will be for Kaldheim related cards and packs only. So, lets get on with the data! I manually track everything and double check my data using MTGAHelper. Gameplay Stats will be my Arena Post Kaldheim Gameplay Stats article that will be written shortly before the next set release. So, after 15 Kaldheim (KHM) quick drafts and after opening 60 free KHM booster packs, here is what I ended up with. Keep in mind all of this was free, I only spent gems for the mastery pass (which I obtained from previous set winnings) and gold was spent on drafts, cosmetic items and the gold/gem daily deals. I did not buy any packs with gold. KHM Booster PacksAll booster packs were free, earned through set mastery, mastery pass, codes and draft rewards. I did not purchase any packs for this set. These packs were tracked independently from the draft, so all numbers reflect what can be expected if you only opened 60 booster packs for the current set and nothing else. 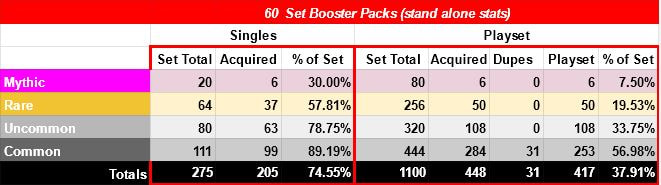 KHM Draft StatsI completed 15 quick drafts. I did not do any premium drafts this set.  KHM ICR / Crafting StatsThis is a new table I created to add up anything I crafted for this set. It also adds up ICR's I received while playing, whether through events or just daily play.  Total KHM StatsThis includes all data from KHM cards collected via all methods above. 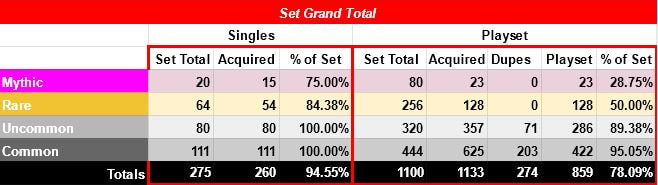
New and Improved!For this set, I felt that my tracking tables were pretty much on point and didn't really need to adjust them any further. Instead I decided to start consolidating the way the tables track the data into fewer places. I now have 5 tabs on my spreadsheet:
I am working to get all of this perfected so that I can release this spreadsheet to the public as the ultimate Arena data tracking spreadsheet. I'm just very picking about final drafts and sharing them with others. Since I believe any incorrect data makes the entire set of data incorrect, I am constantly tweaking and doublechecking everything to make sure it's all correct. Below is the data that my dashboard displays. Stats are of today's date that I wrote this. This shows 56 days of play, and there are still 30 days left in this set release. 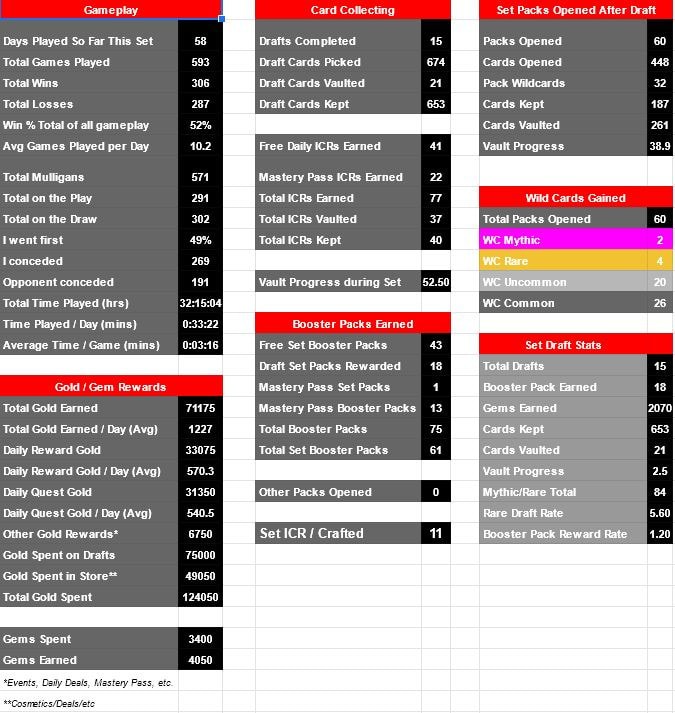 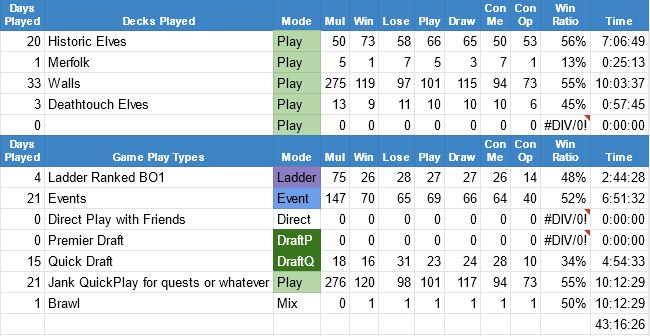 What's Next?I want to continue perfecting my dashboard and main collection stats so that I can be sure that everything is perfect and accurate. I would really like to release my tracking spreadsheets.
Stay tuned for my final gameplay stats article for Kaldheim to come out as the new set is released. We still got another 30 days to go before Strixhaven!
Original Article...I was happily playing my Historic Elves this month when out of nowhere a similar deck to what I am about to show you surprised me. It beat me turn 3-4 and I was powerless against it. It was irritated that such jank should beat my carefully crafted Elves deck that I had to go look at my tracker to see what I just got beat by. I only saw a few cards, but quickly formed my own list that seems to work pretty well for me. Here's what I came up with: The Deck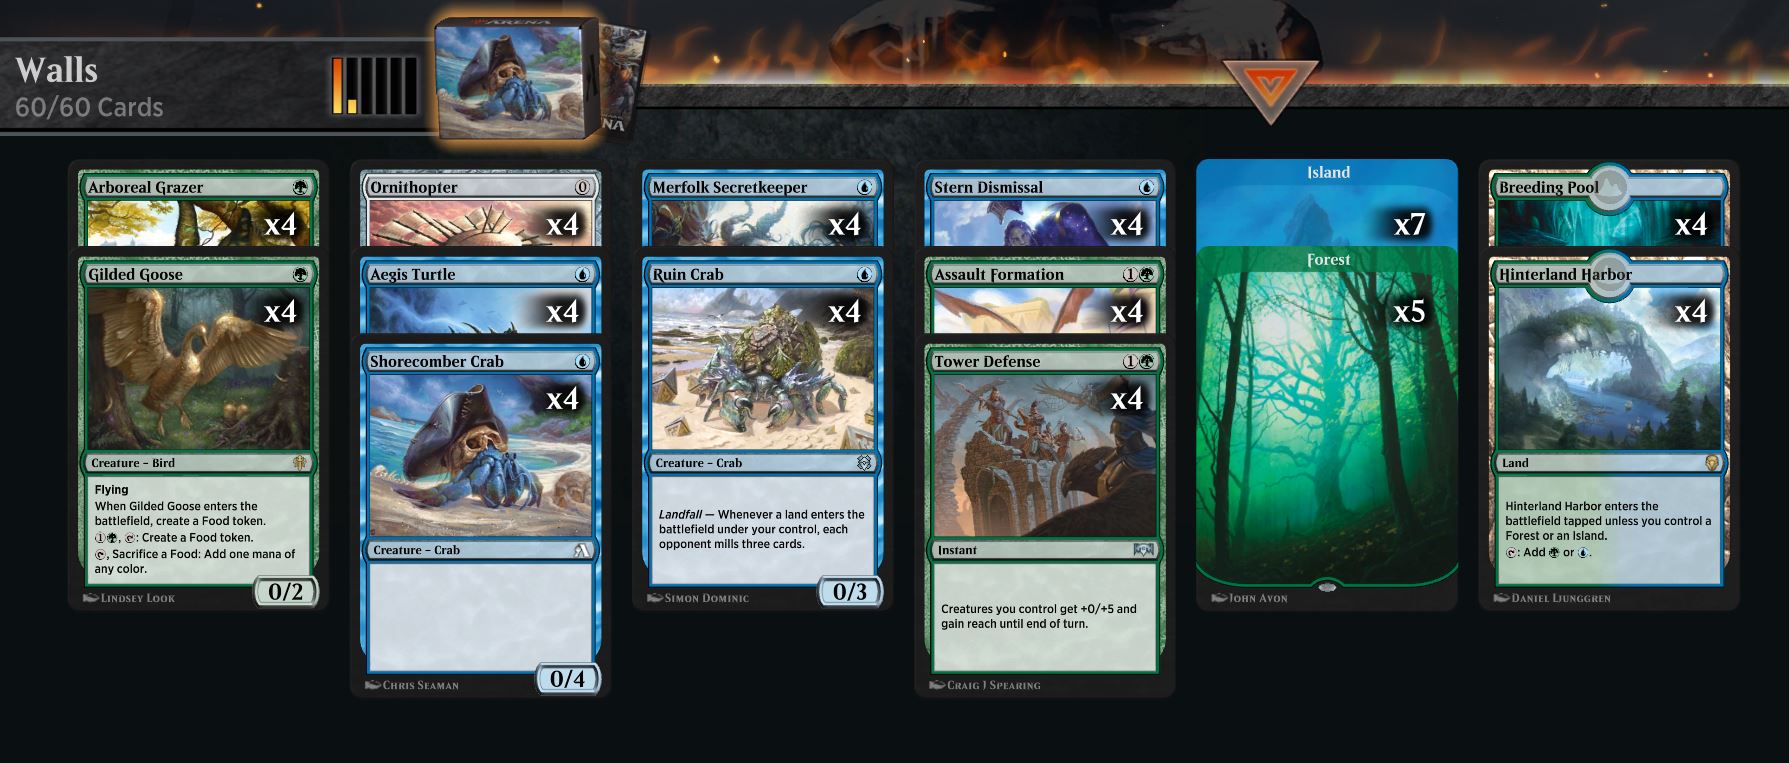
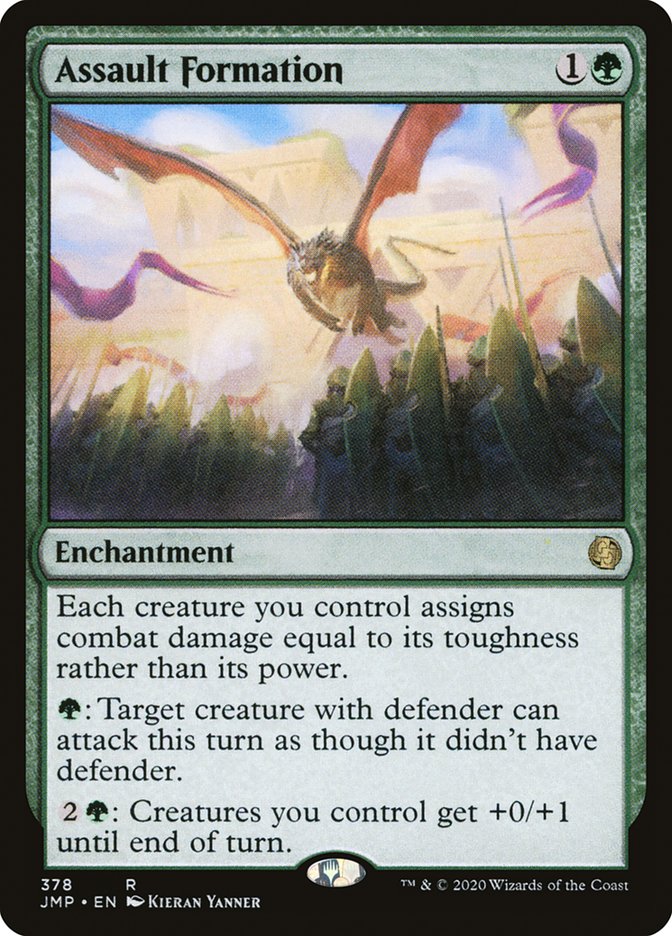
How does it work?It's fairly simple. Slam down harmless 0/x creatures, then drop Assault Formation and attack all-in for the surprise win. You absolutely must hard mulligan for Assault Formation in your opening hand. There will be games where you won't get it so just concede and start another game. This is a pretty forgiving deck. I've mulliganed down to Assault Formation and 2 lands several times now and still pulled off a fast win. Lets go over what each card is best used for:
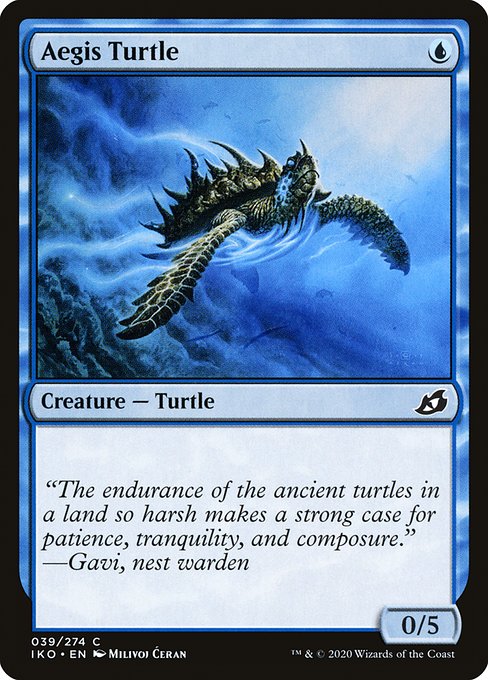
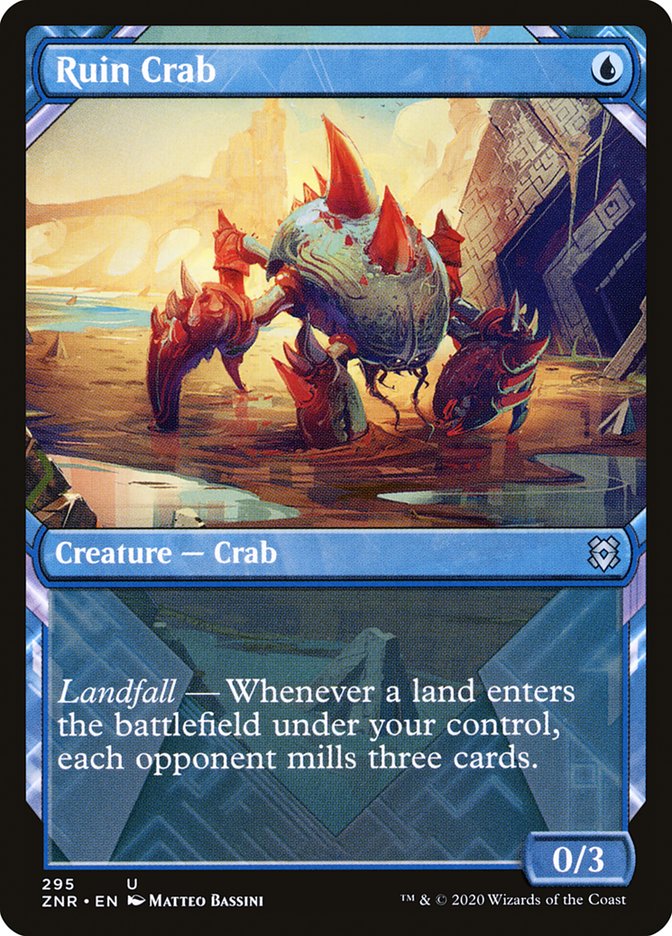
Ornithopter is an excellent free drop, especially on turn 1. It's also our only other flyer to add some evasion in to the deck. Shorecomber Crab and Aegis Turtle are both big beefy creatures that seem so innocent on the first turn or two. Once Assault Formation is played, they are serious threats that are hard to remove and can steam roll over most of your opponent's early creatures.
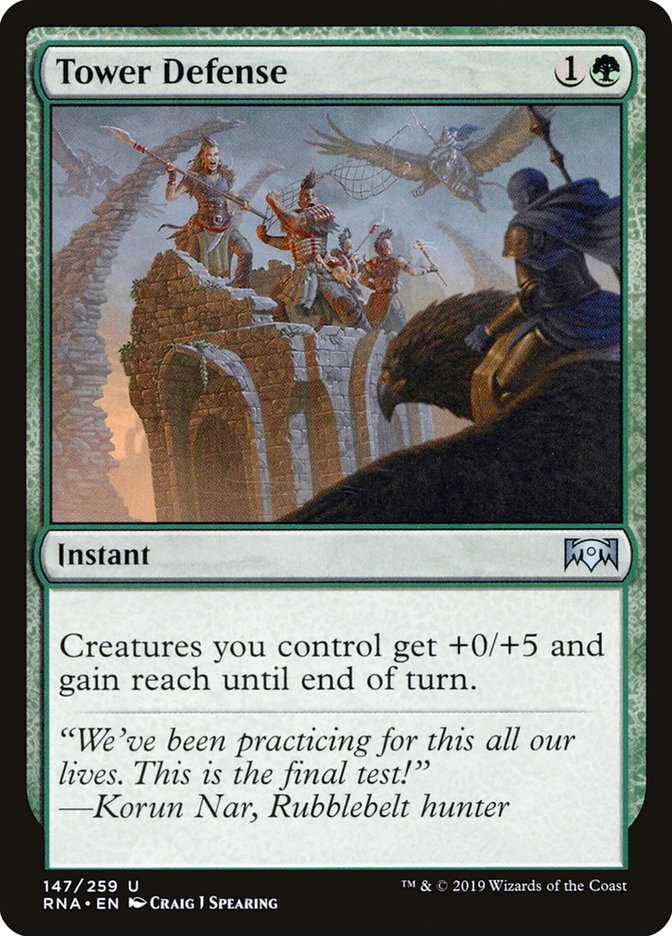
Assault Formation is the main card of this deck. Without it, your creatures are absolutely useless. You must have Assault Formation in your opening hand. Mulligan until you do. If you have too few cards, just concede and start the next game. It's rare you don't get it by at least the 2nd or 3rd mulligan. Just make sure you leave yourself with at least 2 lands of different colors and you can still play Assault Formation, then just whatever creatures you draw. I've won several games with a 3 card starting hand. The deck is pretty forgiving to get you going. The downside to this deck is that if Assault Formation is destroyed or removed somehow, you may as well concede, as the rest of the game will be spent waiting to draw another, and your opponent will have recovered by then. Players don't typically run much Enchantment removal, so you're usually safe from this. It does happen once in a while though. Tower Defense can be used in 3 different ways. The first is the obvious one-shot kill. If your opponent doesn't bother blocking because you don't have enough for lethal, then Tower Defense will almost always be a fast lethal strike. Secondly, you can use it as a defensive move, both blocking and attacking. If the opponent has creatures much larger than you that you are having a hard time playing around, you can use this to beef up your big creatures to kill their big creatures. The same goes for blocking, let them attack in with their big creatures, and then play this. Third, you can use this to avoid a non-destructive board wipe. Quite a few board wipes just do mass damage. This can boost your creatures above the minimum toughness needed to beat most of these board wipes. Stern Dismissal can be used in multiple ways as well. Remove something in your way of attacking or an opponents enchantment, or use it to save your own Assault Formation enchantment from being destroyed, or one of your creatures.
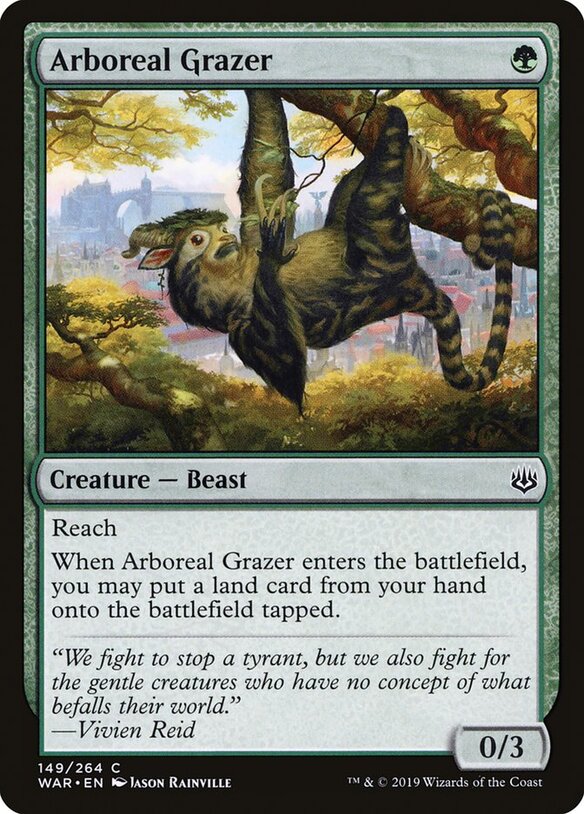
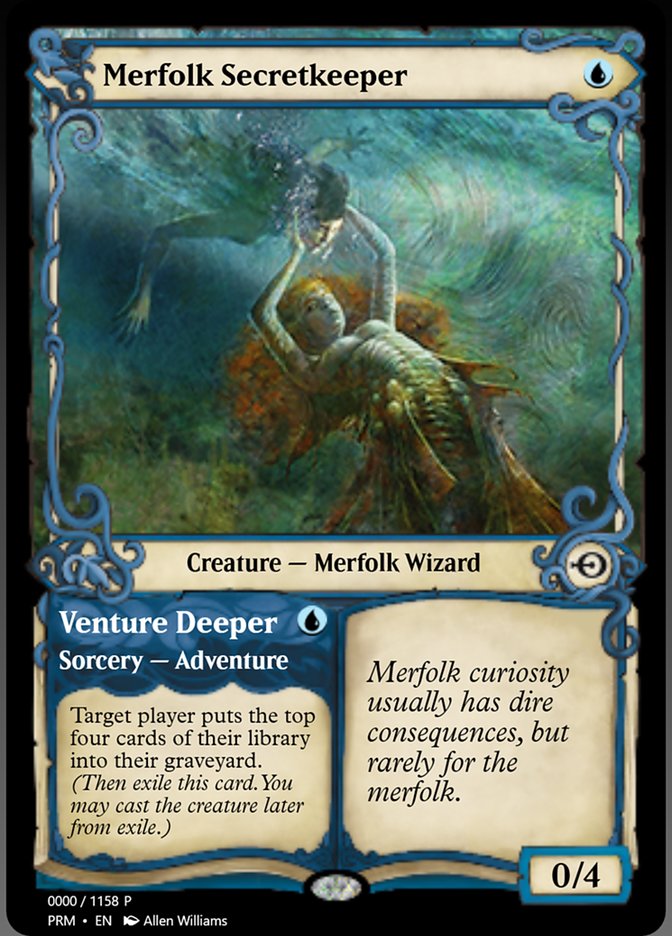
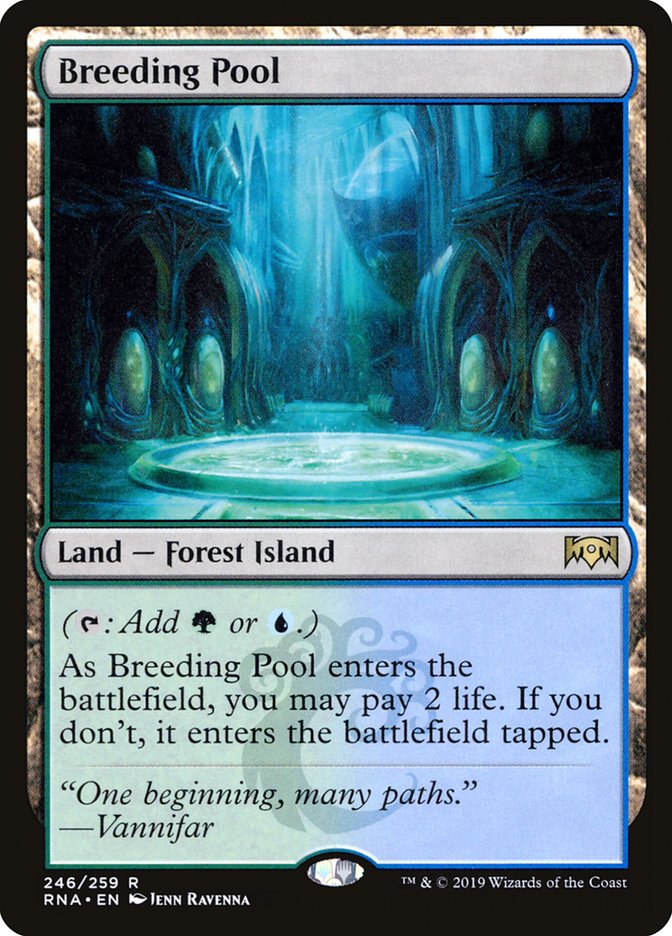
Because this deck moves very fast, we want to make sure we have fast mana. 20 mana seems to be plenty for this deck to work quickly. Keep in mind 70% of your cards are 1 mana. One playset of cards is 0 mana, and then your most important card is only 2 mana. You don't need a lot. Because you are trying to hit hard and fast and end the game by turn 4 or so, you want to make sure you always have mana available in the way of not using any tap lands. GamePlay ExamplesSo far after playing this deck daily for 9 days straight each morning, I have a decent 65% win rate in the BO1 Play queue. What surprises most people is the odd assortment of cards. I am playing both mono-green ramp cards and mono-blue mill cards, along with some random useless blockers. Most opponents don't think twice about it and just think it's either one of the two variants, when it's really neither one. Instead Assault Formation gets dropped and all of those useless creatures are suddenly a massive threat. This morning I went 4-0 in just 8:34 mins. Yesterday I went 4-2 in 15 minutes. The deck is fast. Here's some examples of what to expect with good opening hands. Game 1 - Against Shrines Turn 1 - Island, Ruin Crab Turn 2 - Forest, Aboreal Grazer--> Breeding Pool, Aegis Turtle Turn 3 - Shorecomber Crab, Assault Formation, attack all in. Opponent didn't even get going yet with their shrines and instantly conceded. Game 2 - Against Zombies? Turn 1 - Island, Aegis Turtle, Ornithopter Turn 2 - Hinterland Harbor, Shorecomber Crab, Arboreal Grazer-->Breeding Pool Turn 3 - Hinterland Harbor, Assault Formation, attack all in. Opponent conceded with a few creatures and a saga out on the field. Game 3 - Against Mono White Angels/Lifegain Turn 1 - Breeding Pool, Arboreal Grazer-->Breeding Pool Turn 2 - Hinterland Harbor, Aegis Turtle, Merfolk Secret Keeper Turn 3 - Ornithopter, Assault Formation, attack all in, opponent didn't block Turn 4 - Attacked all in, Opponent didn't block since I did not have lethal and he was just getting his lifegain going. I then activated the Assault Formation ability to +1 all my creatures and killed him. Game 4 - Against Toski shennagins of some kind Turn 1 - Forest, Gilded Goose-->Food Token Turn 2 - Hinterland Harbor, Ruin Crab, Shorecomber Crab Turn 3 - Forest, Merfolk Secretkeeper, Assault Formation, Attack all in with no blocks. Turn 4 - Forest, Arboreal Grazer, attack all in. Opponent had critical mono green stuff out that he didn't want to die, and I did not have lethal showing. He did not block, so I activated Assault Formation's ability to +1 everything, and killed him. Now the next 2 games I lost. The first loss was because the opponent destroyed my Assault Formation. I waited 2 more turns and conceded. The second loss was because I got greedy and was just loading the board with all my creatures. I was going to drop Assault Formation on the next turn for a glorious attack, except the opponent looked at my hand and discarded my Assault Formation. Word to the wise, don't be greedy, get that thing down ASAP. 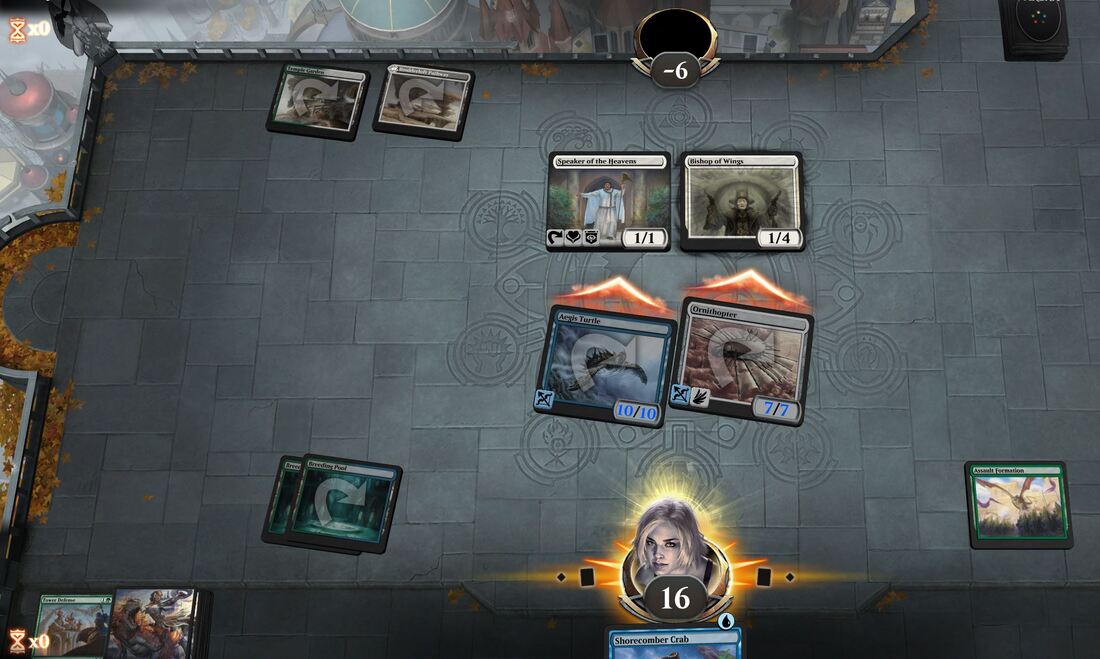 The game above was a quick turn 3 win against the hard to beat mono white lifegain angels deck. I mulliganed down to 5 cards to get an Assault Formation and 2 lands in my hand. Turn 1 - Breeding Pool, Aegis Turtle, Ornithopter Turn 2 - Breeding Pool, Assault Formation, Attack. Turn 3 - drew a Tower Defense, I figured the opponent wasn't going to let his two key pieces die, so he didn't block. I played Tower Defense for lethal. Yes, that's a turn 3 win against that lifegain angels deck, with only 2 lands, and a 5 card starting hand. It's very forgiving! What Doesn't WorkIt does not play well against full on deathtouch decks unless you have enough flyers out to outlast the opponent. If not, just concede. It does not play well against Golgari decks that seem to find all the things to kill your stuff with, and then can also destroy your Assault Formation. Cards like Thought Seize and Assassin's Trophy is an immediate concede. Any control that takes your Assault Formation, such as Skyclave Apparition, or other white/blue enchantments that can steal your stuff. Just concede and start the next game. Obviously if you don't have a great opening hand and slam out a bunch of creatures and get overwhelmed by the opponent, then you may as well concede unless you can somehow kill all their stuff (Assault Formation ability or Tower Defense). I hit all of these examples the very next day and only got a 50% win rate. The day before I didn't see as much of these examples and ended the day with a 65% win rate. In conclusion...These are just examples of perfect opening hands. Even a bad opening hand can be mulliganed a couple times to become a good one and still be perfectly playable. I tried this deck out in the BO1 Historic Ladder, but only made it to mid silver before getting stuck with the more powerful meta decks, and that included a ton of losses. My win rate was not good in ladder play. This deck is more of fast deck to get your daily 4 or so wins in and move on. Anyway, I hope you found this deck tech fun, exciting and useful. Please let me know if you have any questions, comments or tweaks you can think of. I really enjoy off-meta decks that do well. |
Categories
All
Archives
August 2022
|

- Home
-
Abandoned Travels
-
Abandonments
>
- 2014-2015 >
-
2013
>
- CMX Construction
- Orange House 01
- Fertilizer Plant
- Egg Plant
- Box Plant
- Ellaville Bridge Revisited
- Gold Kist Farms Silos
- Lafayette House 03
- Columbia House 01
- Columbia Barn 01
- Cash's Towing
- Coastal Revisited
- Suwannee Shack
- Hernando House 01
- Lafayette House 02
- Lafayette House 01 Revisited
- Lafayette Chimney Revisited
- Lafayette Quarry Revisited
- Williston Urbex
- Elljay Garage
- 2012 >
- 2010-2011 >
- Travels >
- Nature >
- Water >
-
Abandonments
>
-
Games
- Food
-
VATS Sucks
- Stuff
- About


 RSS Feed