|
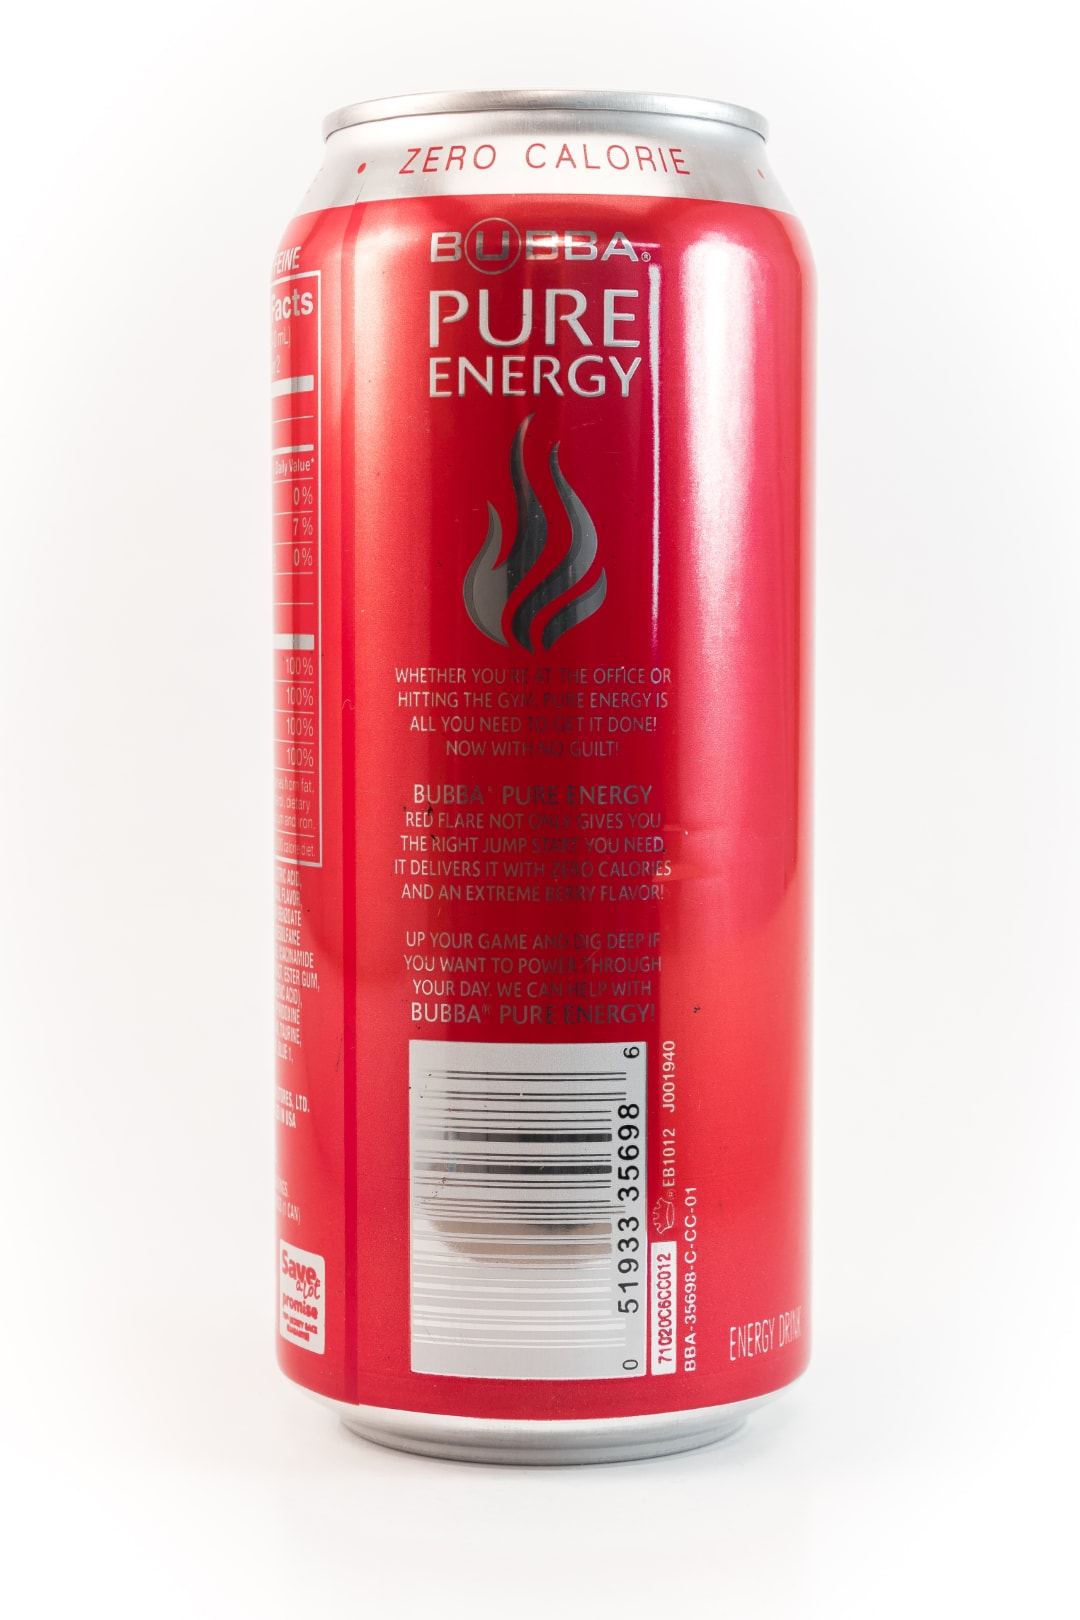
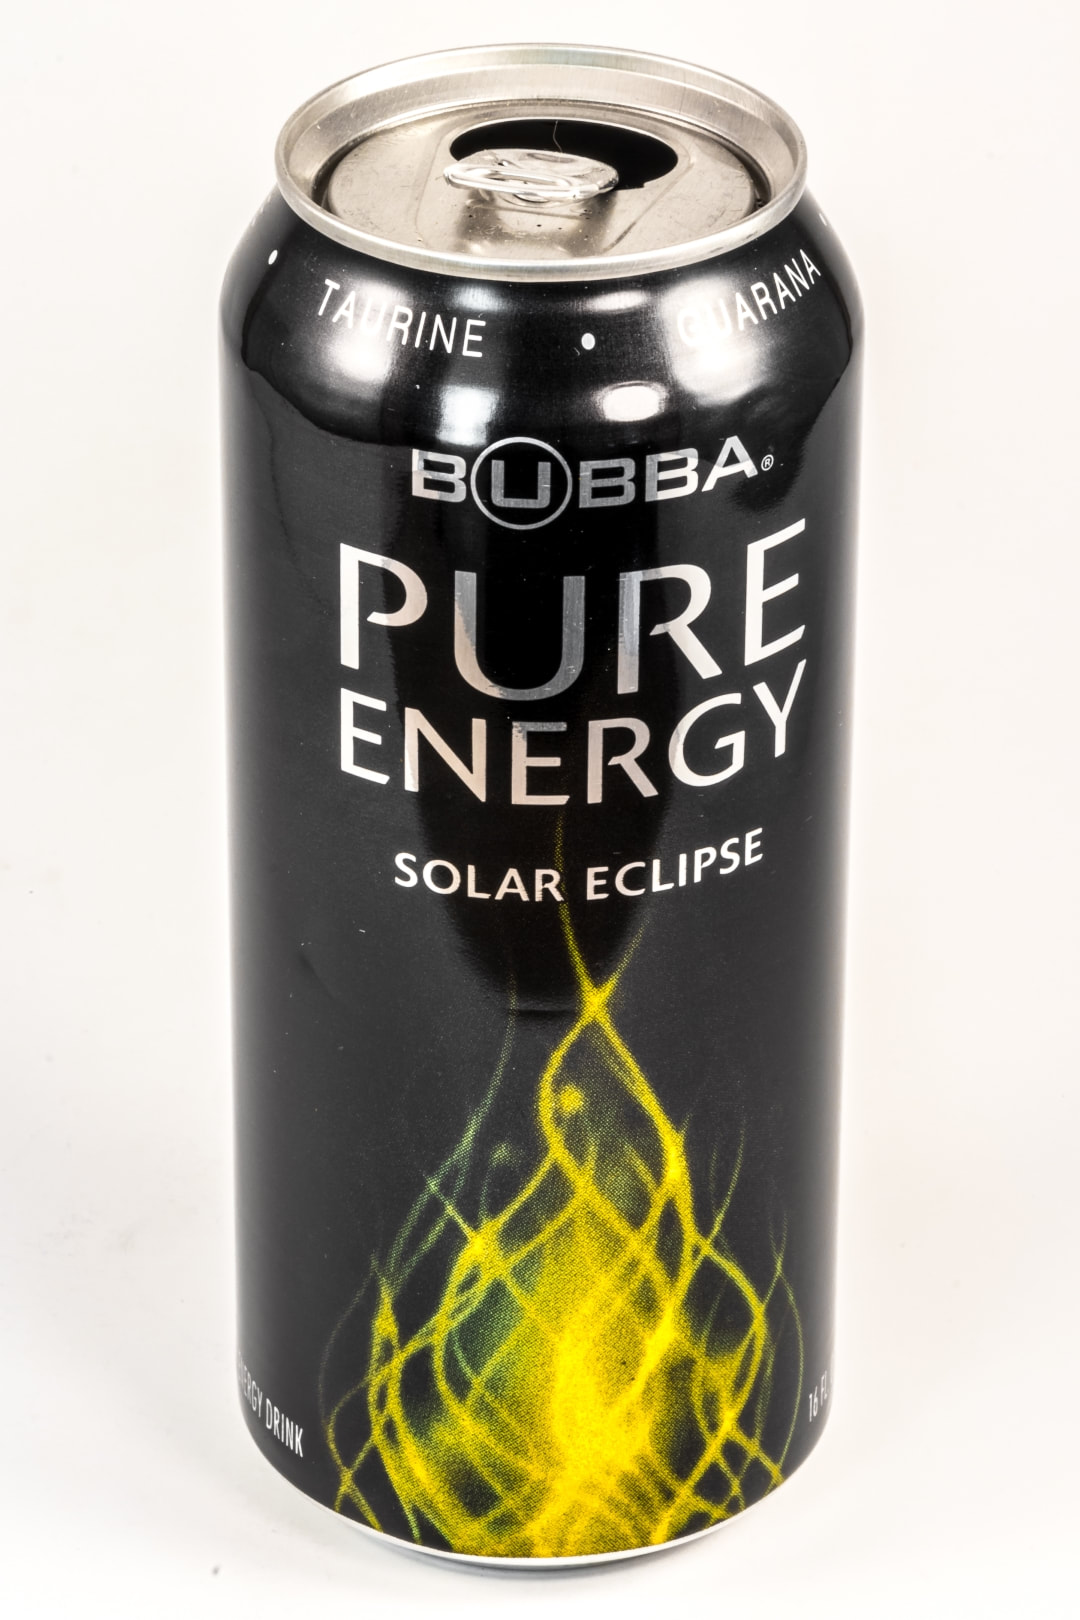
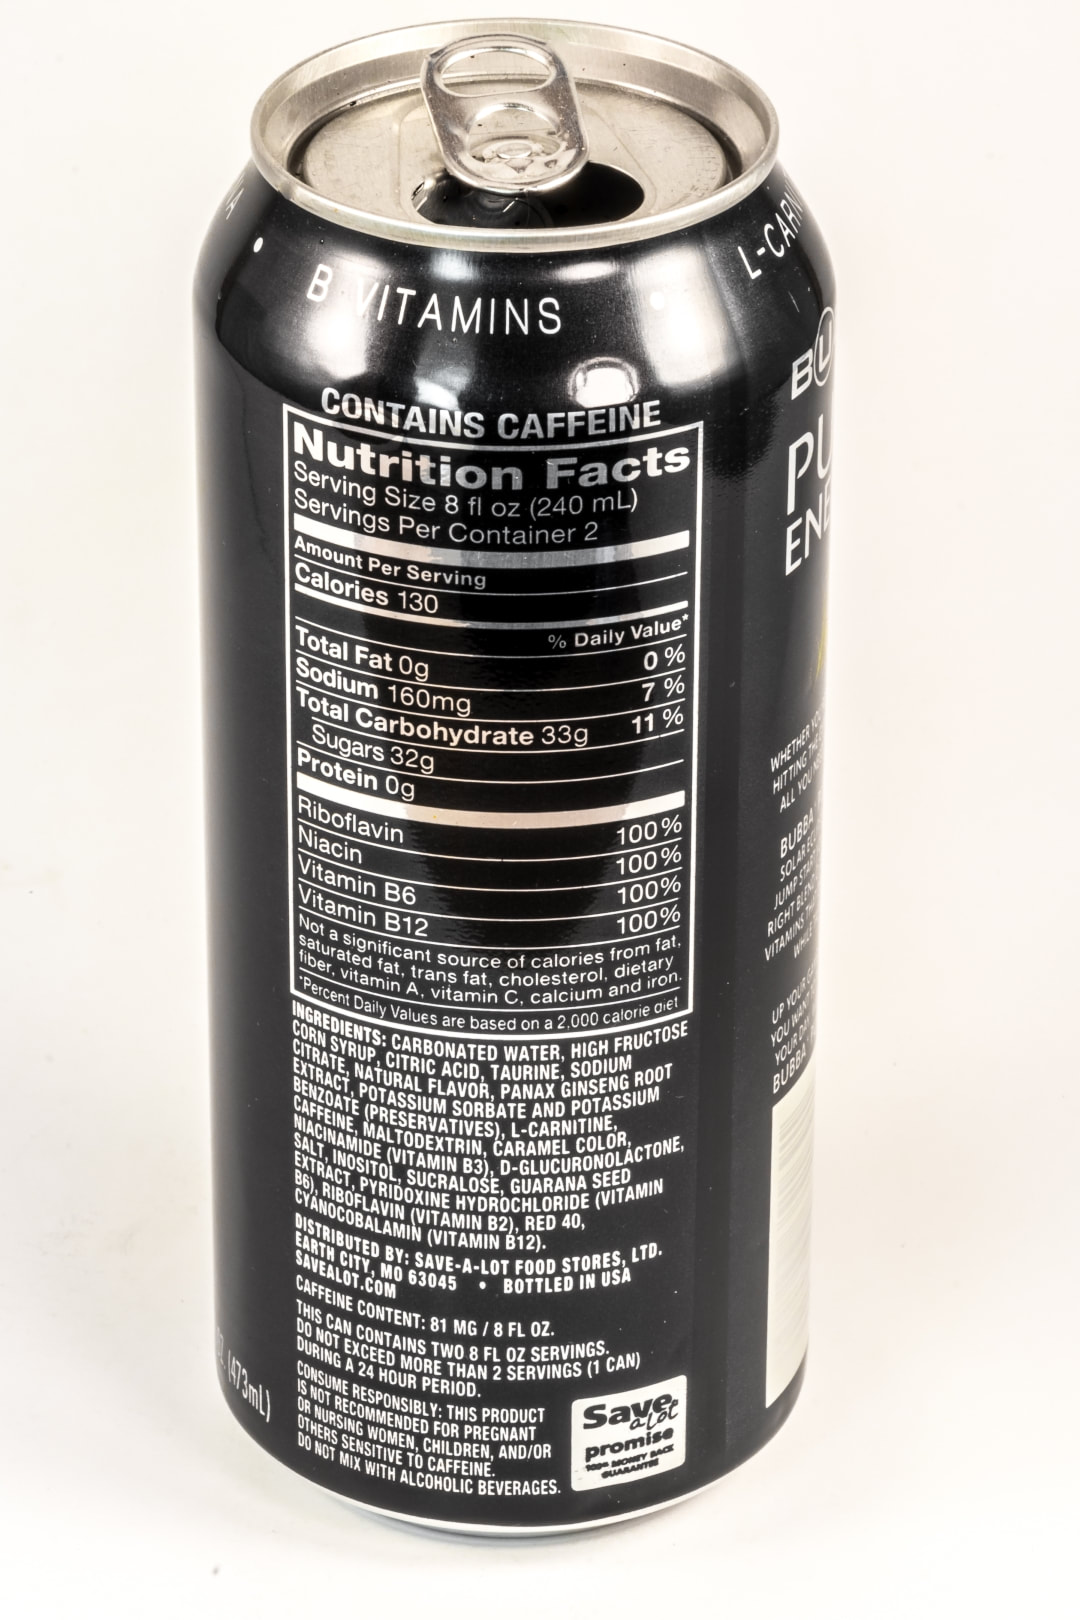
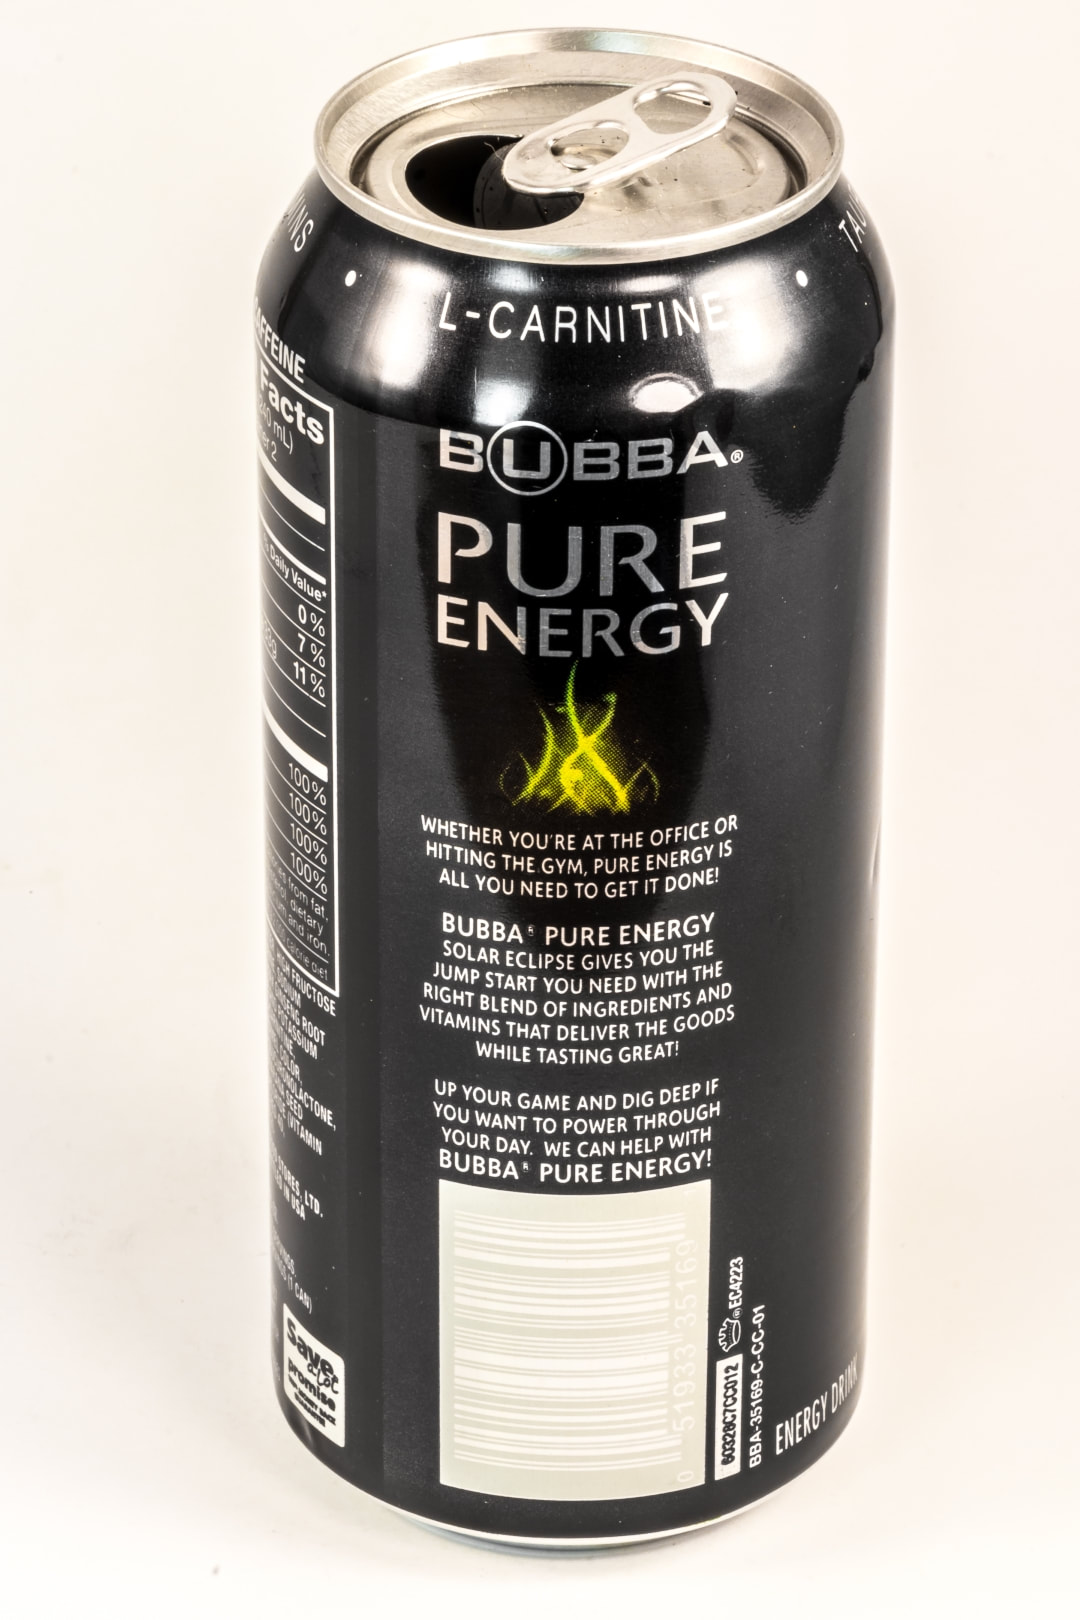
After trying the Bubba Pure Energy Red Flare, I was really excited for this version. I saved it for last, as I get the most excited about the possibility of finding an original Monster Energy clone. Based on the green color on the can, and that it doesn't signify it is sugar free or state anything different, I thought it was trying to copy the original Monster. 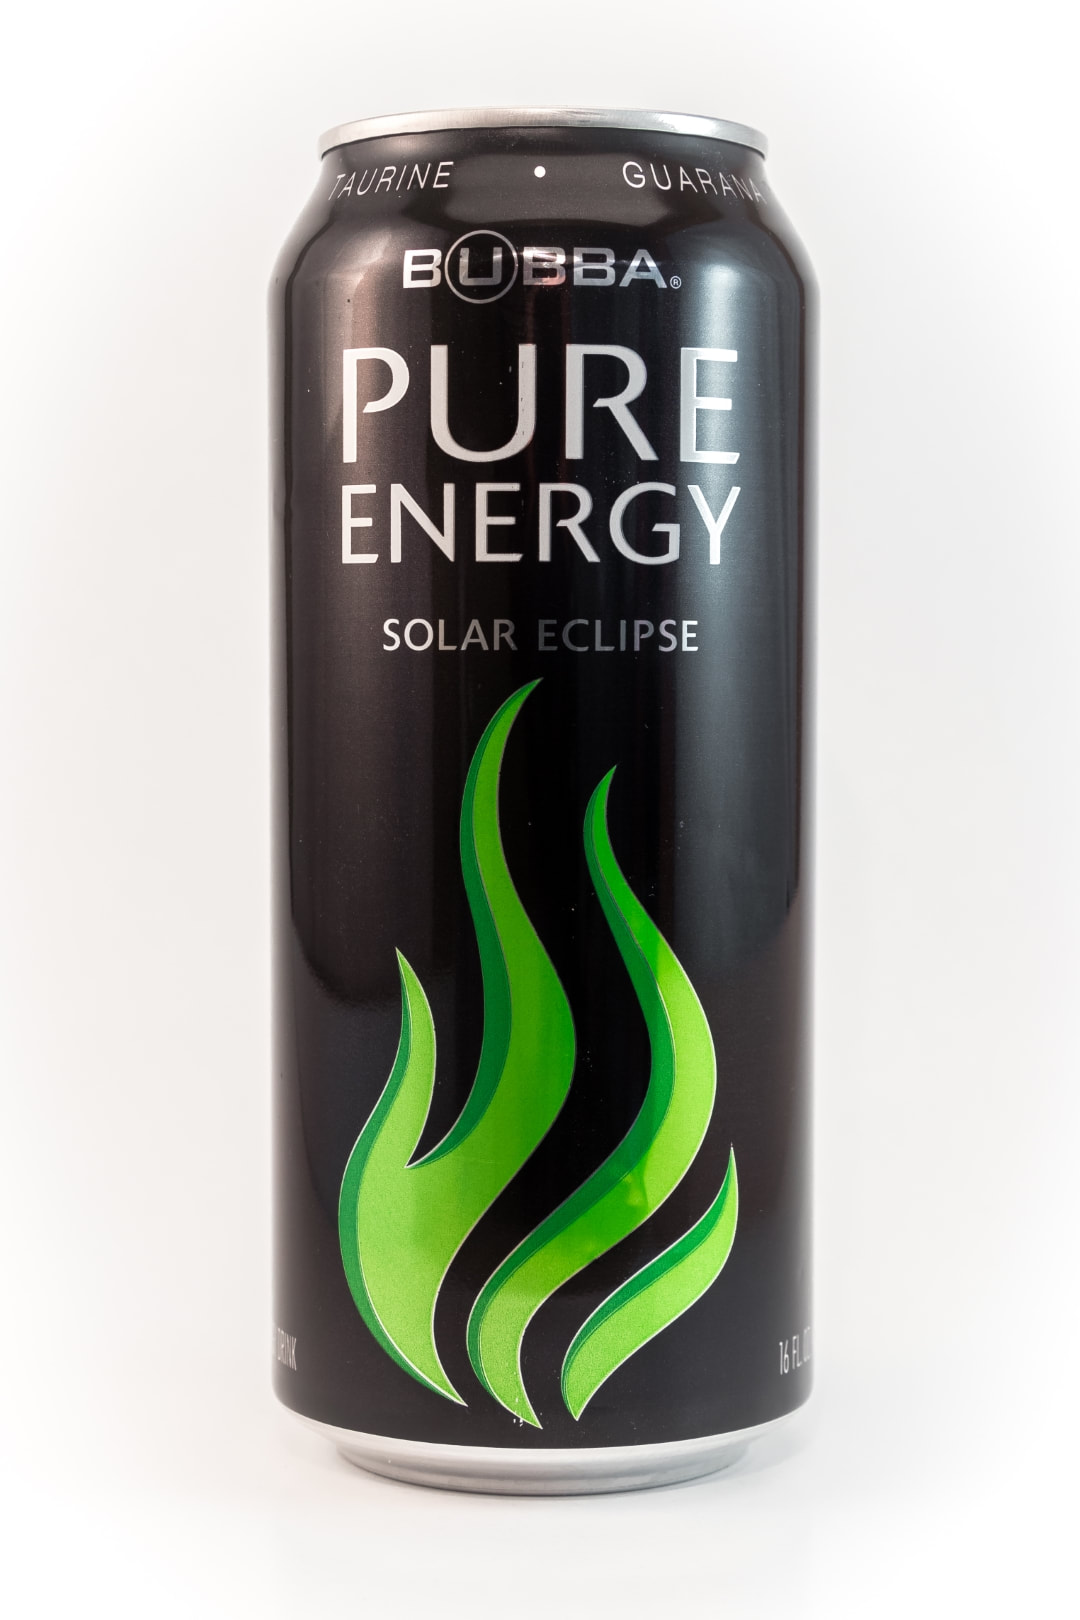 After cracking open the can, the taurine smell is immediately noticeable. I had high hopes for this. Pouring it into the glass produced a nice carbonated champagne effect with heavy bubbles that stayed for a while before dissipating. 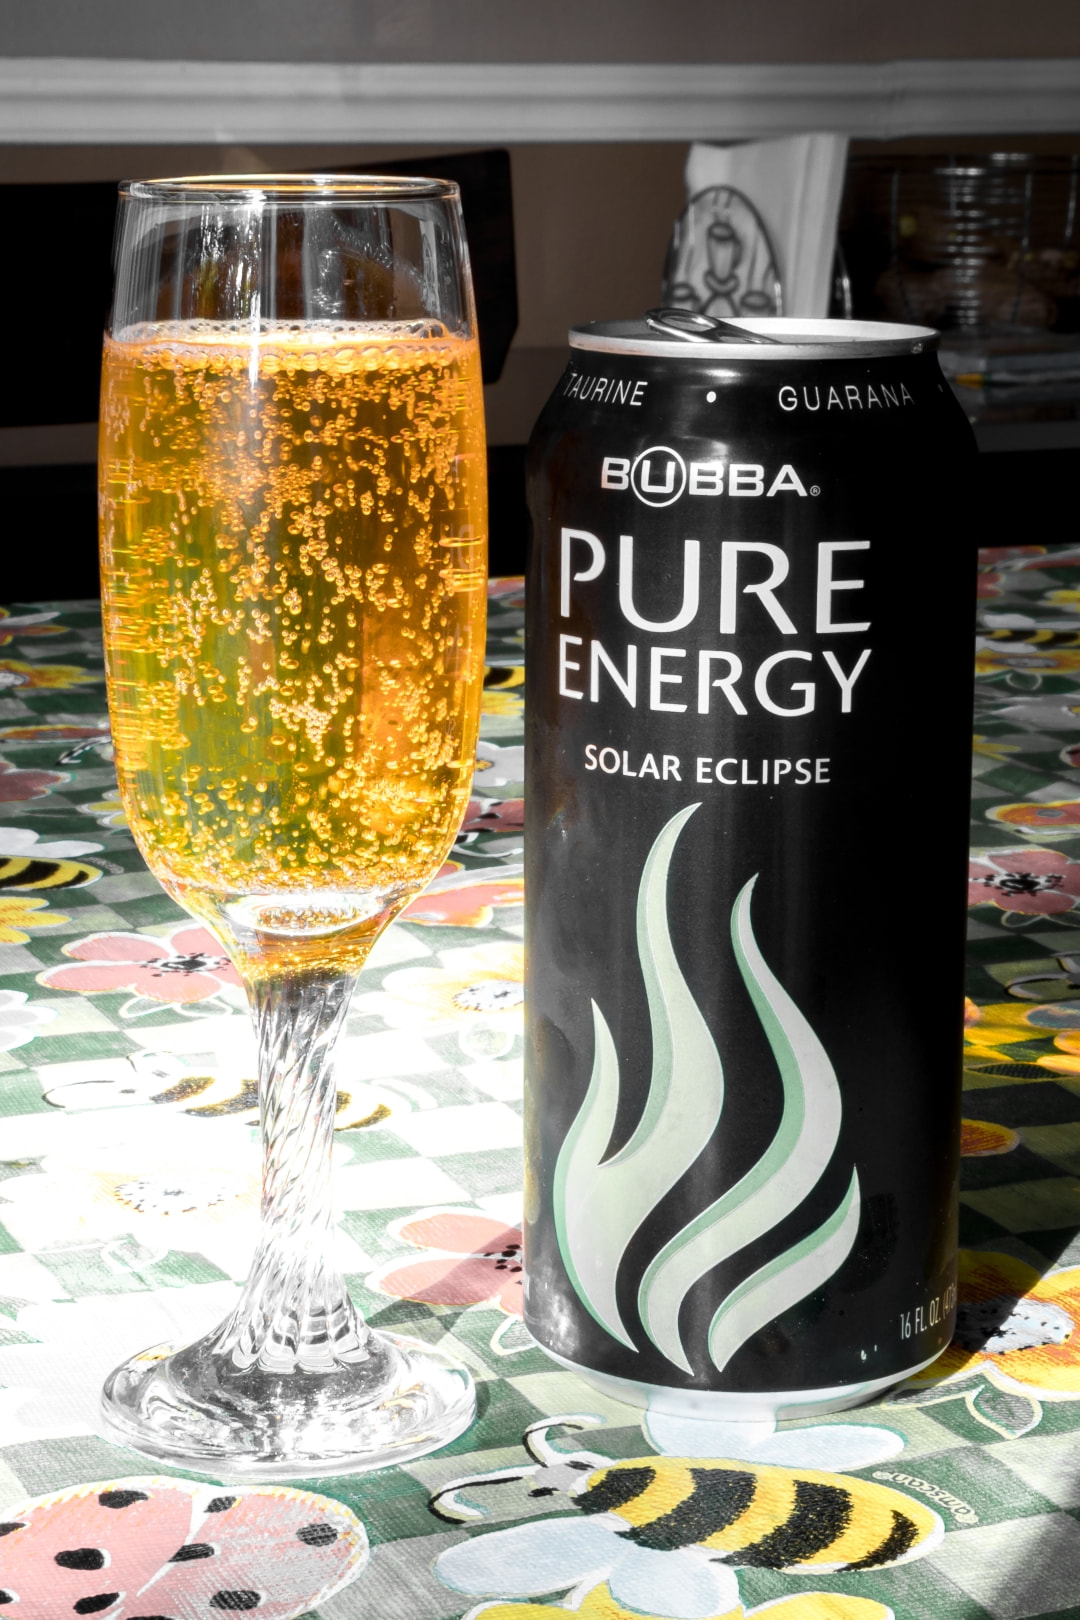 I was expecting a green tinted liquid to come pouring out, but the color golden amber instead. It had strong notes of taurine and an almost sickly sweetness to it. My first impression was that it was was not Monster. It was somehow off. It definitely did not hit the comparative mark that their Red Flare version did. 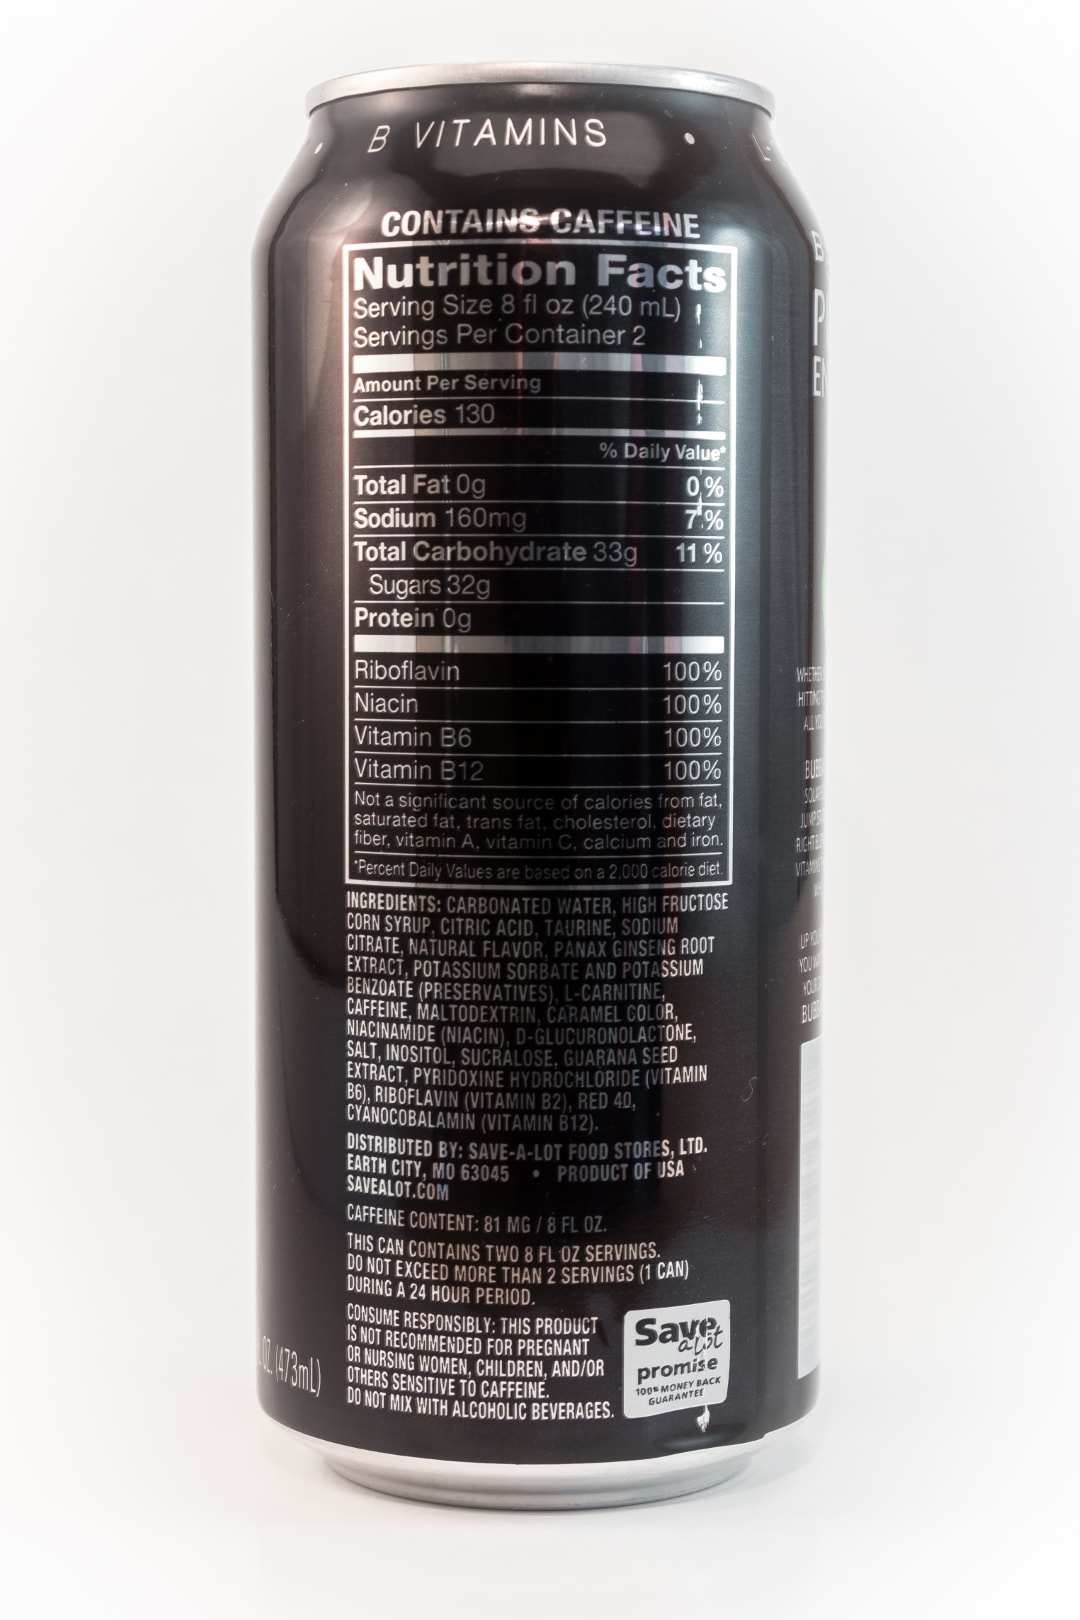 The taste isn't bad, but it's not really good either. It's sweet to the point that it makes this chilled beverage taste warm. Looking at the ingredients reveals that it's sweetened not only with HFCS, but also sucralose. That's what I was tasting, was the sucralose cutting through the HFCS. That's saying something if one sweetener can cut through another sweetener. I did enjoy this drink to some degree, but as I kept drinking it I really wished I had an original Monster Energy instead. The aftertaste does not leave anything unpleasant, as sometimes artificially sweetened drinks do. About 30 minutes after drinking the last sip, my stomach wasn't upset, but just had that too-much-sugar feeling. I don't know if that's from the HFCS or the sucralose. 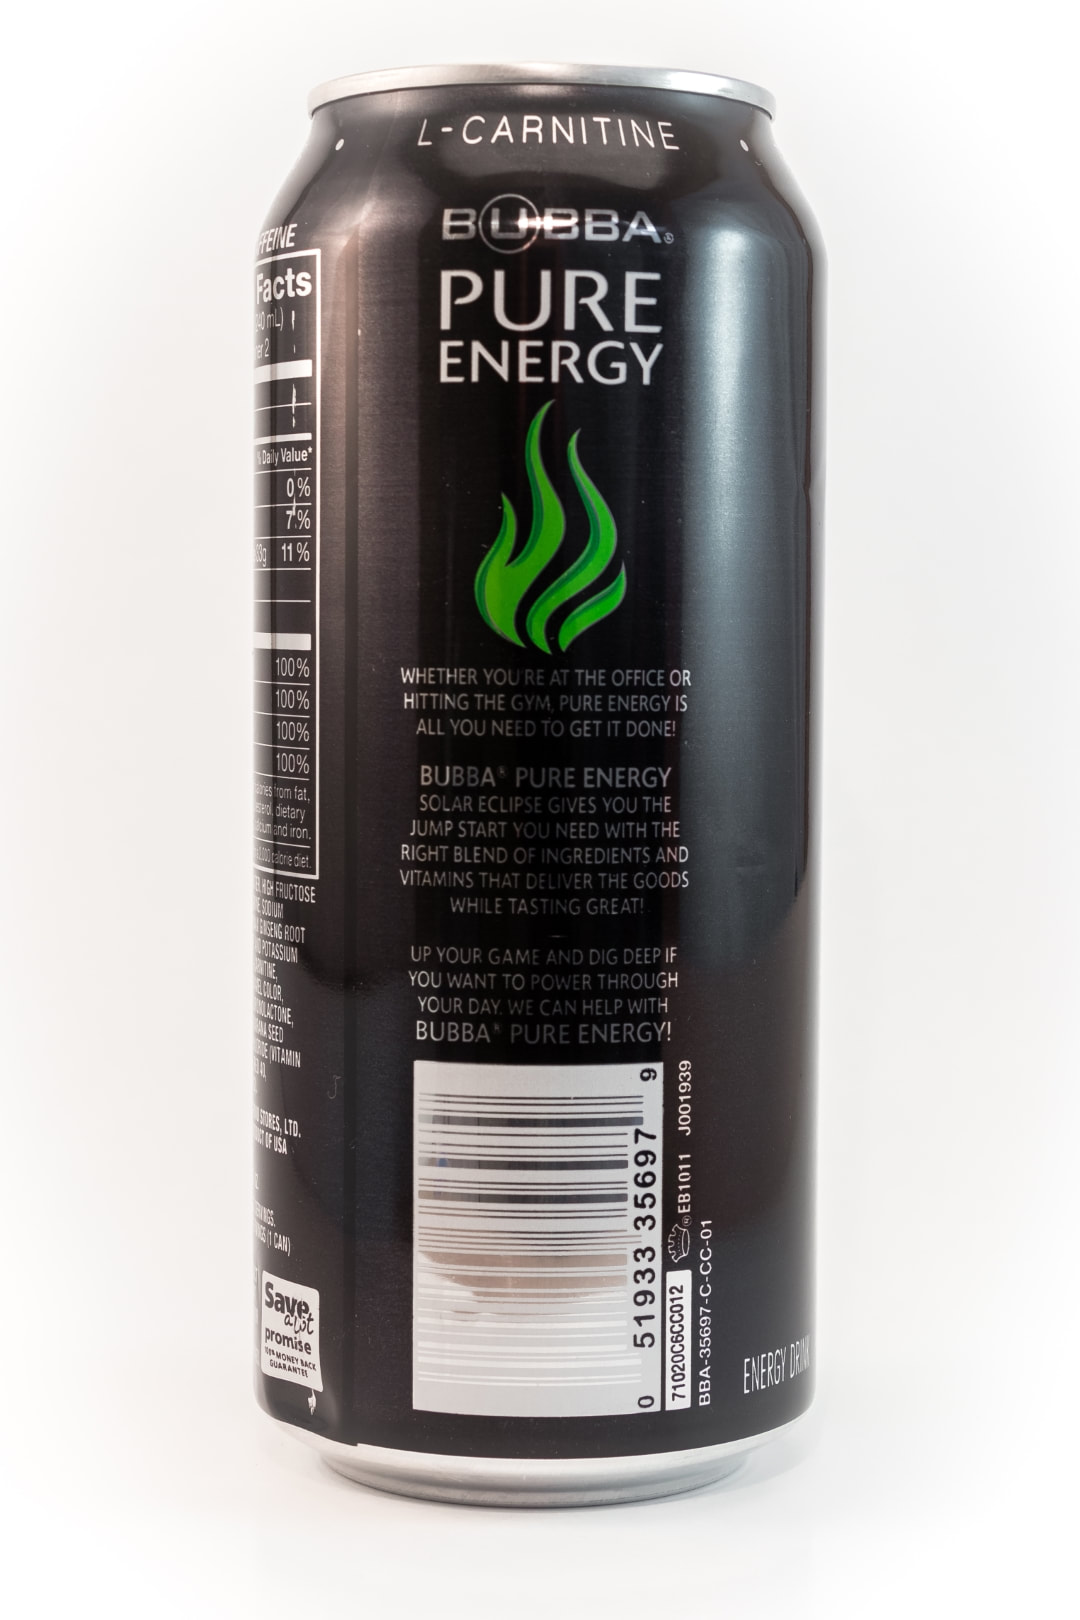 Overall, it wasn't terrible. It was drinkable, just way too sweet. If I was buying Bubba Pure Energy only, I would reach for the Red Flare can instead, which mimics Monster Energy Ultra Zero perfectly. The Solar Eclipse version doesn't hit it's mark of being an original Monster clone. For what this cost, you can often find Monster for only $.50 more. If drinking once in a while, I would rather spend the extra money on a Monster. If daily drinking and needing to cut costs, I think there are better options out there. Where to Buy: Save A Lot Cost: $0.99 Rating: 3/5 I wouldn't buy again, but would try again with a friend. I would rather have something else. If it's the only thing around, it will suffice and I would still drink it and enjoy it as the only option. Here are a few bonus images of the older version of the can from I don't know how long ago. I had a box of old cans in the garage I was saving for some purpose. Also, these are the new photo format going forward, I upgraded my light box since I took the original photos above.
0 Comments
My wife surprised me this weekend with a breakfast run to Wawa. I went with her and perused the energy drinks. I decided to give the new Reign brand a try. Reign is Monster Energy's new brand. According to Reign, this product is aimed at fitness, active lifestyles and is better for you than other energy drinks. They state zero calories, zero sugar and zero artificial flavors and colors, all while still loading each can with 300mg of caffeine. Reign also has a different energy supplement mix than Monster. What does all this mean? Not a thing to those of us who just enjoy drinking them! The cans stand out on the shelf, like a phalanx of energy, protecting you from other sub-par brands. It's easy to their sharp design with bold contrasts among other brands. The cans have a raised texture to them as well, and feel like the Monster Ultra cans in your hand. I had no idea what any of the flavors were, so I just grabbed two that seemed appealing. The first one I am tasting is Melon Mania. 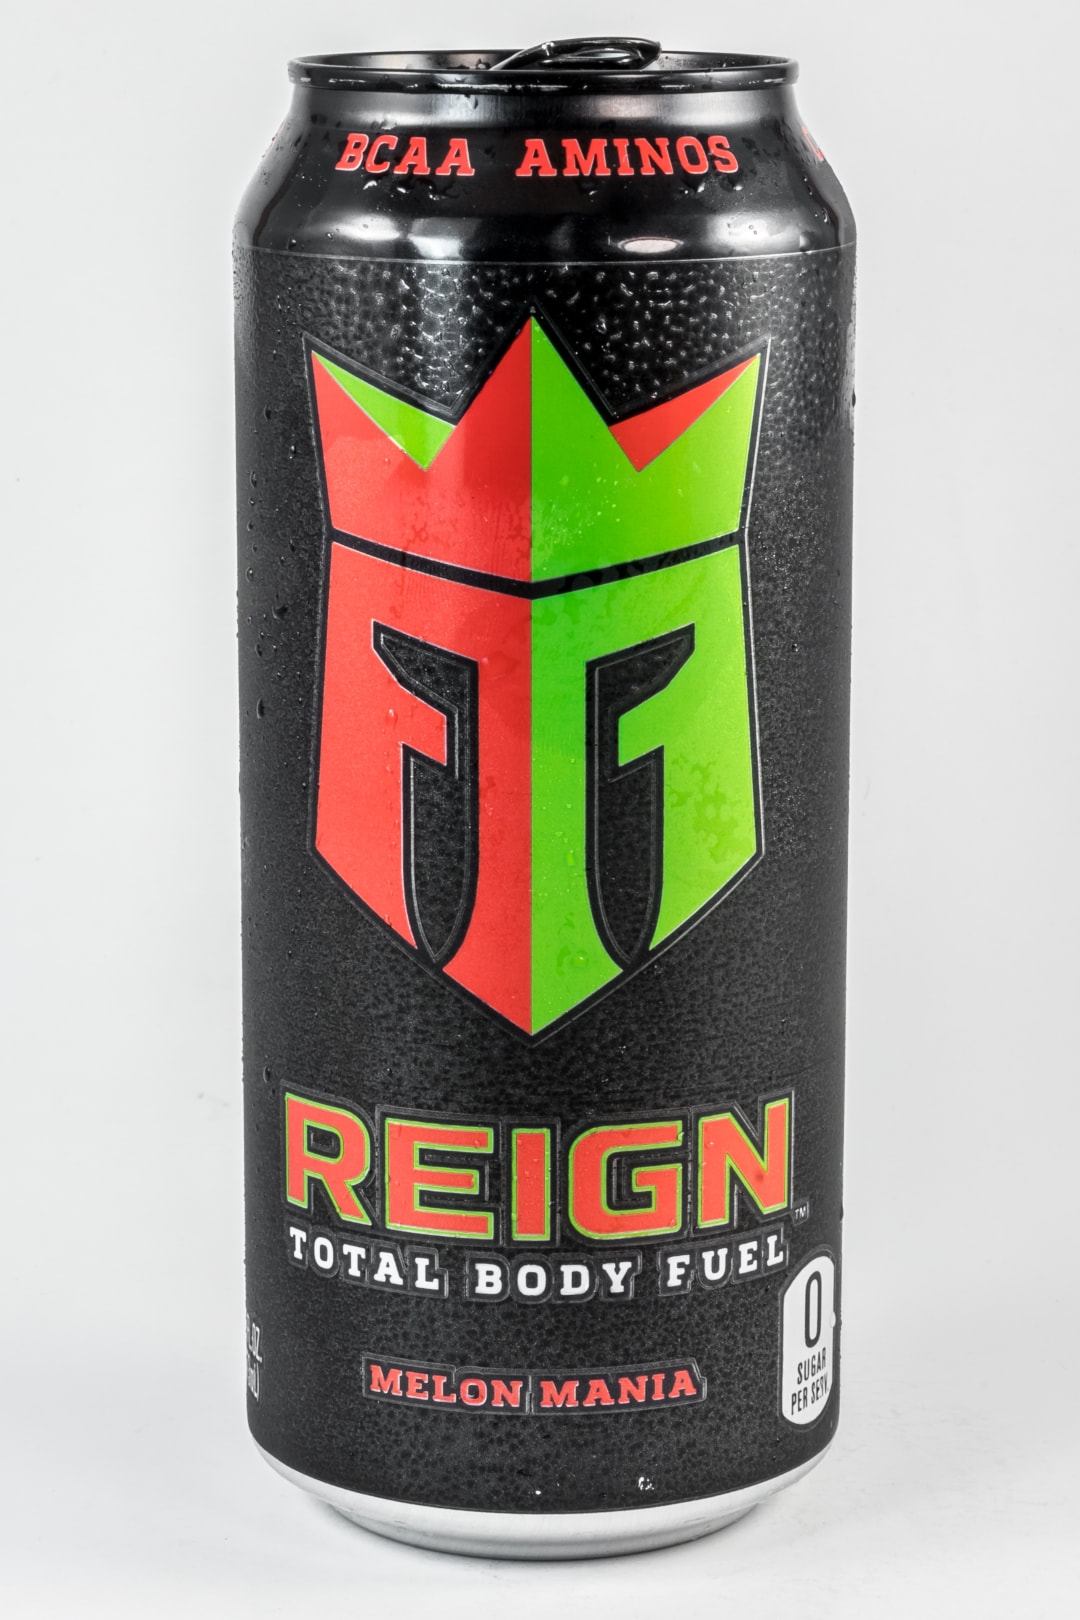 After cracking open the can, I immediately smelled Jolly Rancher - maybe watermelon, maybe sour apple. I didn't know they were not using any artificial colors, so we were guessing what bright fun color it might be and were disappointed that it was perfectly clear. 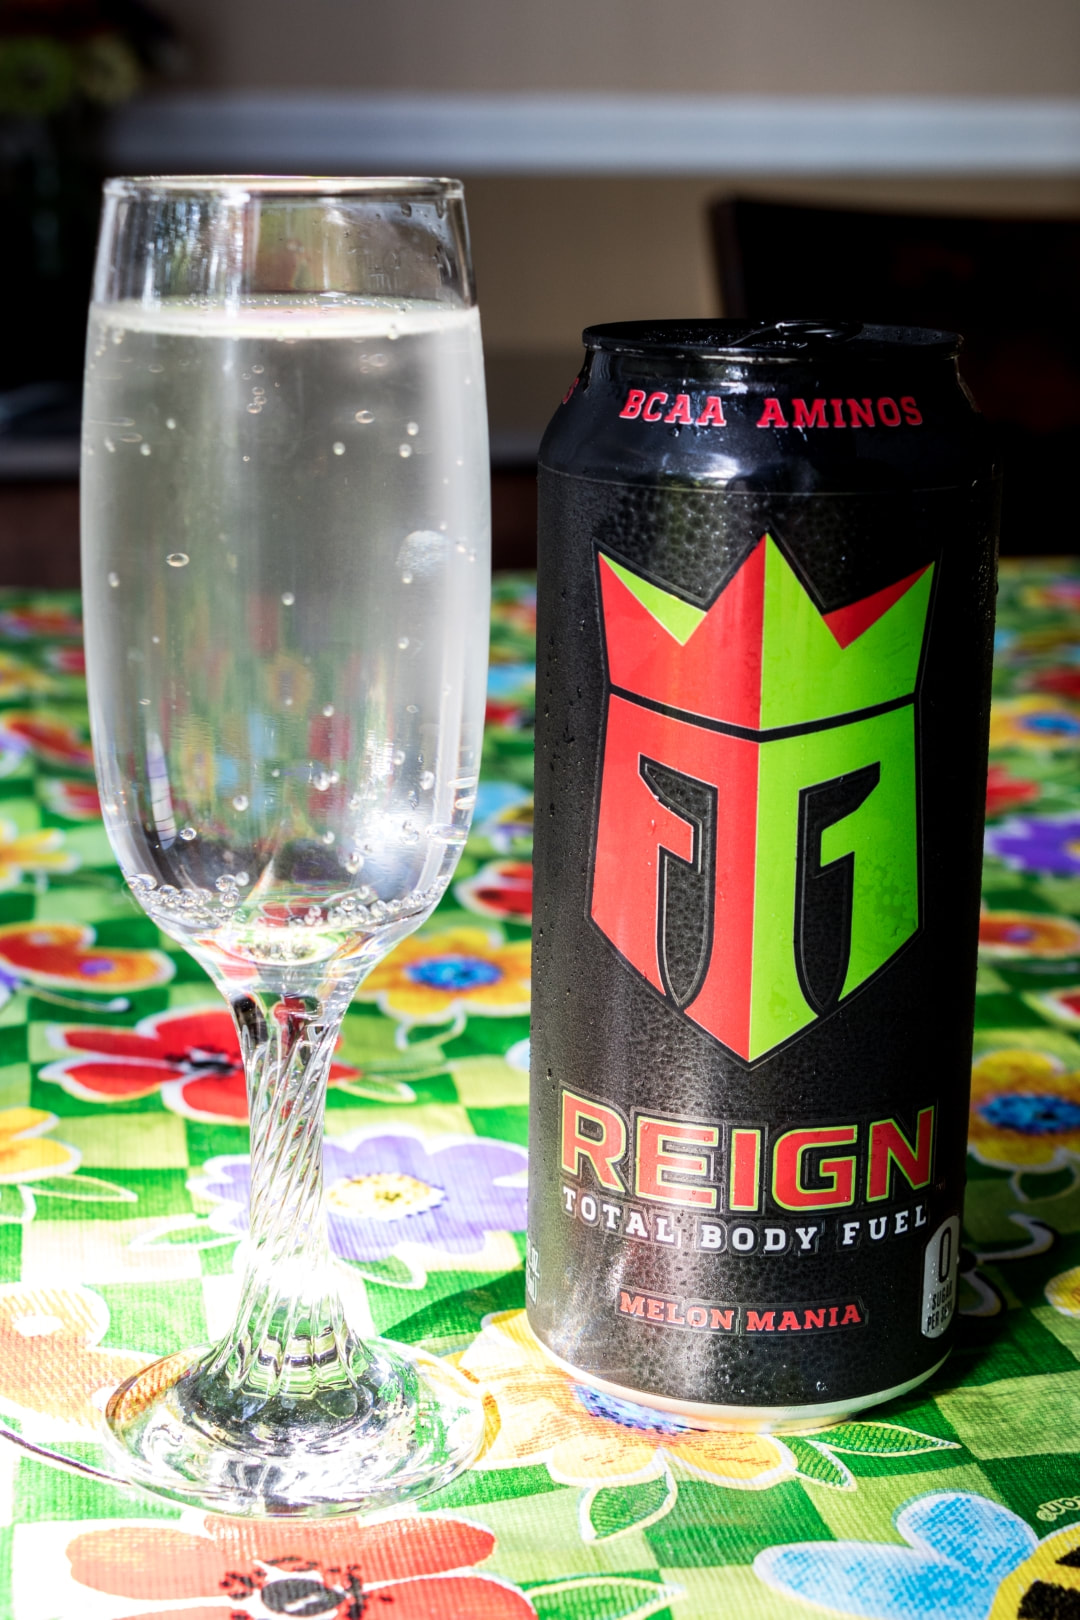 Having a clear drink really messes with the flavor if you can see it. Drinking right from the can won't matter as much, as there's no visual aspect aside from the can design to persuade your taste buds. It was well-carbonated and bubbled nicely when poured. My first impression was that this was a watermelon Jolly Rancher. It changed a little with each sip as I tried to pinpoint the exact flavors. It shifted more towards watermelon combined with sour apple Jolly Rancher, like a Jolly Rancher cocktail. The flavor was soft and artificially sweet tasting from the sucralose. There wasn't a crispness to the taste. I definitely prefer energy drinks that are sharp and crisp on the tongue. 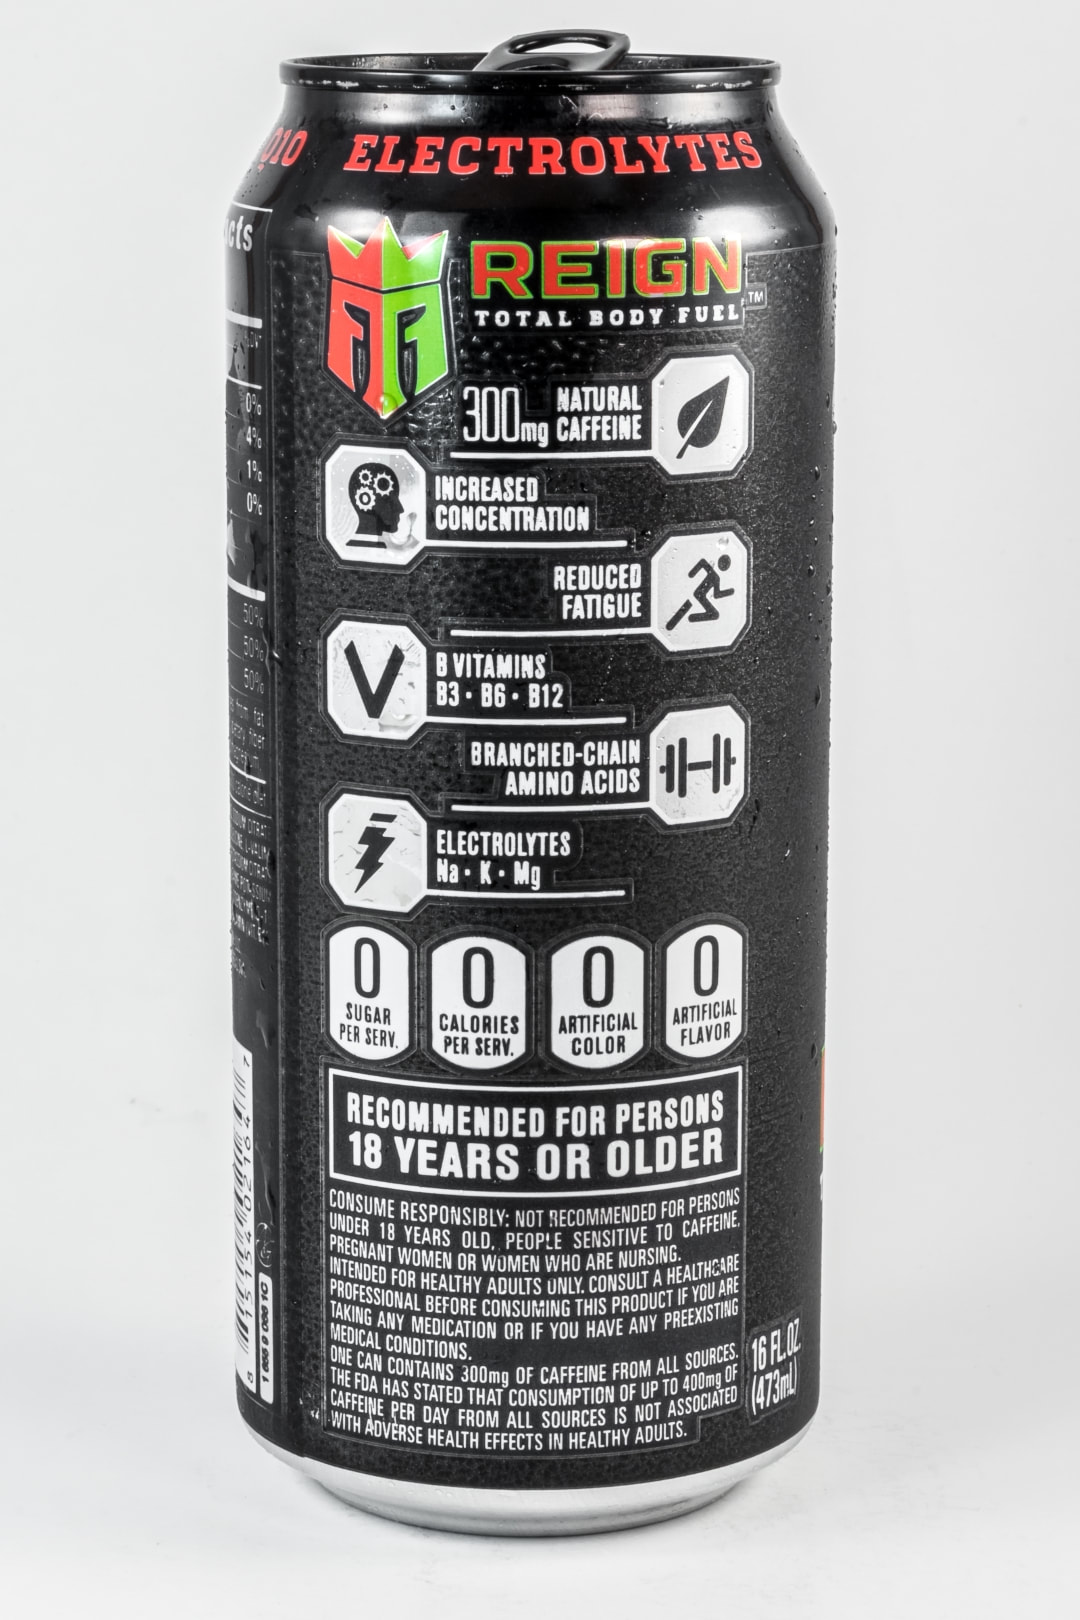 I had my wife try a few sips as well. Her initial reactions are always entertaining as she does not like the taste or smell of energy drinks. After her first swig she said it smelled fake and had a nondescript "what is in this?" bubbly flavor. Then she said, " No, this tastes like the dentist's teeth cleaning polish. You know the pina colada flavored one?" She followed up a few minutes later with, "It's coating my tongue! BLECH! I'm going back to my coffee!" 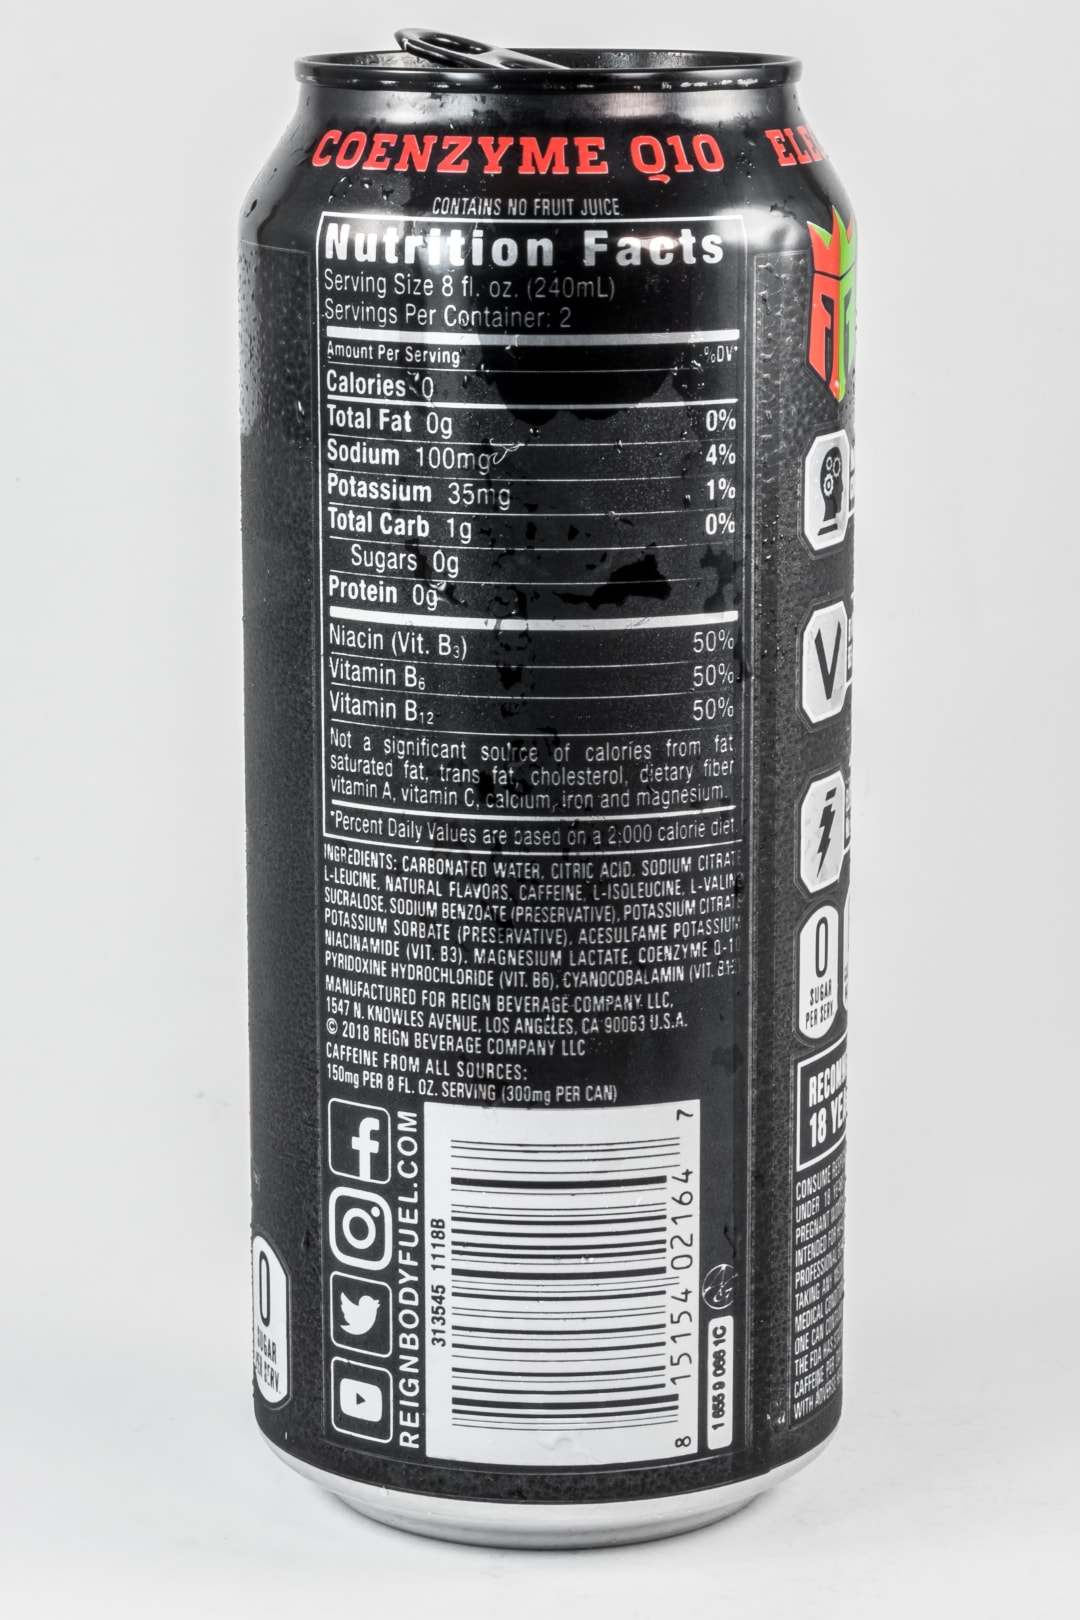 About 20 minutes later, I got the wake up effect. I was really tired, having only slept four hours that night, so this was a good test to see what the caffeine jolt would do. I suddenly felt very alert within a few seconds time. My legs started bouncing and I got very chatty and started talking my wife's ear off. My eyelids felt like someone was pulling them wider open.
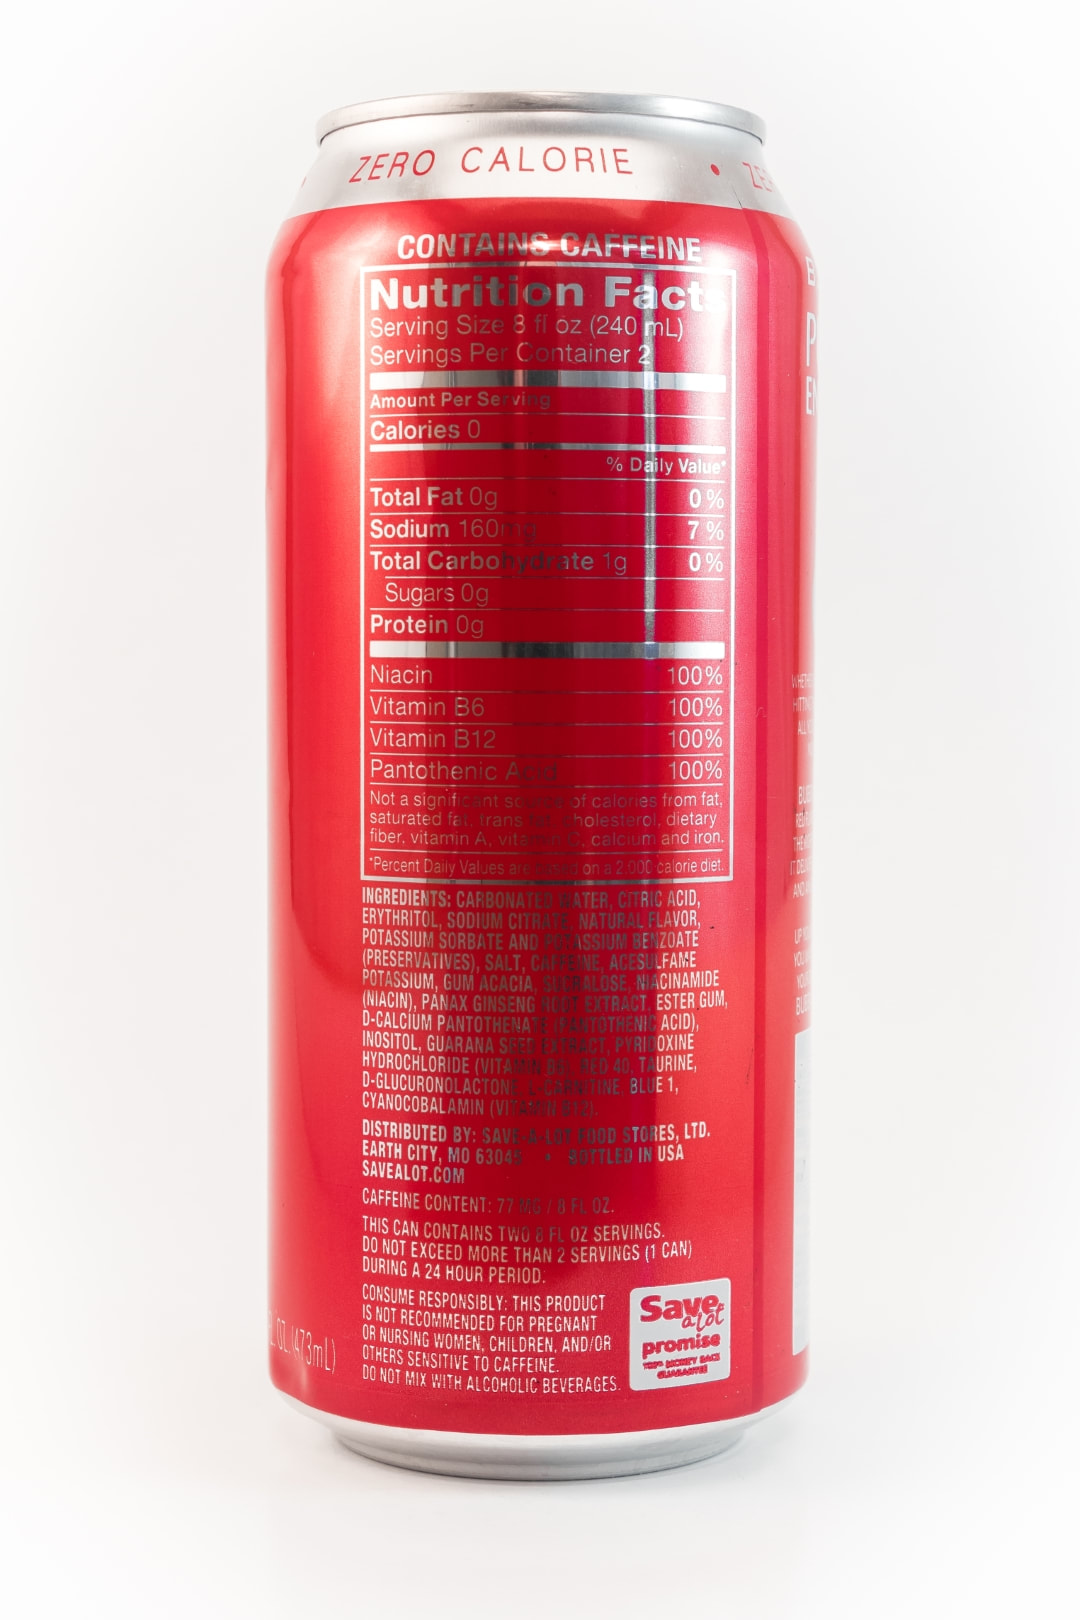
I wouldn't say this effect was native to this particular drink, but mostly because I just drank 300mg of caffeine in one sitting. While I plan to try the rest of these flavors over time, I don't know if I would pick Reign over the original Monster. I think that I might pick Reign over the Monster Ultra lineup as it offers more descriptive flavors and is only slightly better for you. Where to Buy: Nearly Anywhere Cost: $2ish/can ($2 for $4.25 seems to be the new price of energy drinks as of this writing) Rating: 4/5 I would only buy this again if I was reaching for a Monster Ultra. I prefer the original Monster flavor over all else, though. I was out grocery shopping for supplies for an out of town buddy that was visiting us for the week. This was also the same buddy I used to work with and that started tasting all of these crazy energy drinks with me several years ago. We were walking down the soda aisle at my local Save-A-Lot and he spotted a new energy drink! 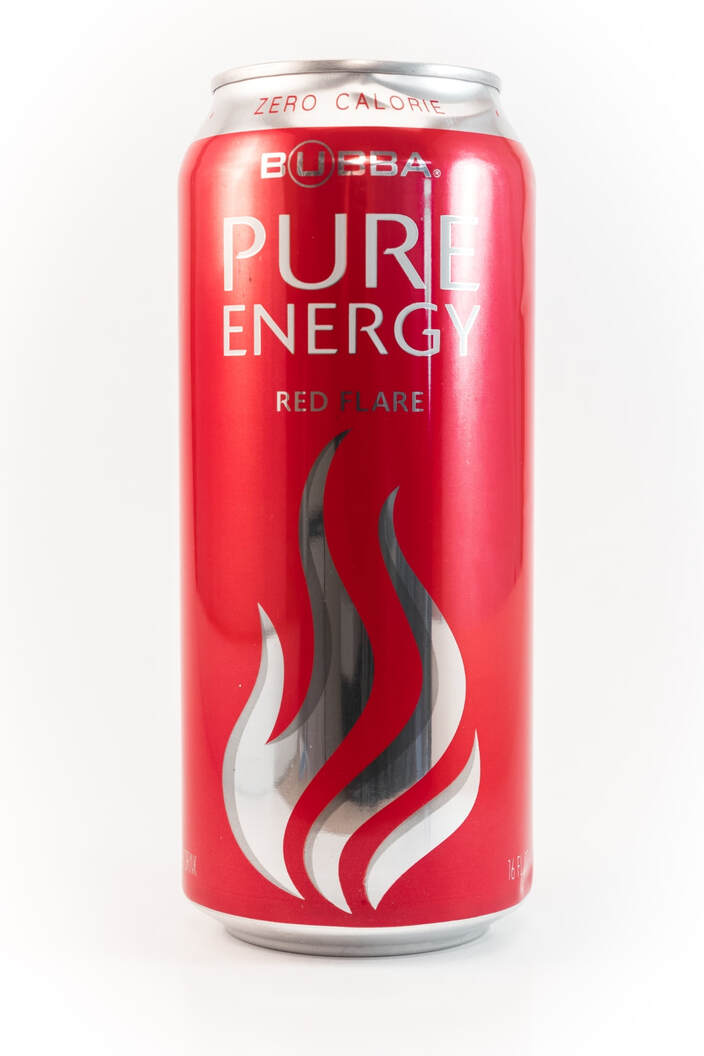 It was Save-A-Lot's own Bubba brand, which I think is a hilarious name for a tasty brand. They have excellent Mountain Dew, Diet Coke, Dr Pepper knockoffs, and their root beer and ginger ale are also excellent. I had high hopes after seeing this, so we got a couple cans of each flavor energy drink to try. After chilling overnight, we tried the first one: Red Flare. 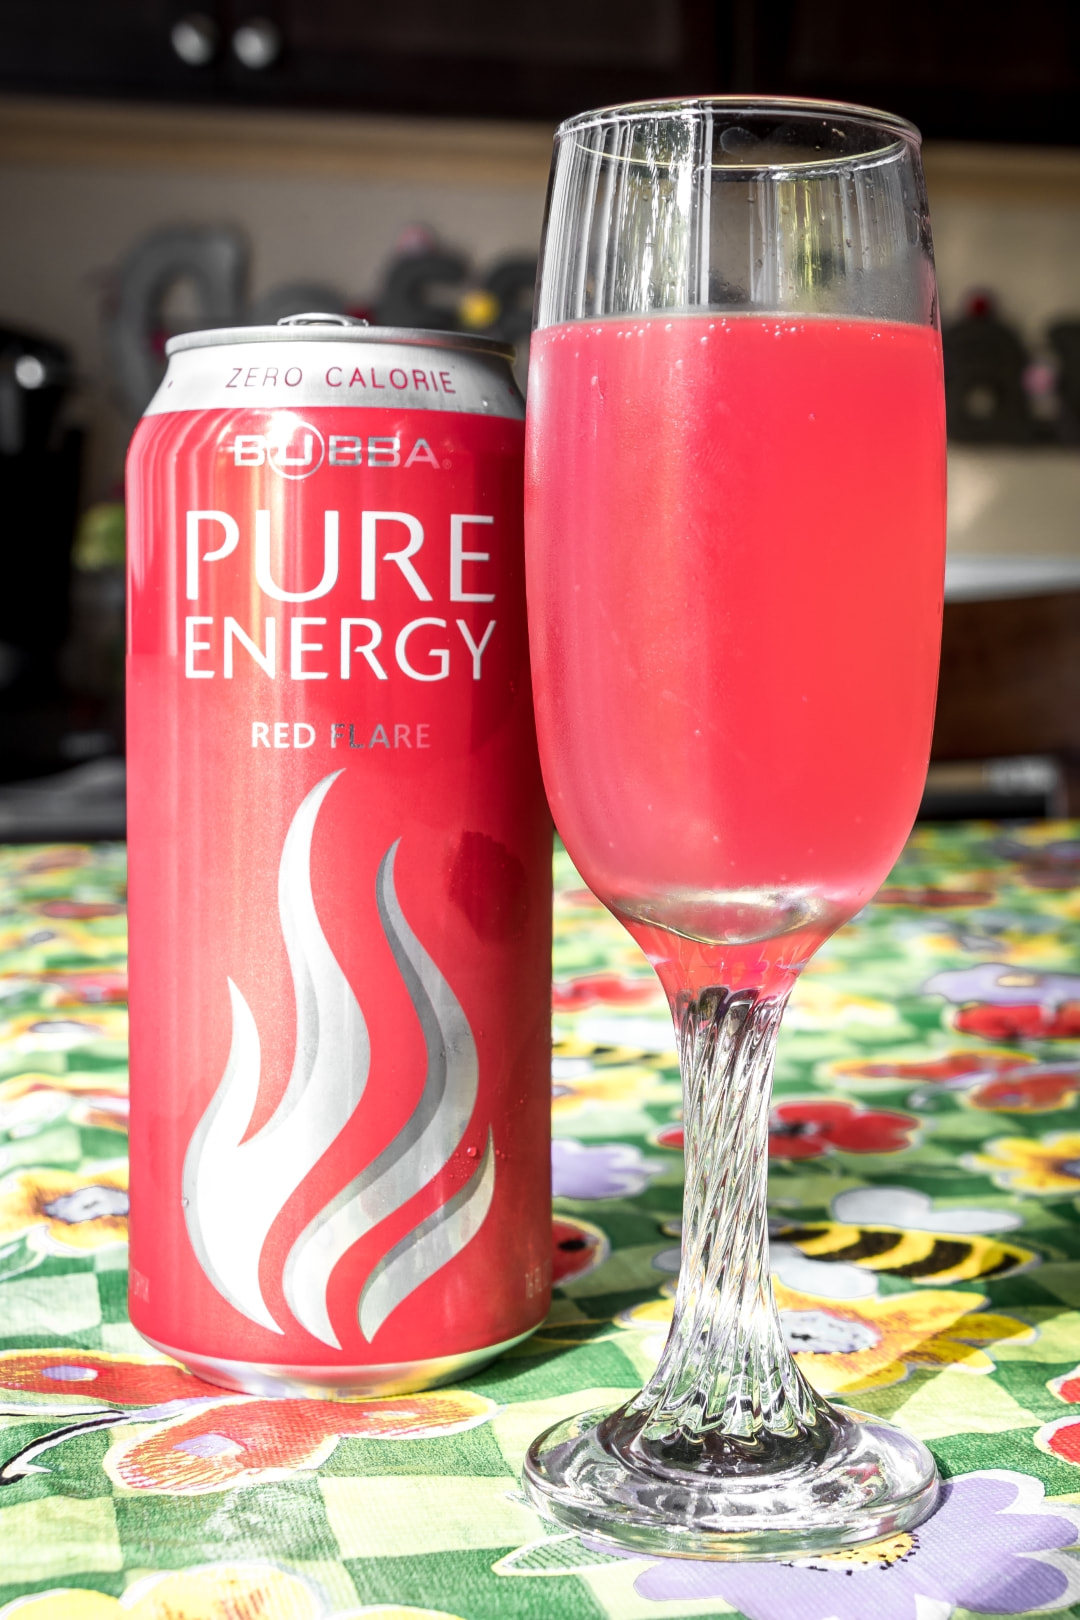 Immediately we were impressed with it's not-awful flavor. In fact, it was pretty good. The first smell after opening the can was an artificially-sweet berry flavor. We were shocked at the color after pouring into our glasses. The color was the color of pink lemonade. I tried to adjust the colors as best I could in the image above to correctly show the color in the glass. On first taste I was impressed. It tasted like something I had before, something else that was good. It wasn't until I had another can a couple of weeks later that I realized this tasted almost exactly like Monster Zero Ultra, which you may have seen in the grey and white etched and frosted can. This is a good thing, as this is a very popular drink among the no-calorie energy drink connoisseurs. Save-A-Lot did a top notch job in replicating this one. To note: I have not tried many of the new Monster Ultra line in the past years, and I don't remember what the Ultra Blue tasted like. I recently had the original Zero Ultra, so that is all I am going off of at this time for taste comparison. This drink is sweetened with sucralose, so it has the much sweeter, more mild taste vs. other artificial sweeteners. The carbonation was excellent, it was as it should be for a Monster clone. There was no bad aftertaste. I was actually sad when I drank the last drop. After letting it sit for a while, I did not get any noticeable side effects, such as jitteriness or headaches. While I used to drink these daily, I am down to one energy drink a week now, so these should effect me more than if I was still daily drinking these. About an hour after drinking this, I felt slightly more peppy and energetic. The Monster brand drinks give me the same feeling, so this is something I actually look for and enjoy. Not too strong, not too weak, and the taste is excellent. 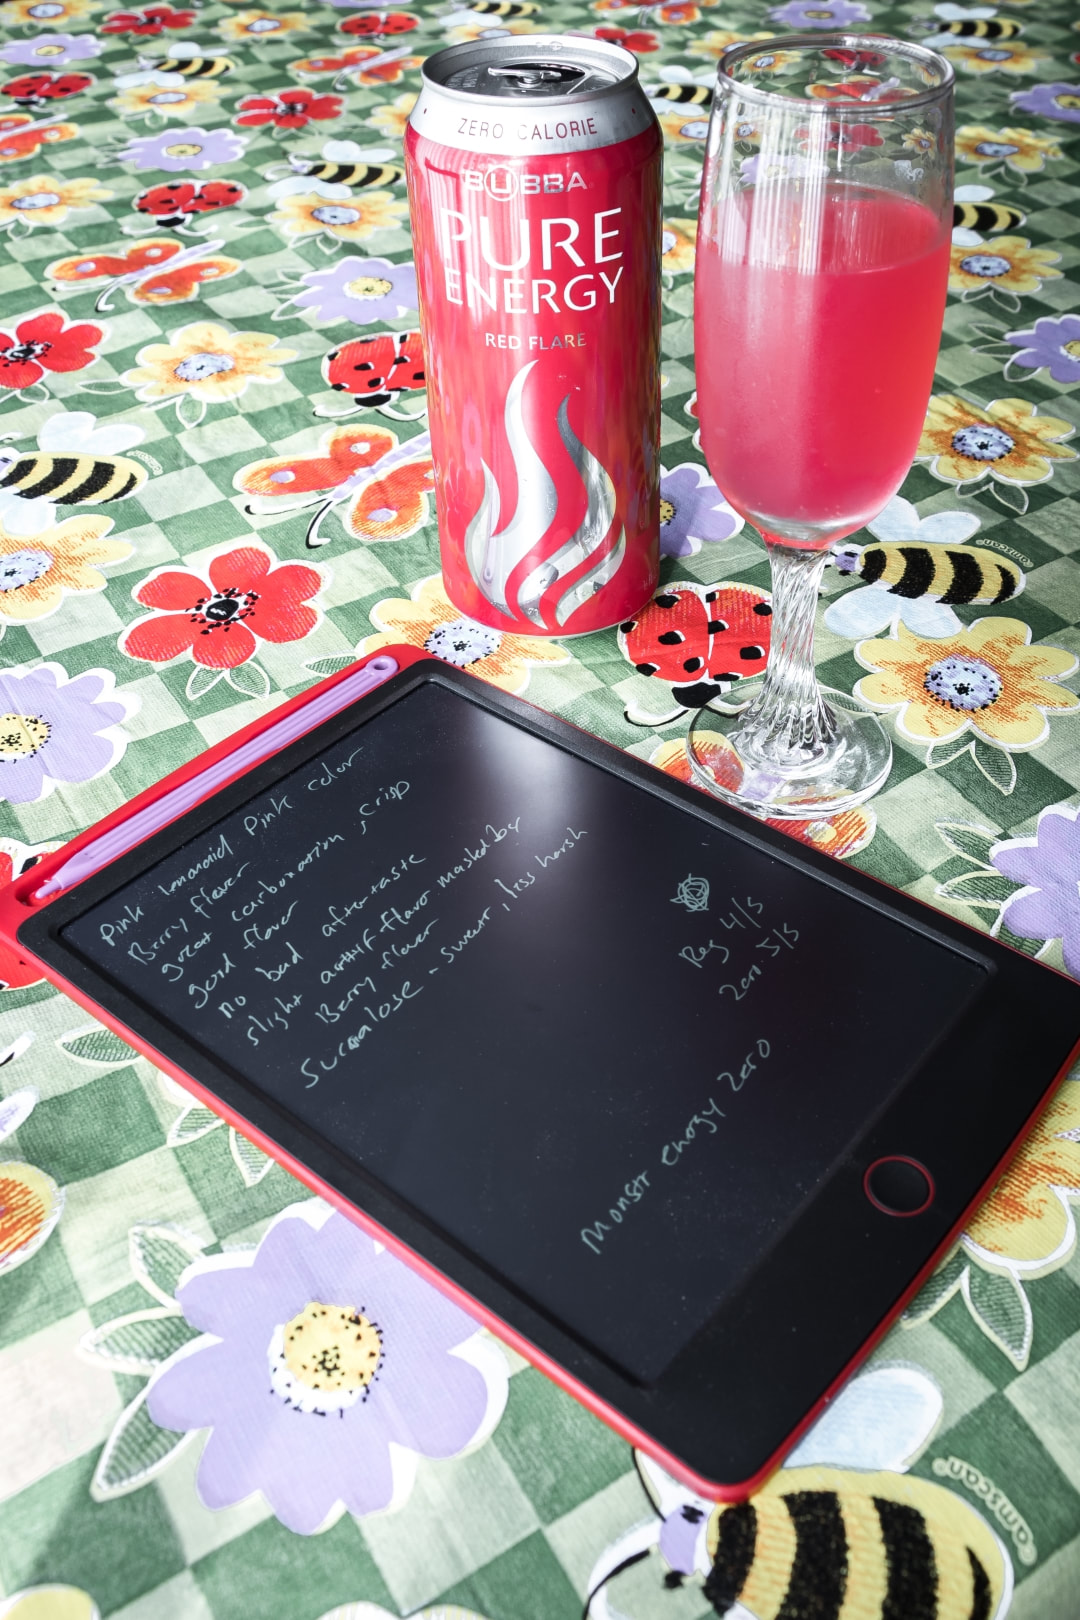 While I do enjoy Monster Ultra, I prefer the original green Monster. If I was reaching for a $2.50 can of Monster Zero Ultra, and this was sitting next to it for $.99, I would not hesitate to buy Bubba Pure Energy Red Flare over Monster Zero Ultra. That is really saying something, since energy drinks are so difficult to get just right. I am not sure who actually produces this drink, as there are no manufacturer names on the can. It states it is distributed by Save-A-Lot. Their regular Bubba soft drink line is made by Cott Beverages, which was sold to Refresco in 2018. Refresco appears to manufacture energy drinks, so I inquired with them to find out more information on this product. If I find out after this article is published, I will update it when I know more.
  Get the PDF of this article: Click Here This guide will instruct you how to play Magic: The Gathering Arena on an iOS device, using Steam Link. Since Magic: The Gathering Arena (MTG Arena) came out, we have been begging for a mobile version. After all, Hearthstone is on both iOS and Android and works very well. I’m sure it will come to mobile eventually. It is still in “open beta” at this time, so the MTG Arena developers are still working on perfecting the game. Recently, Valve released Steam Link for iOS, which will allow us to play MTG Arena on our iOS devices. What this means is finally we get a full touch screen experience on our iPads and iPhones. What is Steam Link? Steam Link is a utility developed by Valve Software, who developed Steam as well as notable titles such as Half-Life, Portal and Left 4 Dead. In 2015, Valve released a device called a Steam Link. This small box connected to your living room TV. You could connect game controllers, mice and keyboards to it. Then, over your home network, it would access your entire Steam Library from your gaming PC. How it worked was, it streamed all of the video and audio content from your PC to your living room. It then sent the input devices, such as a gamepad, or a mouse and keyboard, back to your PC. What you experienced was full PC gameplay, in your living room, with no lag, and no need to hook your PC up to your TV. A couple years later, Valve decided to discontinue the Steam Link devices in favor of developing the Steam Link software to run on mobile devices, Raspberry Pi, certain smart TV’s and even low end computers. Unfortunately, those using iOS were left out in the cold. It was not until May of 2019 that Valve finally release Steam Link on iOS. Installing Steam on PC You will first need to install Steam on your PC. While I will not go into detail on how to install Steam, you may find plenty of How To guides and help directly from Steam’s website. Steam is available for Mac as well, but since MTG Arena only runs on Windows at this time, then you will need to make sure to install Steam on a Windows PC. You will also need to sign up for a free Steam account to use their service. You can find the download link to their software here: https://store.steampowered.com/about/ Many of us are gamers and already use Steam, so the focus on this guide will be how to get MTG Arena working using Steam and the Steam Link app. Adding MTG Arena to Steam Since MTG Arena is not a title available from Steam, you will need to manually add it to your Steam Library. We will assume you already have MTG Arena installed, and have been playing it. If you have not, go ahead and install MTG Arena, log in, and make sure it is fully updated. I will also assume that you have already installed Steam on your PC, signed up for an account, and are able to see the main library screen now. For those of you that already use steam, just navigate to the Library screen. 1 - Navigate to the Steam Library  Add A Game button 2 - Click on the Add A Game button in the bottom left corner of the main Library window. 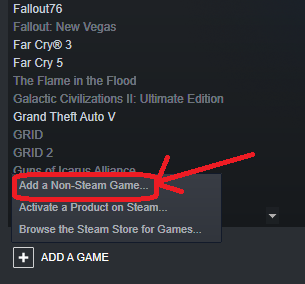 Add a Non-Steam Game... 3 - Next, it should scan your PC for a list of everything installed. Once it has finished, scroll through the list and look for “MtgaLauncher”. 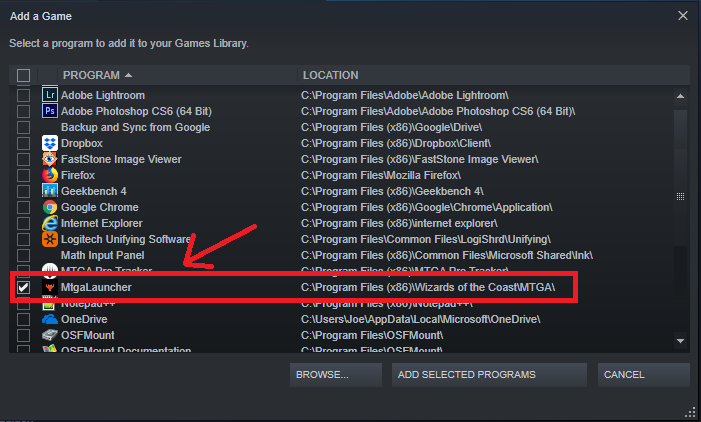 Select MtgaLauncher 4 - Select MtgaLauncher and click the “Add Selected Programs” button. You should now see MtgaLauncher in Steam as one of the games you may play. Go ahead and click on the Play button to test it out and make sure it is ready to play when launched via Steam. Exit MTG Arena once you see that it works. Install Steam Link on iOS I will be walking you through installing Steam Link on iOS using my iPad Mini 4. 1 - Go to the App Store and search for “steam link” 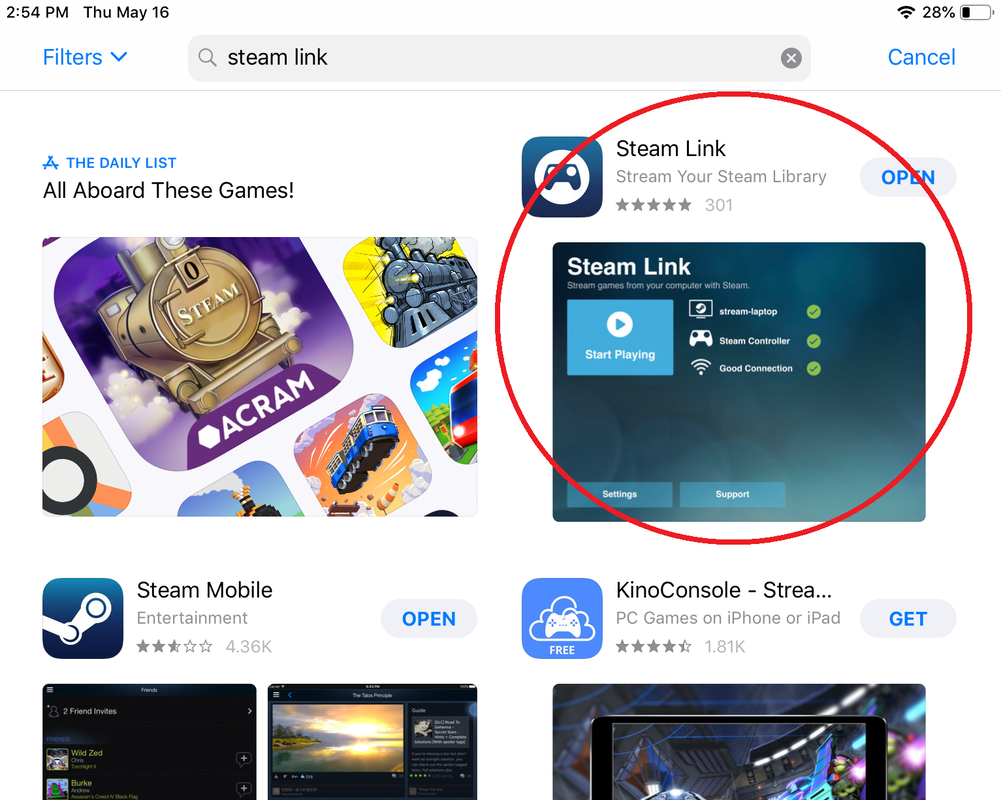 Steam Link in iOS Apps Store 2 - Install Steam Link. Once the install is completed, we will need to link Steam on your PC with Steam Link on your device. Linking Steam Link with Steam Important Note: In order to use Steam Link, you must have both the Host PC (your Windows PC with Steam) and the Client Device (your iOS device) on the same network. This means both of them need to using your network within your home or office. This will not link outside of you’re the location of where your PC lives. You may have your PC wired into your home router, and your iOS device may be on wireless, so long as they are the same network within your home. I will not go into details of home networking, as it falls outside of the scope of this document. 1 - Looking at Steam on your Windows PC, in the upper left corner, click on the menu called Steam, then select Settings. If you do not see Settings, you may have Family Sharing turned on and will need to disable this before you can change Steam’s Settings. Search Google for how to disable Family Sharing 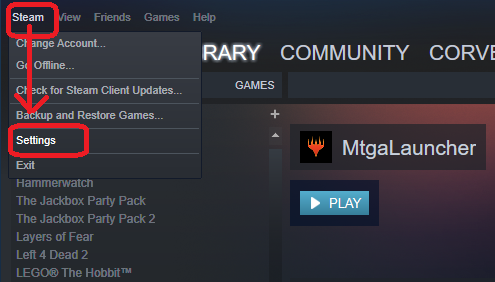 Steam Settings 2 - Select the In-Home Streaming menu. 3 - Make sure Enable Streaming is checked 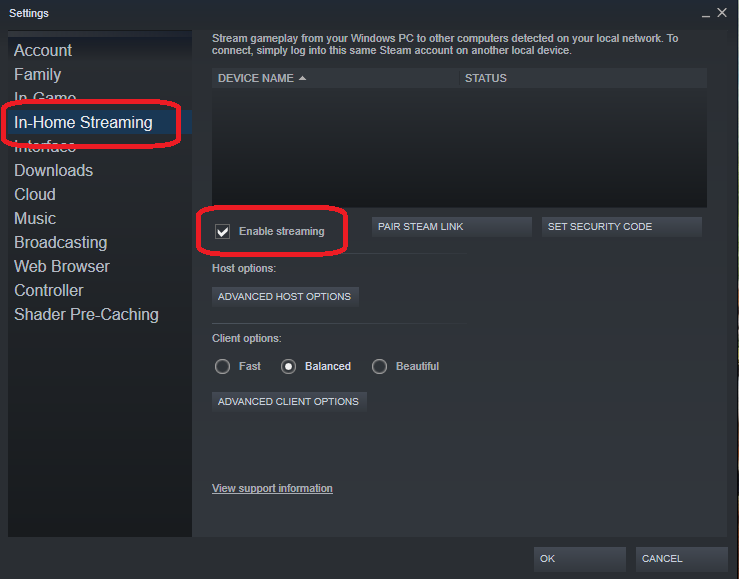 Enable Streaming 4 - Click OK and go back to the main Steam Library. This should be all you need to do. Now, switch back over to your iOS device. 5 - On your iOS Device, launch the Steam Link app.  Steam Link Icon 6 - Tap the big Get Started button on the Welcome screen.  Steam Link Welcome Screen 7 - Tap Use Touch Control on the Pair Controller screen. 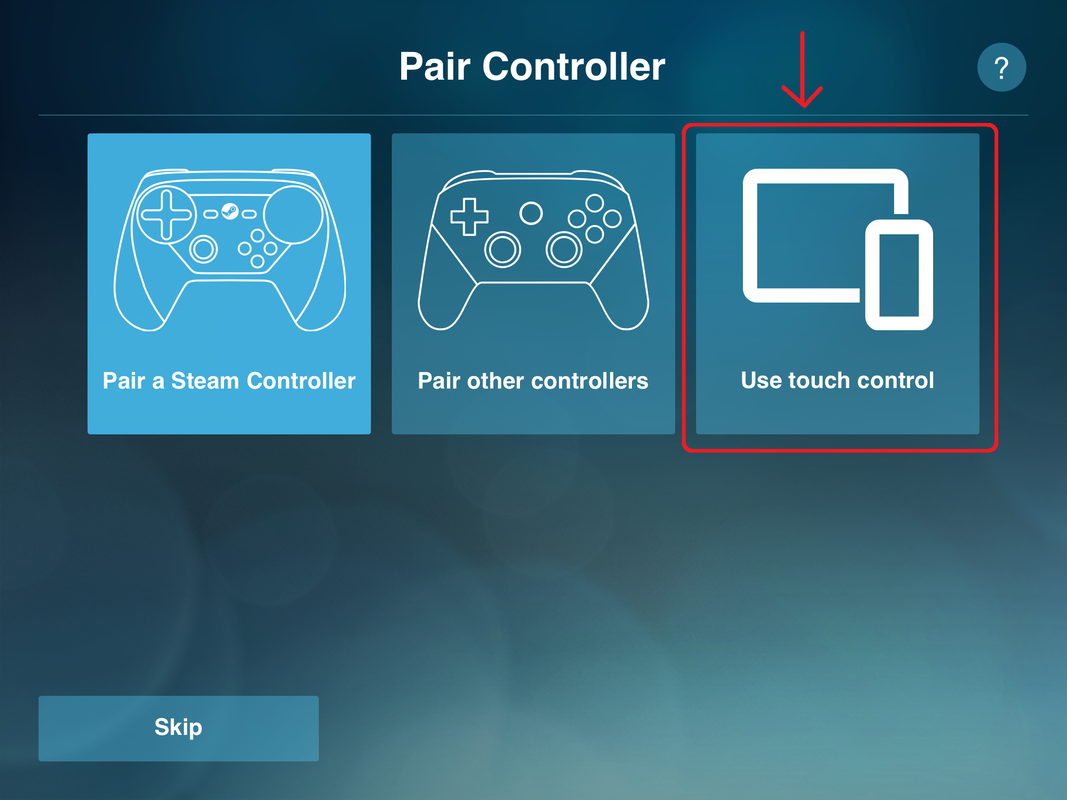 Use touch control 8 - Next, it will run a test to make sure your network is fast enough for the best experience. Make sure your device is on your home WiFi, and not still connecting to your cellular service. 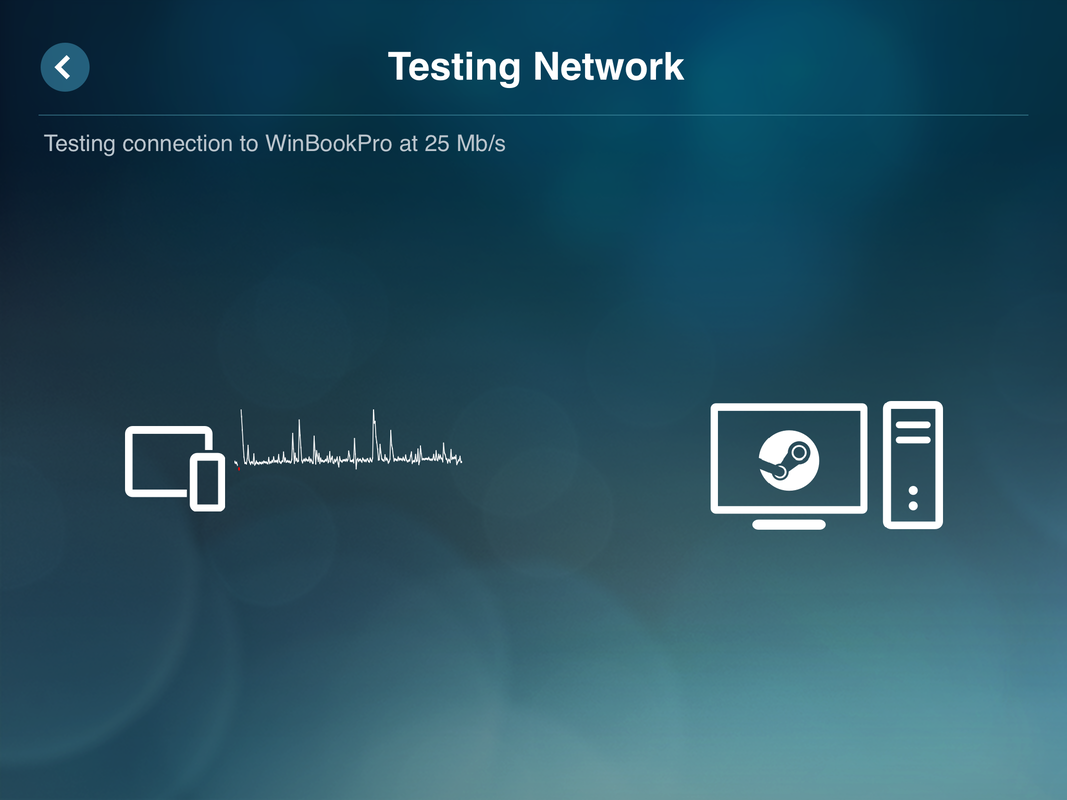 Testing network connection 9 - Once it has completed, it will notify you of your speed and if it is in an acceptable range or not. Tap OK.  Successful completion screen 10 - Next it will attempt to look for your Windows PC with Steam running on it. 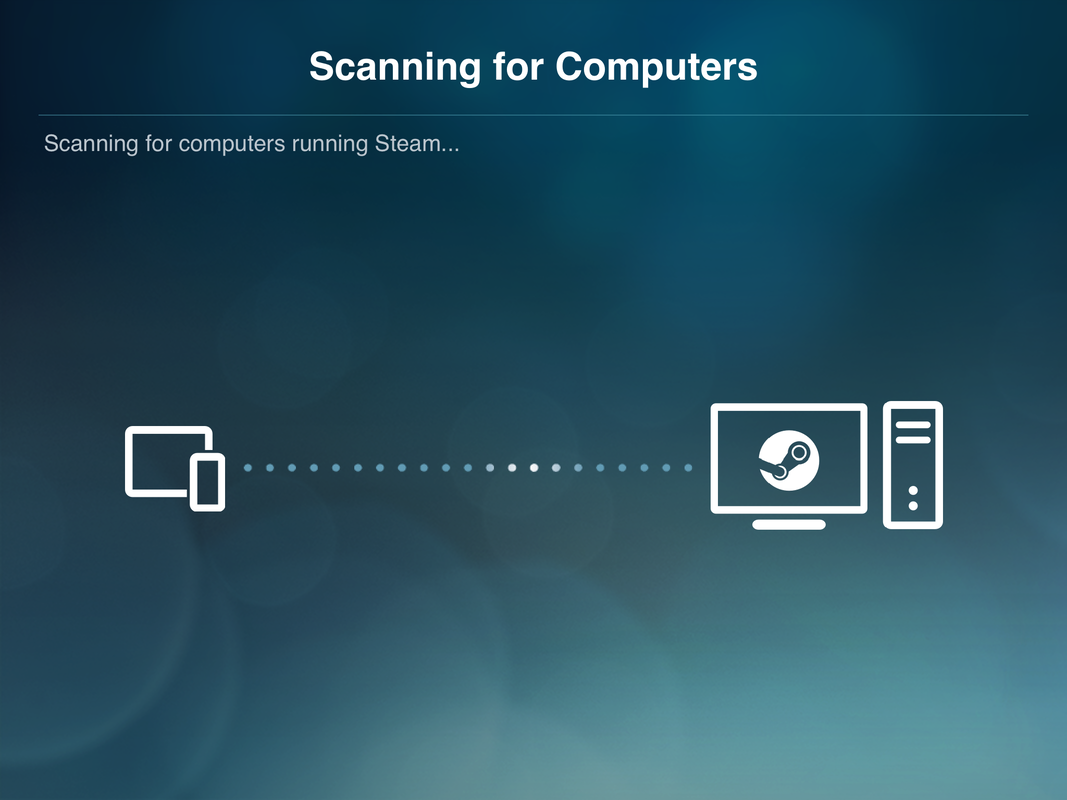 Scanning for your Steam PC on your home network 11 - Once it finds the PC, it will display it on the screen. Select the PC name. 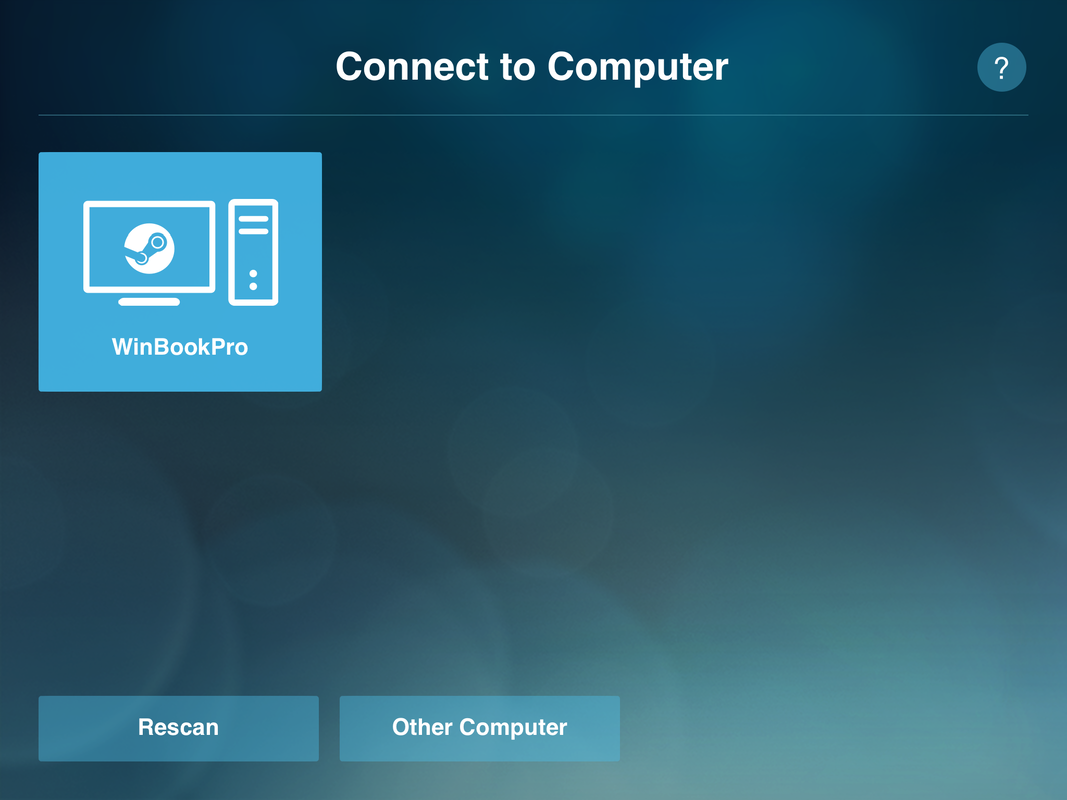 Select your Steam computer 12 - Once you are back on the main home screen, tap the Start Playing button. 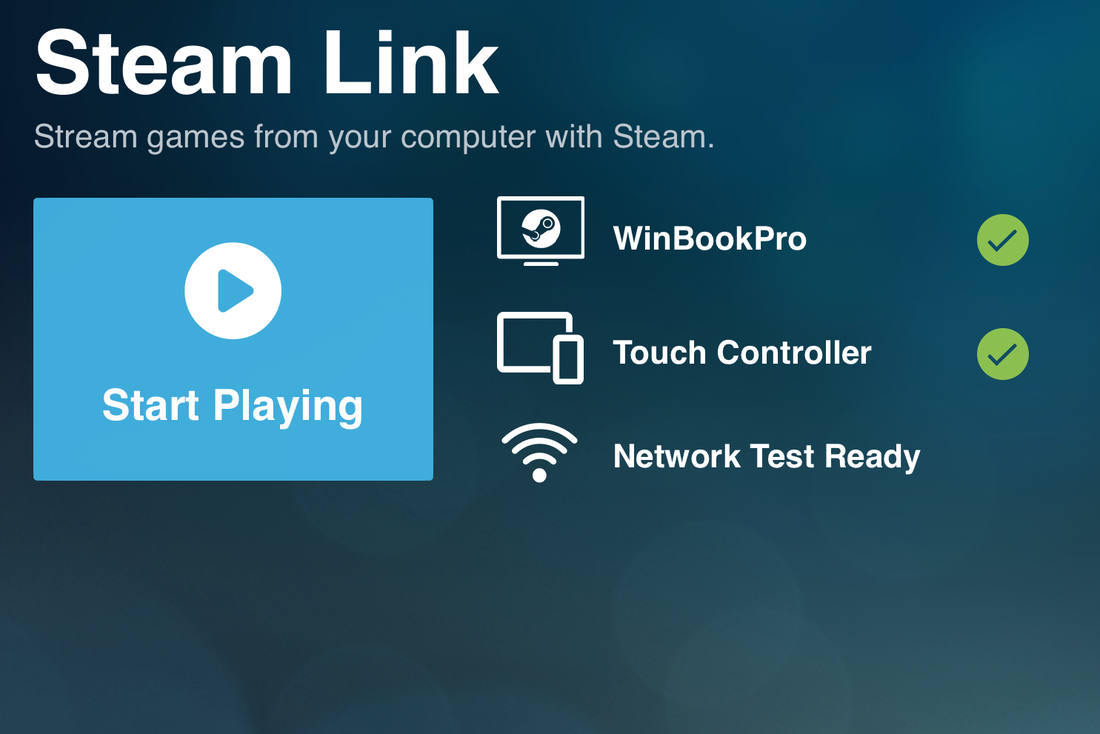 Start Playing! 13 - You will be presented with a list of touch controls, just click Continue.  Note these settings, then click Continue Watch your PC’s screen. It should launch the Steam Big Picture Mode. Both your PC and Device screen should look identical. 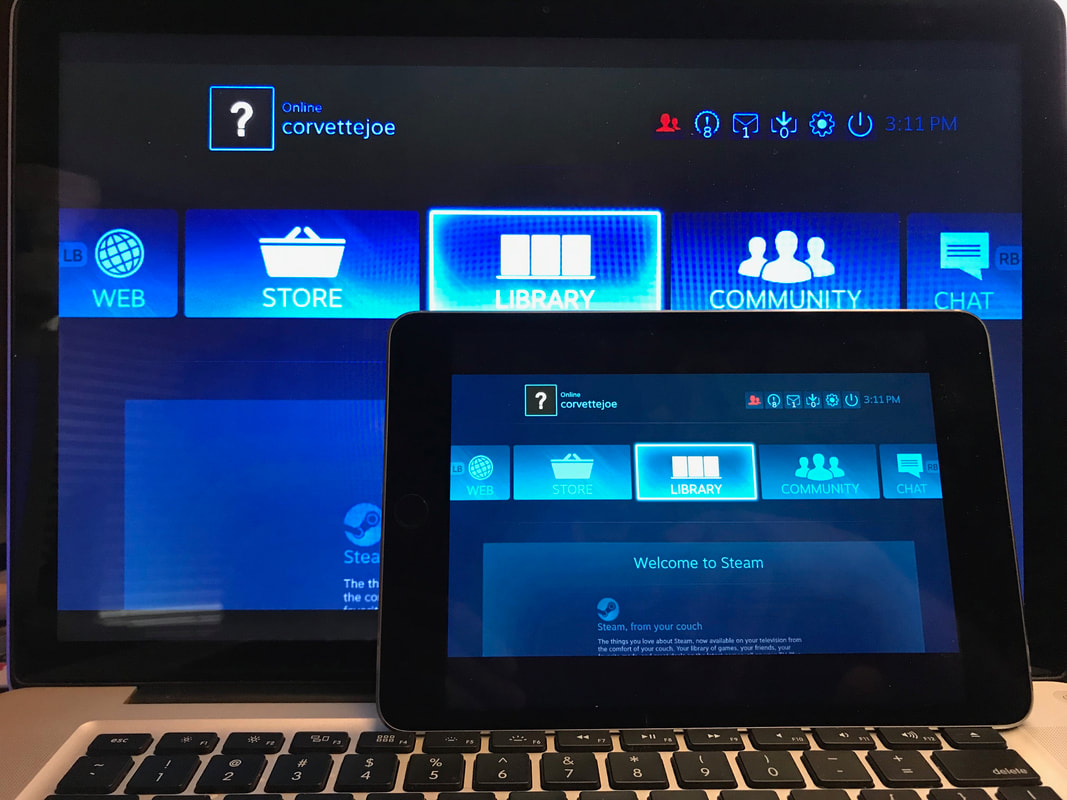 My Laptop with Steam running, with my iPad connected to it via Steam Link 14 - Select Library 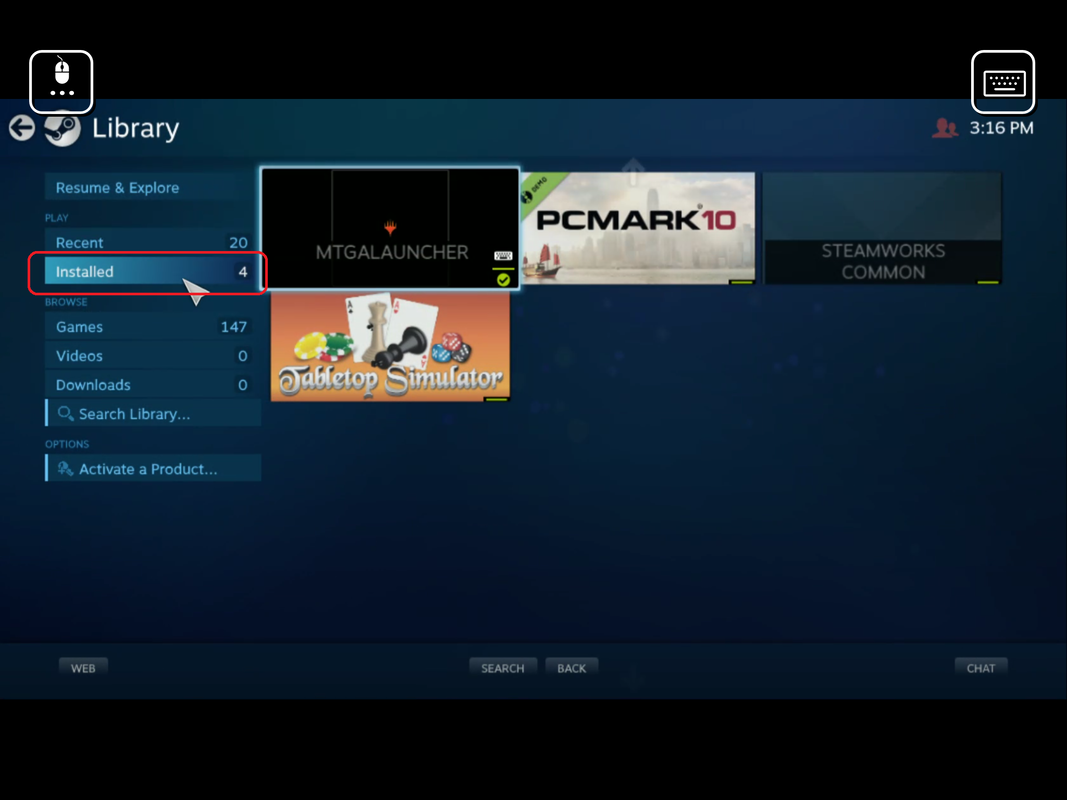 Looking for MTGA Launcher 15 - Select the Installed menu on the left. You should see MTGALAUNCHER listed here. If not, try to resolve the issue on your Windows PC. It will be a lot easier than trying to deal with it via the touch screen. 16 - Tap MTGALAUNCHER 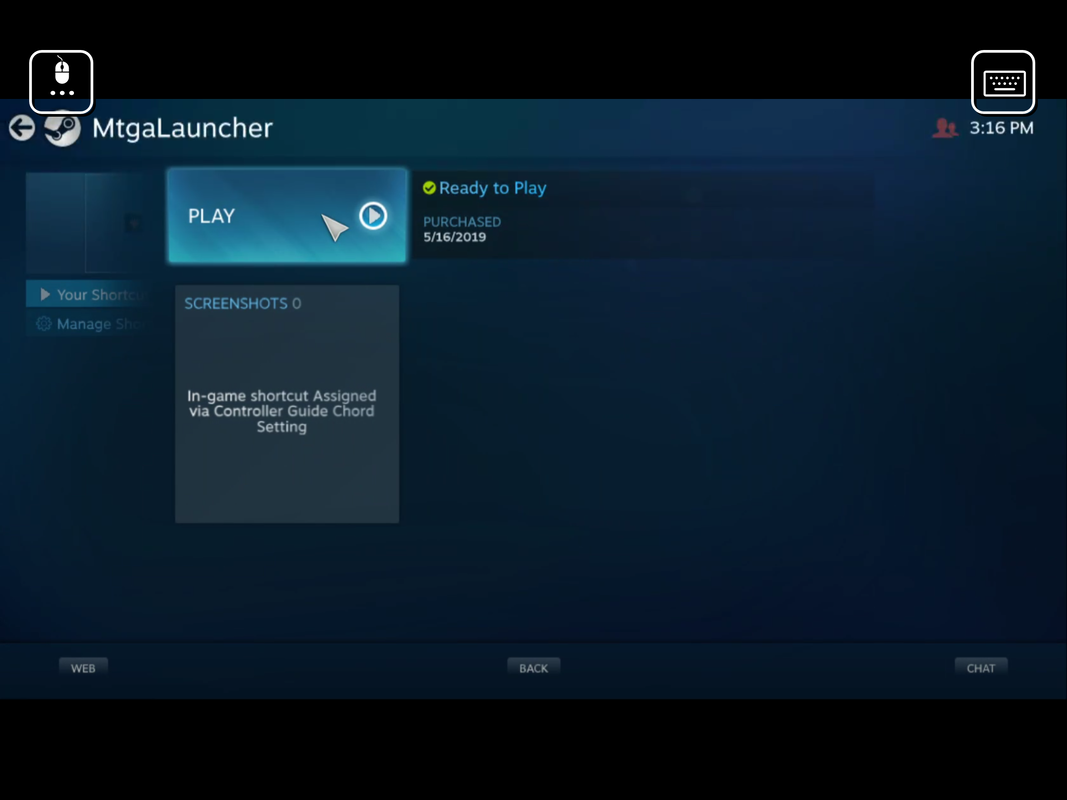 The final Play button! 17 - Tap Play. The game should launch.
If the Play button will not click correctly, look on your PC, and click the Play button with your mouse to help it out. This happened to be once, and after I helped it a little, it did not have any issues after that and worked perfectly.  Now, here is the wonky part. Since this system is not made for a touch screen through Steam Link, it may not perfectly. Be patient until you figure out what you are doing wrong if it does not work right away. Touching the cards on the screen works for the most part, but selecting them to read what is on them does not work that well since part of your finger covers up the card text. If you know your cards well, this will not matter at all. 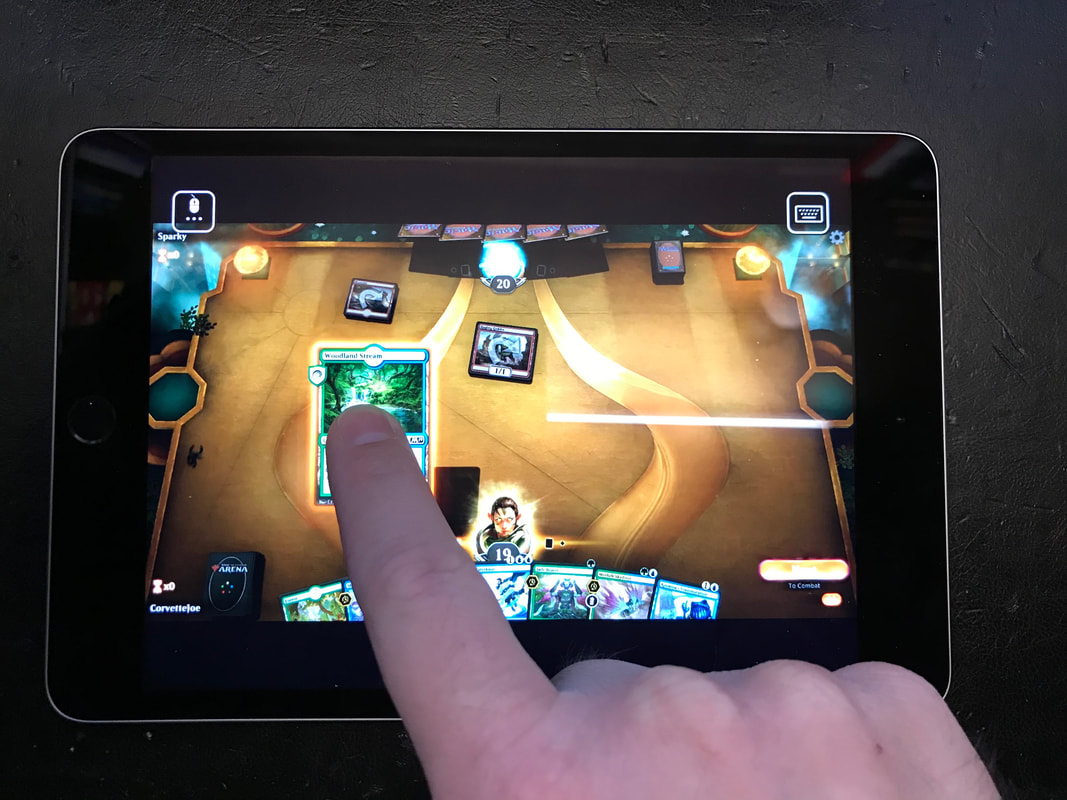 This will matter even more if you are playing on a smartphone, as your fingers will be covering up even more of the card from the smaller screen. I played one game with it against Sparky, and it worked pretty well. I think this would come alive on a larger tablet than the one I have. I am using an iPad Mini 4. While the 8in screen is large enough, it is just barely large enough. I do not think I would really play this on my phone this way. 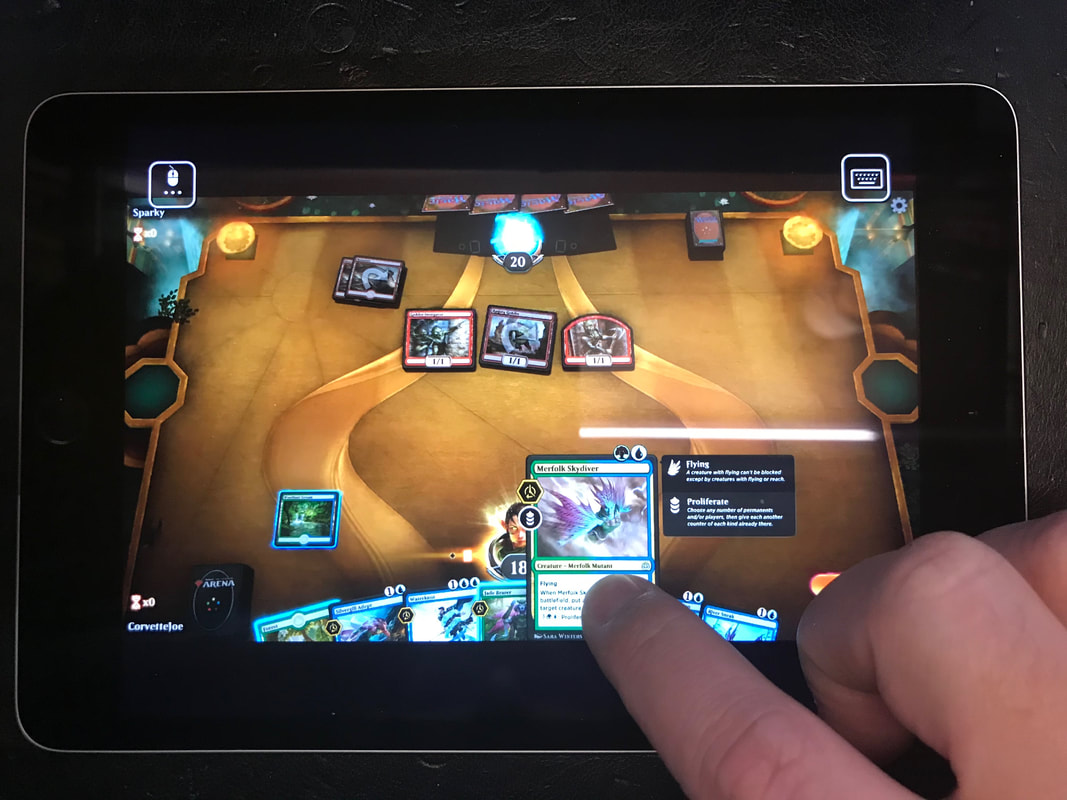 I would really like to have a cheap Windows 10 tablet for the best experience, but this works for now, and it is satisfying enough to use.
 I looked at several recipes for marinara sauce and found most had the same base, using whole peeled tomatoes and olive oil. The nice thing about this is that this is your own homemade sauce, you can make it exactly as you like it! Garlic and seasonings can be added to your taste. One trick if you like the flavor of onion, but don't care for the texture it gives marinara sauce, is to add half of an onion to the sauce while it cooks, skipping the mashing step and removing it before serving. My wife and I like chunky sauce, so we add more ingredients than most of the recipes out there. For our take on the sauce, we add mushrooms and Italian seasonings, but no salt. 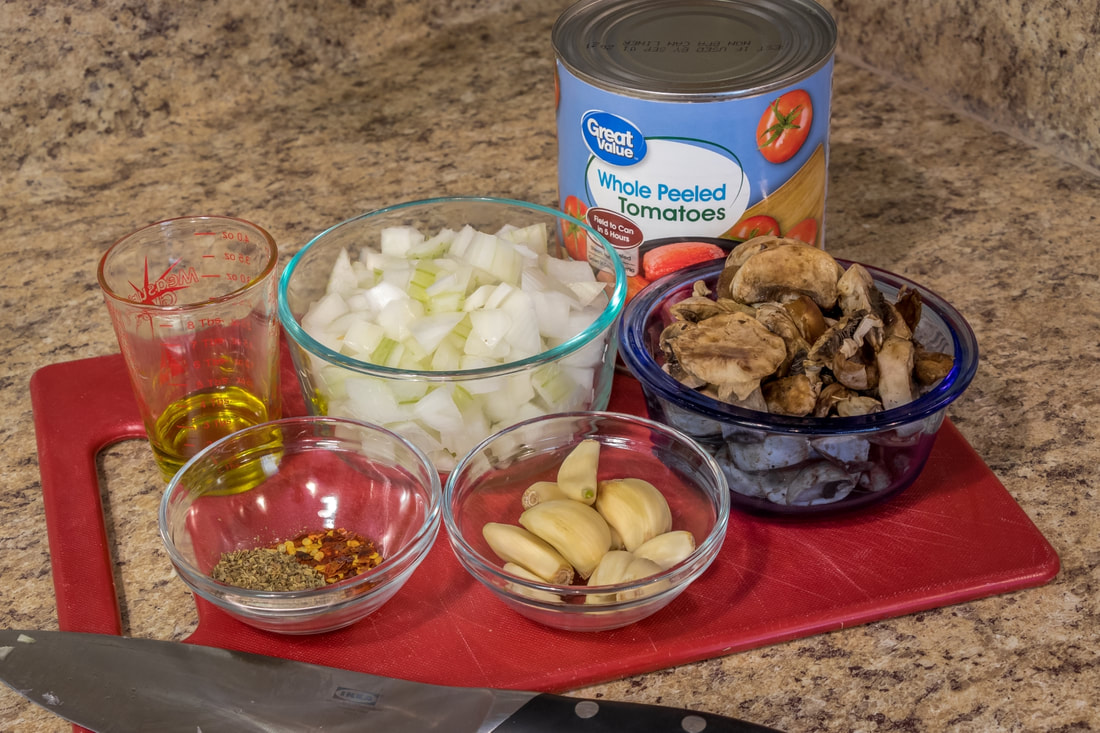 All the beautiful ingredients! Ingredients
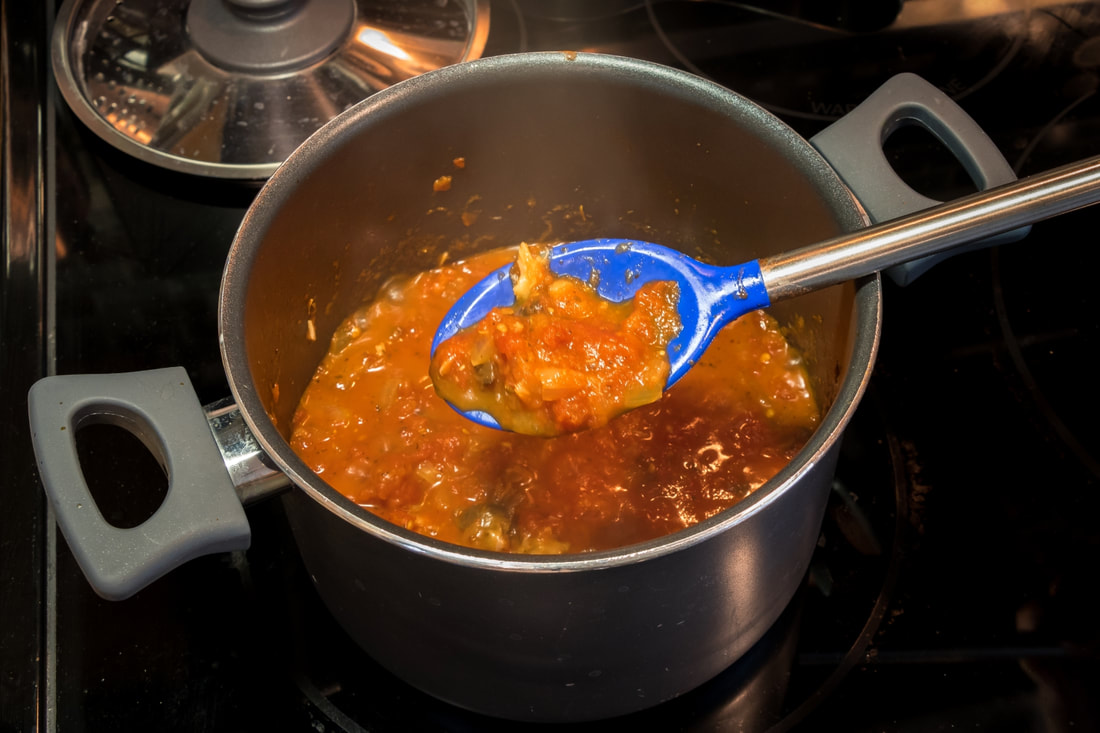
Directions 1 - Pour all ingredients into a small sauce pan.  Pour everything into a small sauce pan 2 - Stir them gently to fully mix, taking care not to break the tomatoes.  Stir everything together 3 - Bring to a simmer over medium/high heat, stirring occasionally. 4 - Lower the temperature, cover with a lid, and let it simmer for 20 minutes. 5 - Mash all the ingredients together, using a potato masher, or other hard utensil, then stir together. This should break up the tomatoes and garlic to start forming the sauce. 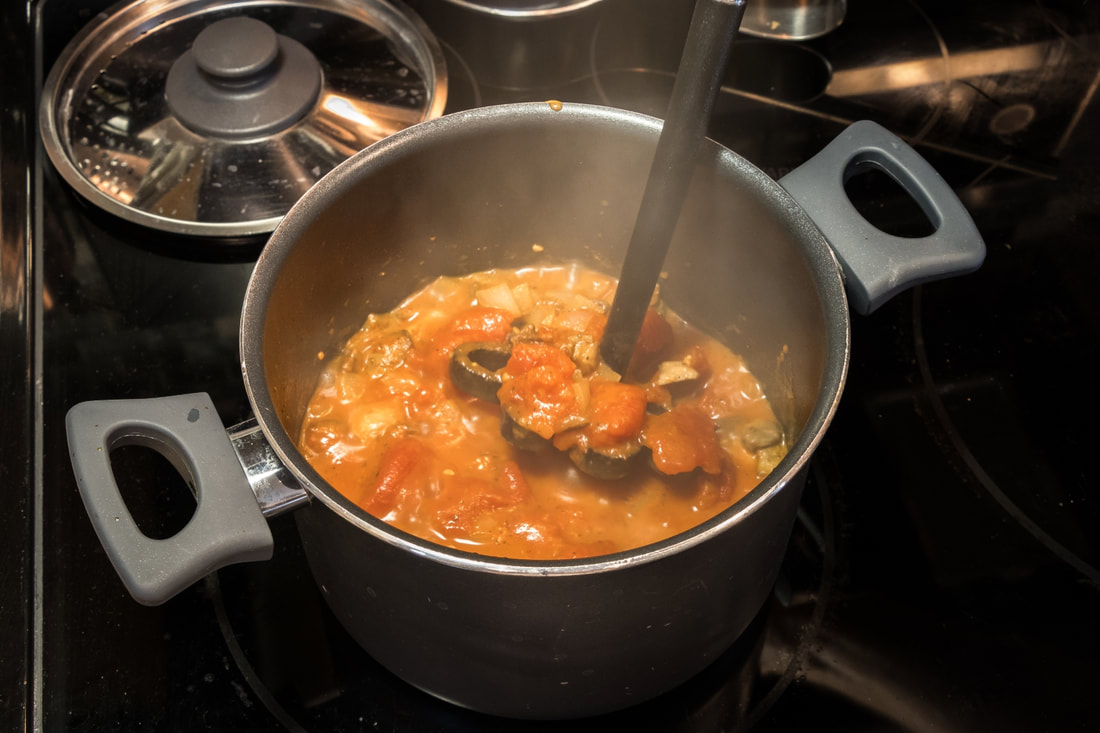 Mash it all together after it's simmered a while 6 - Let it simmer, covered, for another 30 mins. Stir occasionally. 7 - Mash the ingredients once more to break apart the onion and anything else that’s still in larger chunks, then stir together. 8 - Let simmer, covered, for another 10-15 mins or so, stirring occasionally. You may need to mash several more times every 5 mins or so while it's simmering it's final minutes. Awesome Sauce! 9 - It is pretty much done at this point. You can remove it from heat and set it aside. We will now go back to our pizza dough.
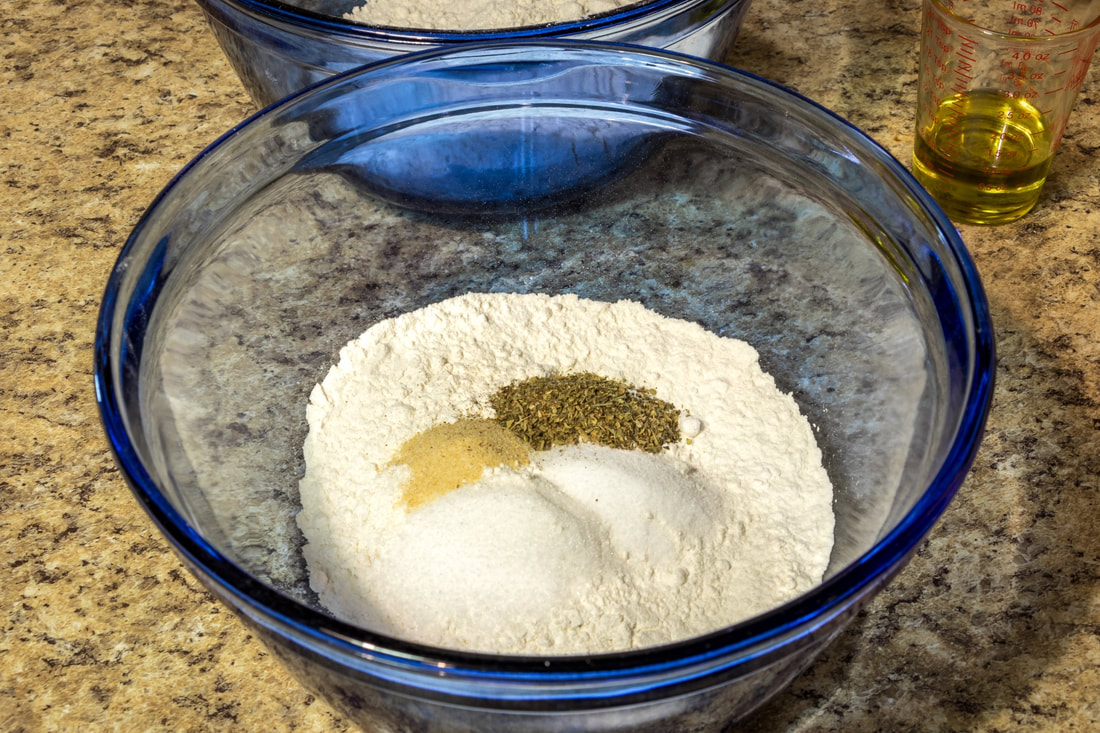
If you want the sauce less chunky, you can run it through a blender before using. You will have a lot of leftover sauce if you’re only making one pizza. There is usually enough left over to save for a nice pasta dish for a future dinner. Keep that in mind if you plan to blend it smoother for pizza use, you may want to set some aside for pasta or other uses. It makes great bread stick dipping sauce too! 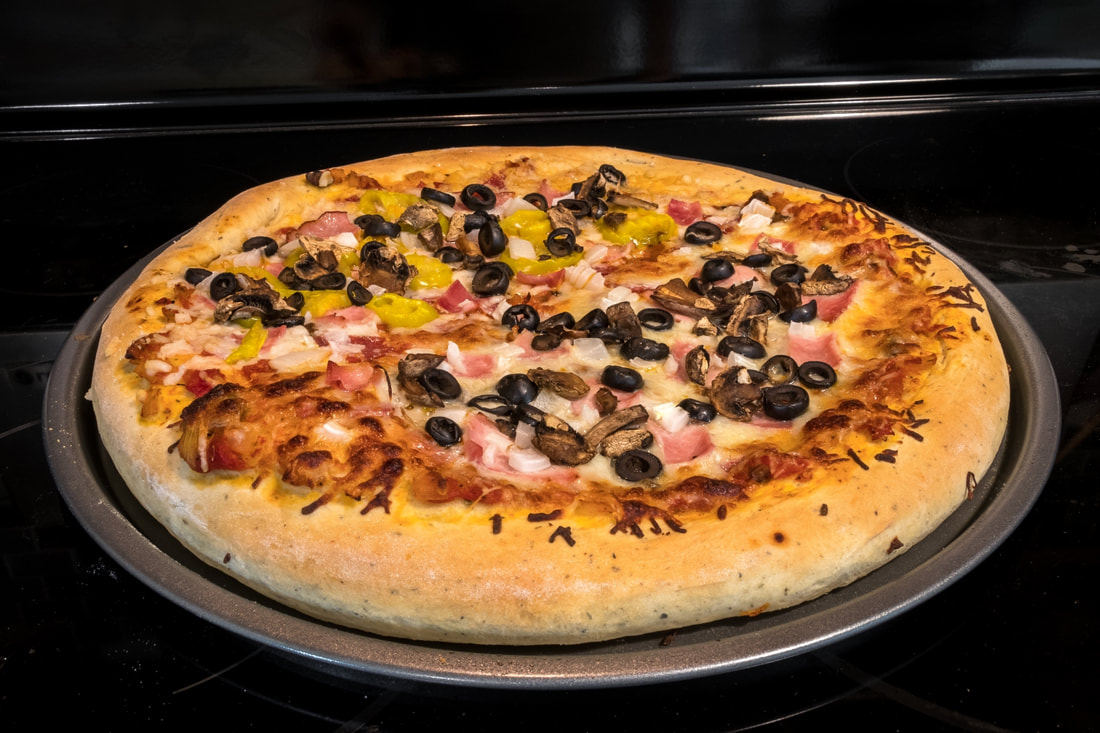 Have you ever wanted to make a gourmet pizza from scratch, but thought making your own dough and sauce would be complicated, difficult or expensive? You might be surprised that it is quite cheap and easy to make your own specialty pie. Restaurants may charge $14-18 for a pizza, but making your own only requires a little bit of physical work, and about an hour of waiting. I will walk you through doing all of this by hand with affordable ingredients, using utensils you most likely already have in your kitchen. For those with stand mixers, I will have alternate instructions at the end of the recipe. I find that many recipes also add too many steps into a recipe that are just not necessary. My goal with these recipe articles is to take either my own, or existing recipes, and re-write them to make them less complicated and easier to follow. I find that a lot of recipes miss out on important things that they assume people should know, or they just omitted an important step that is hard to figure out after the fact. This is very frustrating to new cooks, and I aim to fix that. Personally, I use a stand mixer for everything now, but I was at a friend’s house over the weekend and I wanted to make stromboli for his family for dinner. He did not have a stand mixer, so I showed him how to do it all by hand. I have not made it that way it in a while and forgot how easy it was to do. Now, let's make some pizza! Flour and Yeast For flour, I just use all purpose (AP) Flour. Nothing fancy, I use whatever store brand is the cheapest. For yeast, you can use either instant or active dry yeast. Both will work, but instant will make your dough rise faster. I bought a jar of Fleischmann’s Rapid-Rise Bread Machine Instant Yeast. I bake a lot, and it stores safely in the refrigerator for a long time. Unless you plan to bake a lot, I would recommend just picking up two packets of either type of yeast. I say two in case one is bad. This happened to me and it wasn't fun running to the store for more yeast in the middle of baking. Proofing Yeast How will you know if your yeast is "bad"? By proofing, or blooming, the yeast. I had no idea what proofing yeast was until well after I started baking. I noticed occasionally that my dough did not rise, but did not know why. I found out that it was most likely due to bad yeast. This can happen sometimes if the yeast is too old from sitting on a store or pantry shelf too long. Most dough recipes include water as an ingredient, which is the only thing you need to proof yeast. The simplest way to do this is to put your yeast in the water before adding it to your recipe. You will need to make sure the water is warm. Not steaming, but warm (100-110*F). I just let my kitchen faucet run on hot until it gets warm, then fill my measuring cup to the appropriate amount of water needed for the recipe. I then dump all the yeast into the water, give it a good stir, and then let it sit for several minutes. You can go ahead and prepare the rest of your ingredients while you wait, and when it is time to add the water, your yeast should be ready to go. 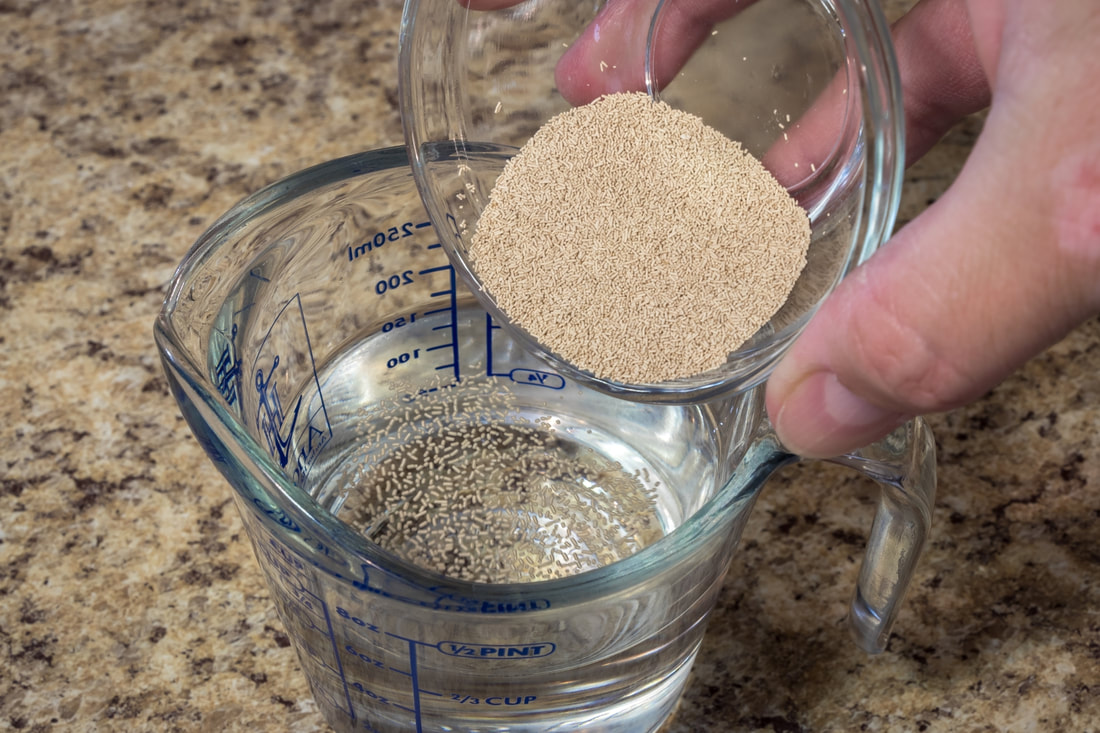 Pouring Active Dry Yeast into warm water What you are looking for is that the yeast granules have puffed or are dissolving and that the water is frothy. If you do not see any froth, stir again and let it sit a few minutes longer. If it still does not produce any froth, then the yeast is bad. Pour it out as you do not want to use it. Set your other ingredients aside and try again with new yeast. 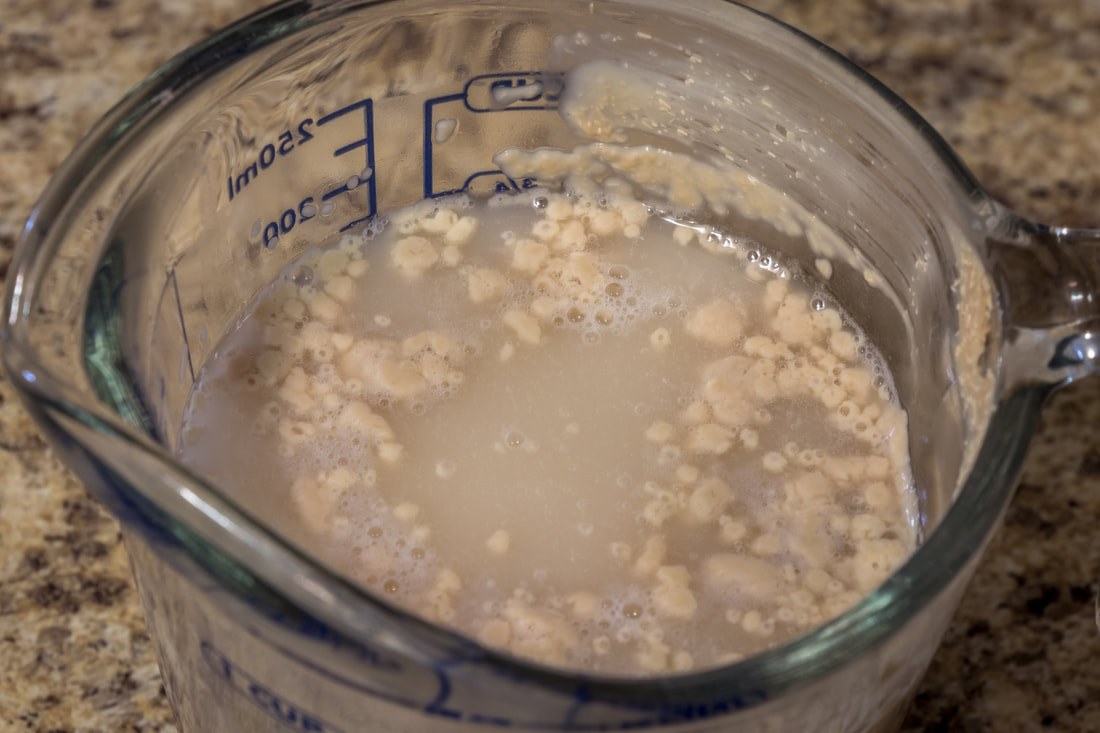 Blooming Yeast If using yeast in a packet, hopefully the next packet is good. If from a jar, it is possible the entire jar is bad. A second proofing attempt will tell you if you should continue with your recipe or not. Now, do not let any of this scare you. Once you have done this and have seen it work, it becomes a routine step you will do any time a recipe calls for yeast. Instant Yeast Technically, you do not need to proof instant or rapid-rise yeast. Instant yeast is always ready to use. The granules are tiny and can be directly added to your dry ingredients without having to proof them. However, I had one experience where I was using packets of instant yeast, and one packet was bad. My dough did not rise, and I had to throw everything away and start over. Because of this, I even proof my instant yeast now, as I cannot trust what I am using is good or bad, and there is no way to tell except by proofing. I also like that the yeast dissolves more thoroughly using water before you put it into your dry ingredients. That is just my personal preference, you don't have to do this if using instant yeast. I have also just poured the yeast right into the dry ingredients and produced the exact same dough that rose in the exact same amount of time. Now that you know how to proof yeast, let us get on to the recipe! Pizza Dough I have tried several recipes over time and came up with this one for my own liking. For all the newer bakers out there, I will be explaining some of these steps a lot more in depth than usual. I know I would have loved to have known these tips when starting out, but I had to figure it out the hard way since many directions are not very well written. 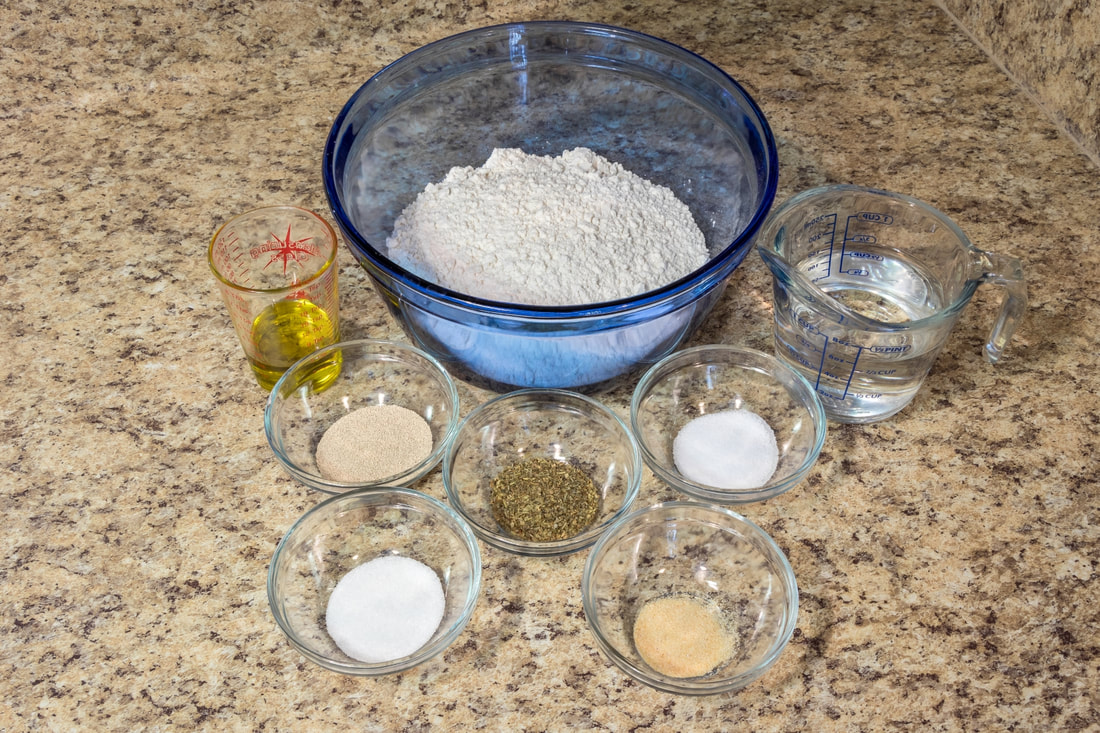 All Ingredients
Directions: 1 - In a large bowl, separate out 1 cup of the dry ingredients, and mix it with all of the wet ingredients. It will turn into a soupy mixture. 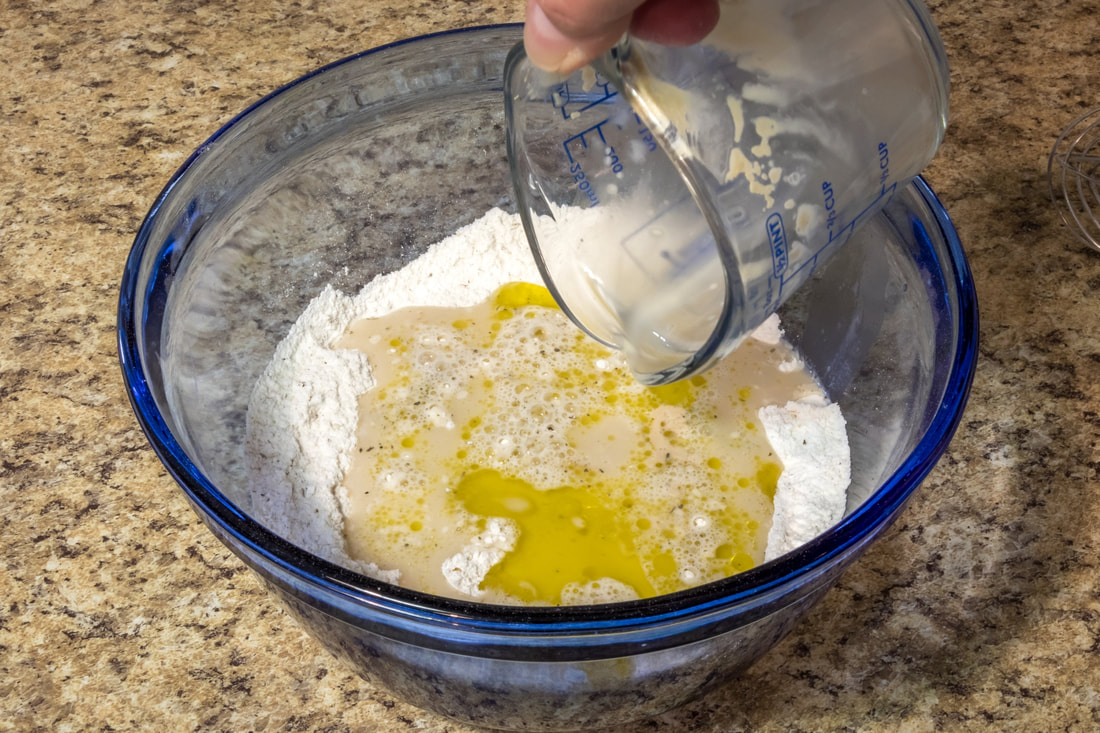 Pour wet mixture into roughly 1/2 of the dry mixture 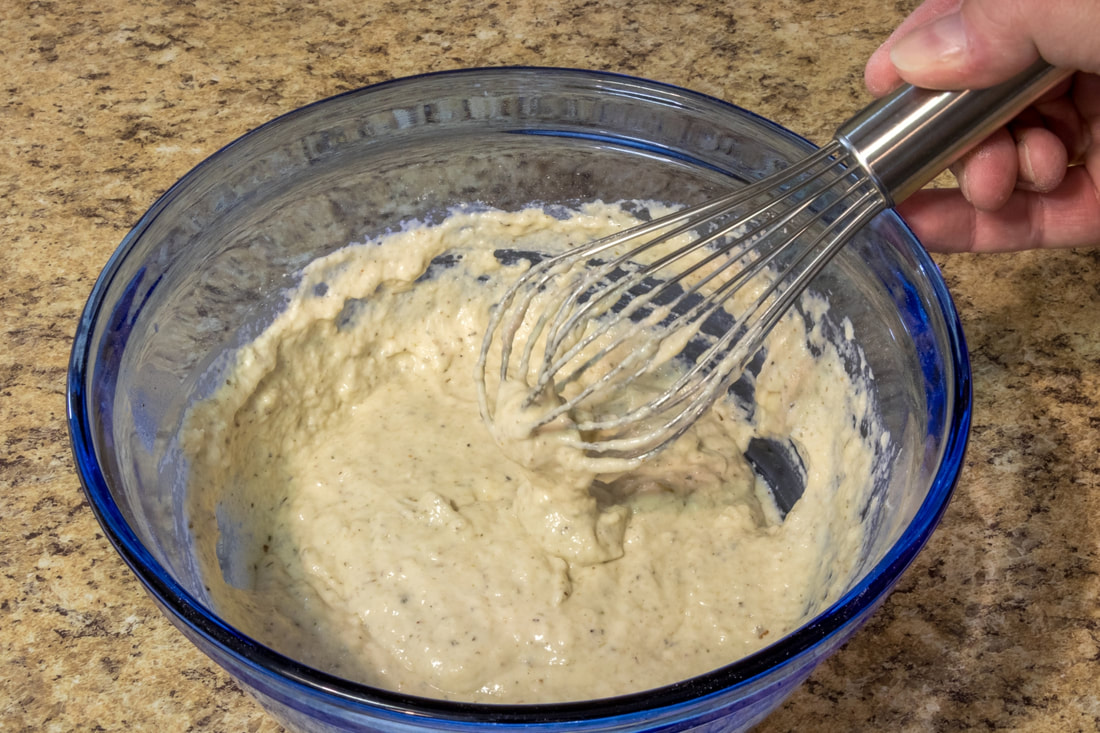 Mix well. Should look soupy 2 - Add ¼ cup of the remaining dry ingredients at a time, and keep mixing until a solid dough starts to form. 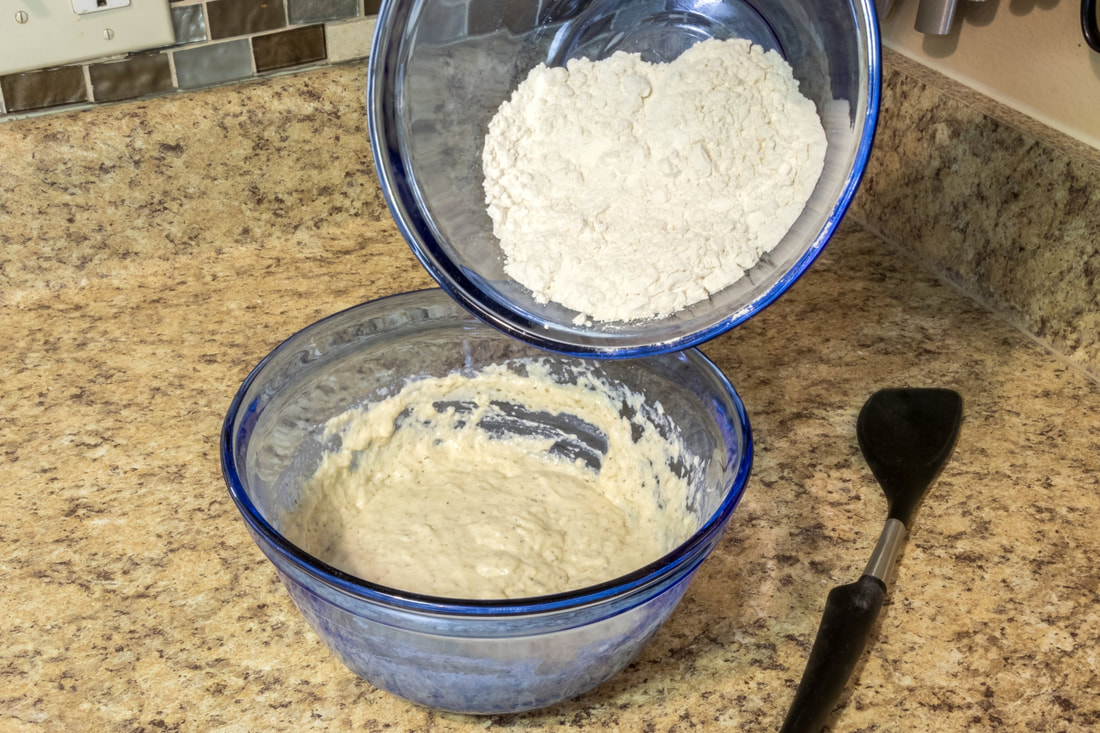 Keep adding 1/4 cup at a time between mixing 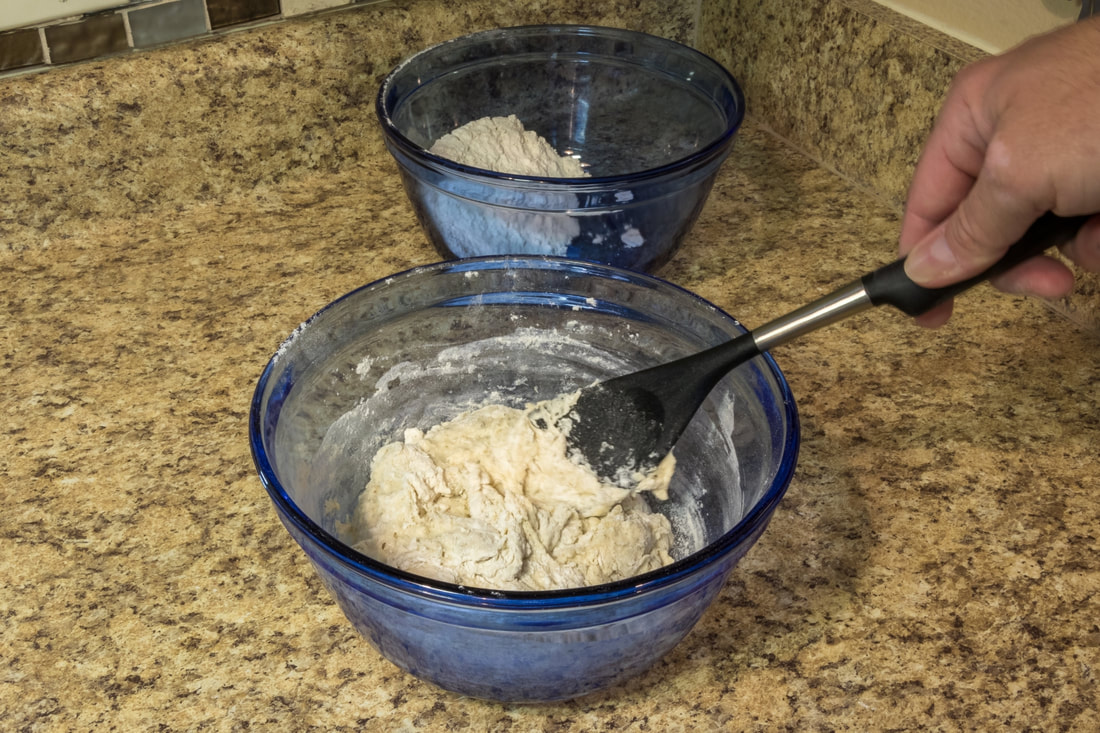 Dough starting to form 3 - If it is too dry, and the flower is no longer sticking, add the tiniest amount of water at a time until it starts to form a good dough again. By tiny amount, I mean barely ½ teaspoon. That is all you need to get it moist enough to take in more flour. Adding too much water will make the mixture too sticky. 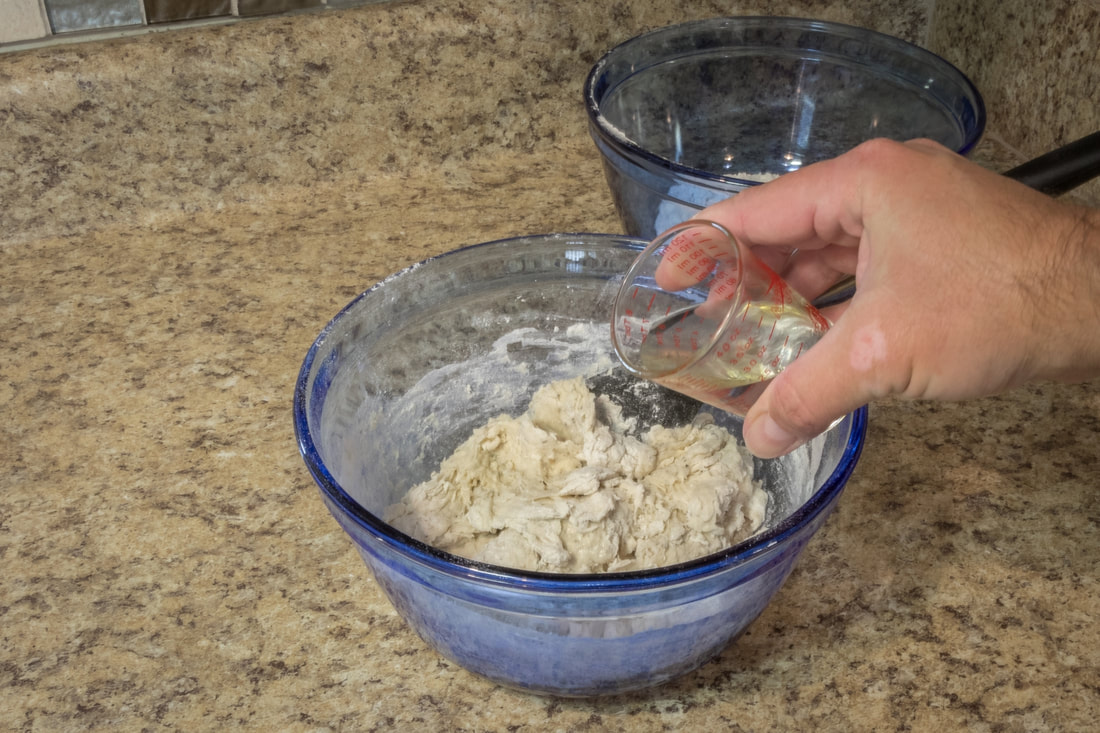 If dough too dry, add just a tiny amount of water. 1/2 teaspoon will do! 4 - Continue adding the flour ¼ cup at a time, adding tiny amounts of water as needed to get the flour to stick. You should have no dry ingredients left. The dough should be tacky, but not gooey or sticky. It should not heavily stick to your fingers when handling. If so, add a tablespoon of flour at a time and keep mixing it until it is no longer sticky. Once it is no longer sticky, it is ready for kneading. 5 - Sprinkle flour over a flat surface, I just use my counter top. Grab a small amount of flour in your hand, hold it a foot over your surface, and sprinkle it all over, giving it a nice dusting. Use more or less as needed, depending how sticky your dough still is. It should look like a light snow covering your surface. 6 - Take the dough out of the bowl and place it on the floured surface. It may be in a nice ball or may be in lumps like mine is in the photo. Either is fine. It will turn into a ball when you are finished with it. 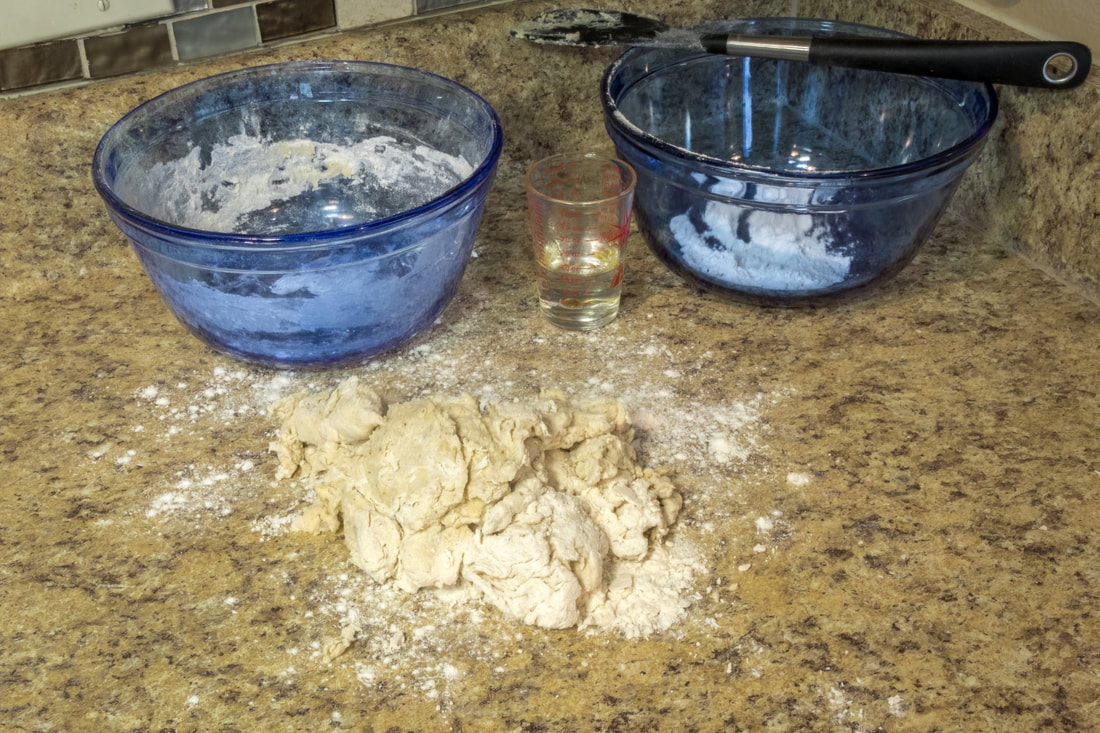 Remove dough and knead on hard floured surface. 7 - Knead the dough for a few minutes, pressing it out, folding it over itself, etc. until it has good elasticity. Make sure it is stretchy. If it is sticking to your fingers at all, sprinkle more flour on your work surface and on top of the dough and continue to knead it. Knead it gently into a ball shape when you’re finished. You should have a nicely formed dough ball by now. 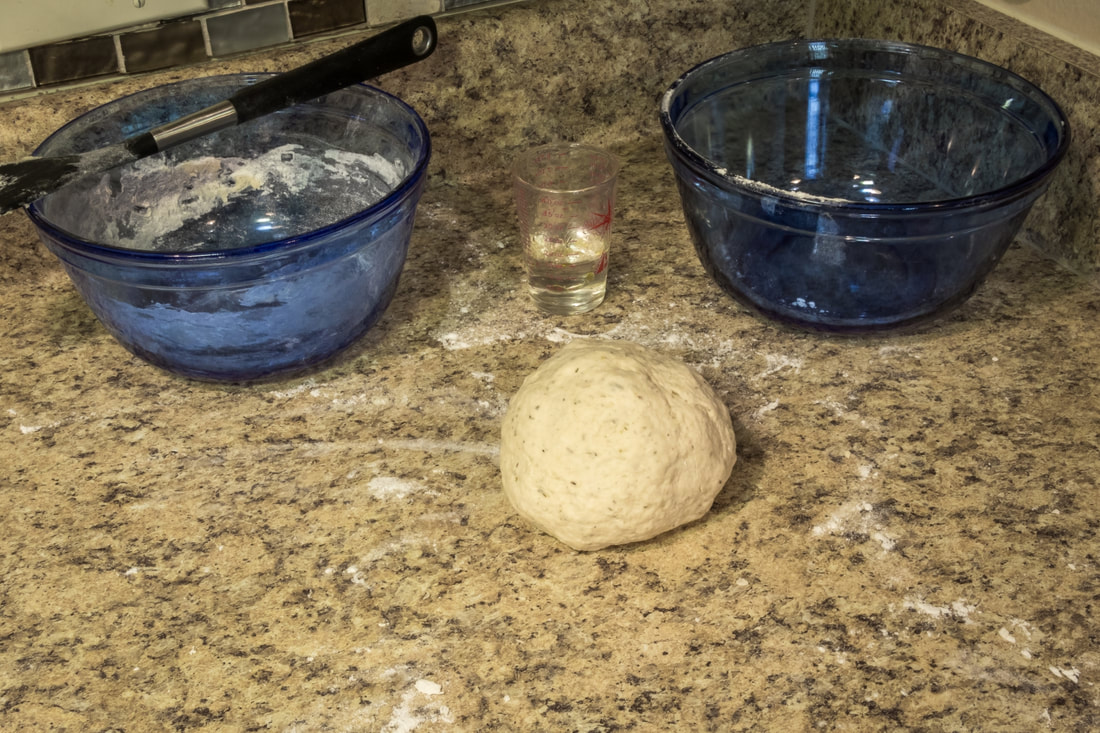 Knead until you can form a nice dough ball. Should be firm and pliable, but not sticky 8 - In a large clean bowl, spray (or wipe) a light coating of olive oil on the inside of the bowl.  Spray or wipe olive oil in a bowl  Set dough ball in bowl, then roll it around once to coat the entire ball with the olive oil  Finished oiled dough ball, ready to start rising!  Cover with plastic wrap or a towl While the dough is rising, you can make your marinara sauce. Since I wanted to make this as one start-to-finish recipe, I will keep these two recipes in the same article for ease of use. Marinara Sauce Rather than make one huge post, you can click here to see the Marinara Sauce how to. Once your sauce is ready, or if you are going to use sauce from a jar, then continue on. Making our Pizza Now comes the fun part. Building your very own gourmet pizza, using the dough and marinara sauce you just made! 1 - Check your dough; it should have risen fully by now. Notice the dough in my photo has doubled in size from the small dough ball to nearly filling the bowl with soft, puffy dough.  Risen Dough 2 - Gently punch the dough down with your fist to let all of the air out. You only need to press gently, you don’t need to pummel it. 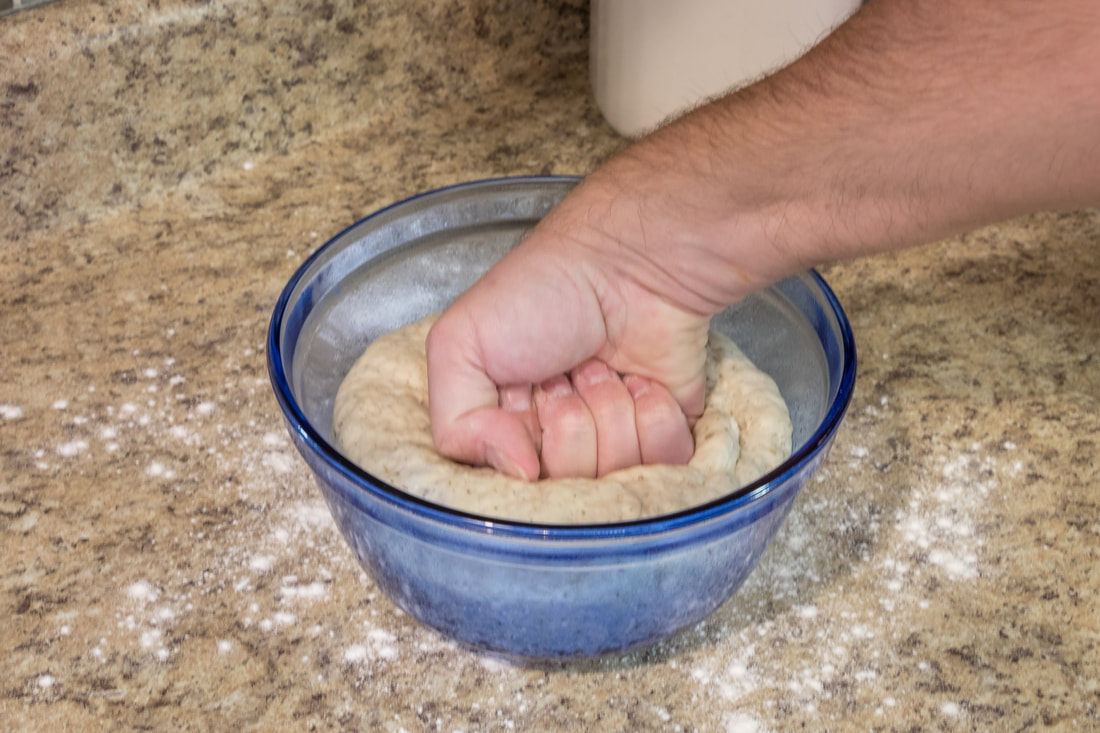 Gently let the air out 3 - Remove the dough from the bowl and knead it for another minute on a clean, floured surface to form a nice dough ball again.  Need to Knead 4 - Roll your dough out into whatever shape you wish. In this instance, I am making a round pizza. You can make a square pizza, you can roll it into a Stromboli, you can fold it in half for a calzone. You can cut it into pieces and make bread sticks. This dough can be used for whatever pizza dough creations you like. 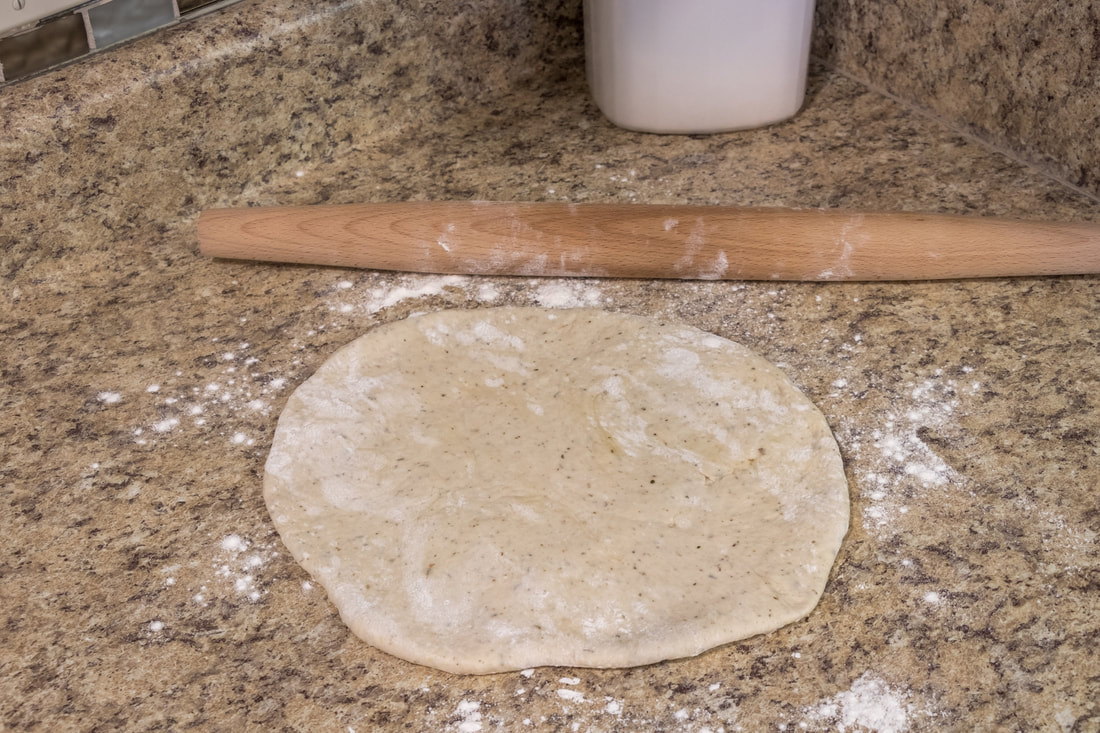 Roll your own For ease of use, I use a pizza pan. I used to use a stone, but I just can’t get the pizza to slide onto it very easily into the oven, so I just use a pizza pan to make it easier on myself. You can use a rectangular baking sheet too. There is no wrong way to do this. Just make sure the shape of your dough fits whatever you are putting it on. 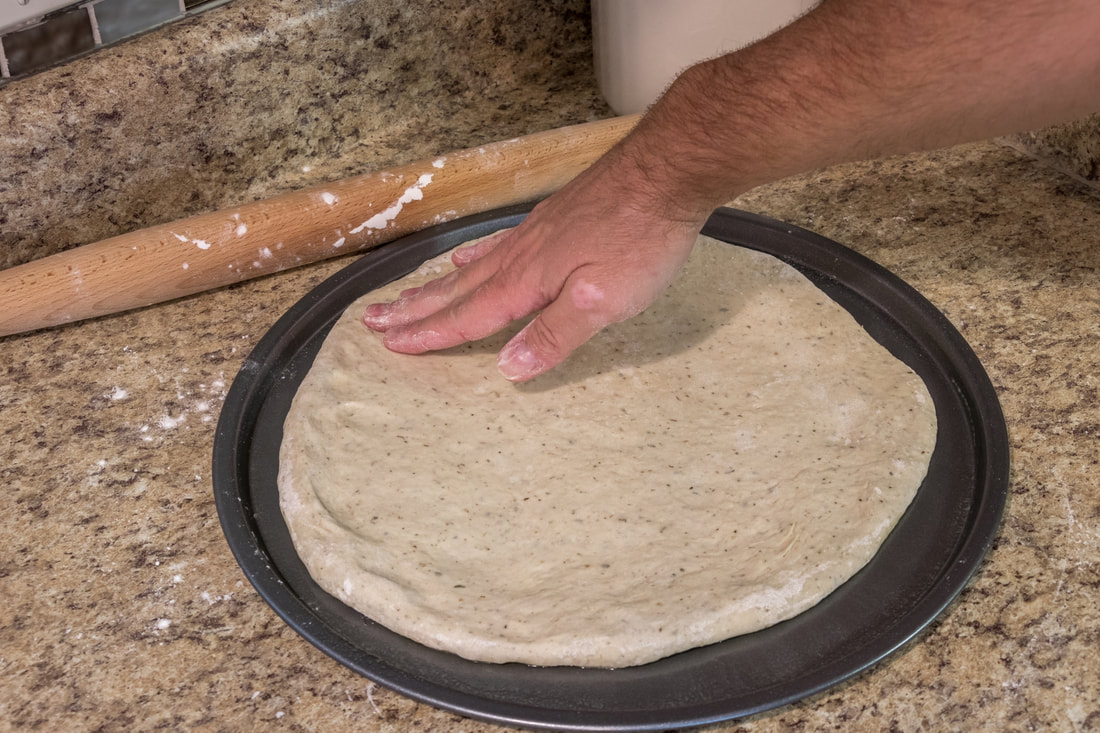 Form to whatever pan/surface you're goign to use in the oven Pizza Toppings What do you put on a pizza? Whatever you want! There are no right or wrong ingredients for your homemade pizza. My wife has a dairy intolerance and will be using non-dairy mozzarella, and for some reason she likes banana peppers, so her half will have those. My half will have regular mozzarella cheese and no banana peppers. The rest of the pizza will have the same shared ingredients across both halves. For veggies, I went with onions, mushrooms and olives. For meats, I went to my local grocery store deli, and bought all Boar's Head meats. I got four slices each of hard salami, sandwich pepperoni and a bourbon smoked tavern ham. The meat only cost about $4 total, which is as much as a small package of cheap pepperoni. The taste is so much better using higher end meats. 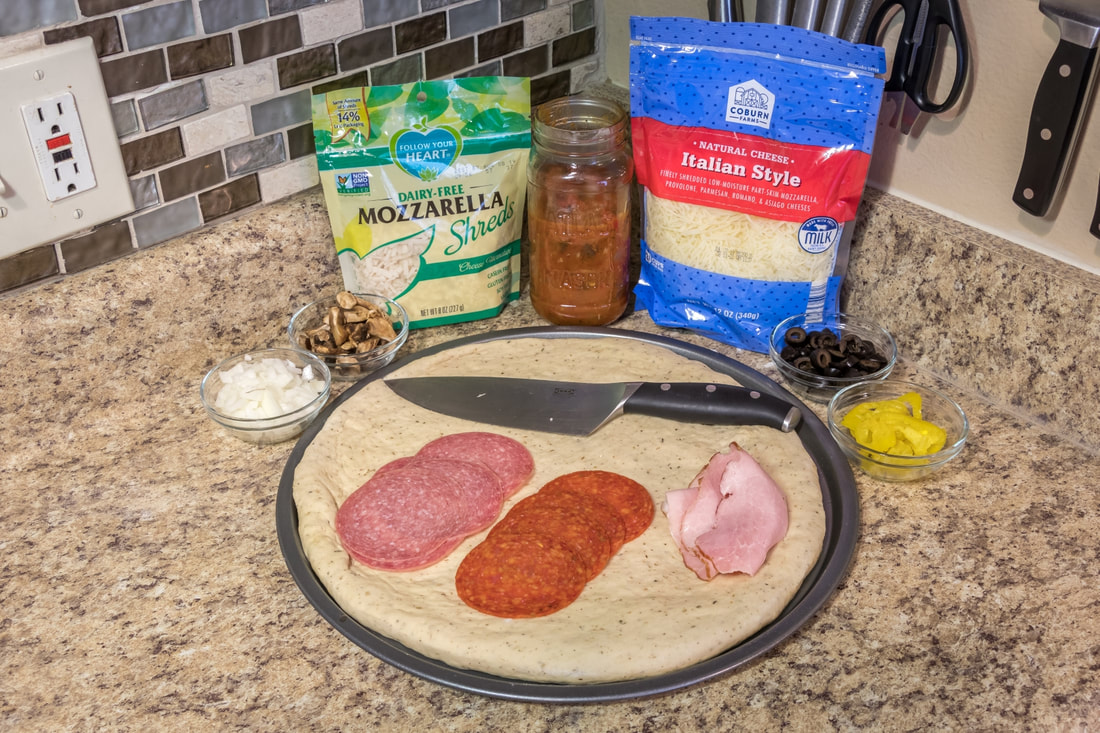 There is no shame in using whatever you have around the house. Typically, we just use cheap pepperoni and whatever random lunch meat we have in the refrigerator. If using lunch meats, cut them into smaller pepperoni sized pieces so you aren’t biting into large pieces of meat that will tear and slide off later. Layering your toppings: Typically, I start with sauce, followed by a meat layer or two. I then add my cheese layer, then another layer of meat (if you have more) followed by the rest of the toppings, such as veggies and mushrooms. If you want more cheese, add more to the top!  Baking the Pizza Cost Breakdown
I hope you enjoyed this recipe. My wife and I make this a few times a month. We typically save the left over marinara sauce for making a nice meaty pasta dish. That sauce is amazing! If you have any suggestions for future recipe write-ups, please leave a comment or write me an email. Dirt Cheap and Goodwill Hauls Last week I had an out-of-town friend stay with us. While he was here, we hit up a couple of thrift stores. At the end of the week, we road tripped back to his house, and stopped by a couple more thrift stores in various towns along the way. I stayed with him over the weekend, and on one of the days, we went out to visit a trio of Dirt Cheap stores for some crazy bargain shopping. For those that have never visited a Dirt Cheap store, they are located mostly in the southeastern United States. These stores appear to buy liquidated items from WalMart, Target, Sam's Club, various home improvement stores and clothing stores. The majority of the items are either overstock, returned items or items that made it to clearance at their respective stores and still didn't sell. This is the store where things come to die... I mean, find a loving new home! I am going to break this trip down into multiple articles with multiple categories of interest. We found home improvement items, toys and games, kitchen items and more. I try to find some excuse to travel to this area every few months, just so I can shop at Dirt Cheap. There are two areas with three stores each. The Columbus/Phoenix City/Auburn area and the Dothan/Enterprise/Ozark area. There are three stores in each of these two areas that are all within 20-30 minutes apart from each other, making it a good solid day of shopping. Thankfully, I have friends and family that live in both areas, which is about 6-7 hours away from where I live. My friend had never been to a Dirt Cheap, so I was ready to blow his mind with bargains. Since I can't remember what all I got at which stores, this will be a mix of everything broken down into categories from all of the stores combined. We visited four Goodwill and three Dirt Cheap stores over three days. Here's a camera phone shot of our total haul when we got back to his house after Day 3. This is everything from the multiple Goodwill and Dirt Cheap stores from both myself and my buddy. 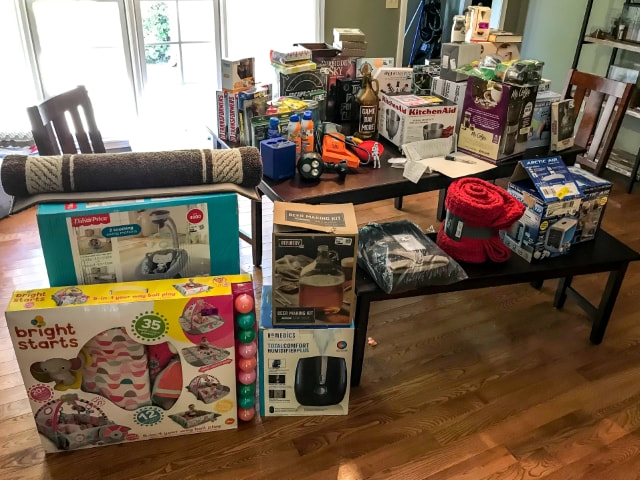 Let's start with the kitchen items. Teavana Perfectea Maker 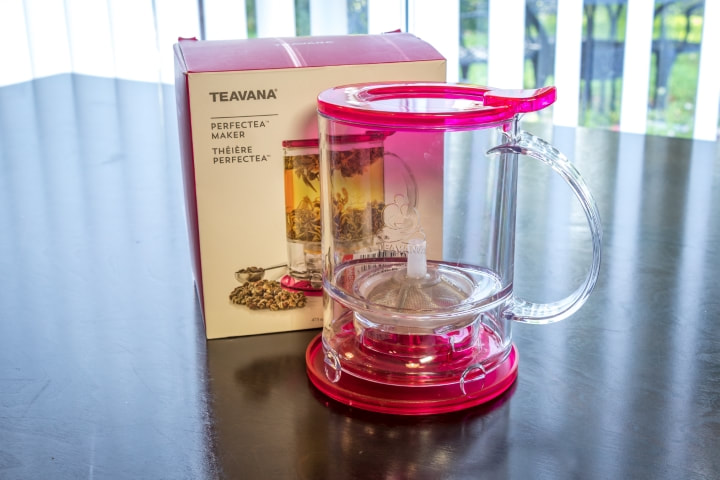 Got this at Goodwill. My wife loves hot tea and I remembered seeing these in use before all of the Teavana stores closed down. I thought I remembered these selling for $25 at the time in stores, but the only price point I can find now is new on Amazon for about $20, depending on the color. This was an especially great score, since my wife loves hot pink. These tea makers allow you to put in your water and loose leaf tea to steep. When it's ready, you simply set the tea maker on top of your cup. The rim of your cup will press up into the tea maker and allow it to release all of the tea down into your cup. You then just wash the tea maker out as you would any other type of cup. It's easy to clean and simple to use. This is the third one we've seen at Goodwill, and the second one we purchased. I would encourage picking these up any time you see them. They make excellent gifts, too! Retail Price (Pink): $16.95 (Amazon) My Price: $2.99 Retail Price (Black): $21.99 (Amazon) My Price: $.99 Total Savings: $34.96 Silicone Utensils and Sauce Containers  I am always on the hunt for high-end silicone utensils. I am trying to replace all of my worn-out cheap plastic and pan-scratching metal utensils. The utensils are all nic and stiff in the center with soft edges. Some utensils are very floppy and cheaply made, but not these. The red ladle is an expensive brand and will be perfect for all of my soups and sauces. The yellow "spoonula" is made by Wilton, one of the better baking brands. The blue spatula has no brand on it, but has the same shape and hole cutout as Wilton. It looks exactly like the Wilton one that I found on Joann's site, so we're going to go with Wilton, or a very good knockoff, for pricing purposes. The ketchup and mustard bottles I am planning to use for some of the custom sauces I am experimenting with. It's also easier to drizzle sauces with this type of container when creating plated food art. I make homemade BBQ sauce from time to time that I would like to have a container for, instead of just leaving it in a jar. These are perfect for that. Now that I am thinking about it, I should have picked up another pair. These are unbranded, so when looking for price comparisons, I just went with the cheapest generic ones I could find on Amazon. These were all found at Dirt Cheap. Ketchup and Mustard containers Retail Price: $3.58 My Price: $.54 Get It Right Ultimate Ladle (red) Retail Price: $15.99 (Amazon) My Price: $5.40 Wilton Silicone Spoonula (yellow) Retail Price: $5.49 (Joann's) My Price: $2.69 Wilton? Silicone Spatula (blue) Retail Price: $5.49 (Joann's) My Price: $1.35 Total Savings: $20.57 Ball Mason Jars 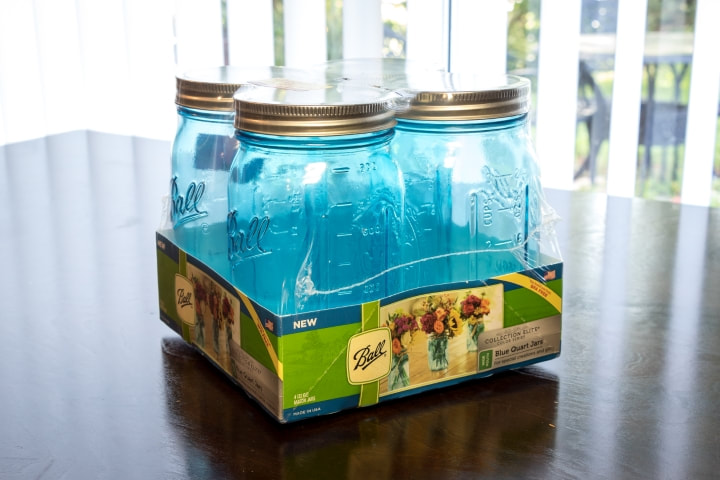 I have been needing more mason jars, but didn't want to pay full price for them. I've been looking for mason jars at Goodwill, but often they are worn and priced too high. I ended up finding this bargain at Dirt Cheap. These are nice because they are brand new and they are the special aqua blue color, which I happen to love. I use these mainly for homemade salsa and marinara sauce. But we also use them for other storage as well, such as large batches of marinade or dry rubs for my BBQ. The used ones in Goodwill have been about $2-3/ea. These came out to $1.34/ea brand new. Retail Price: $11.92 (Amazon) My Price: $5.39 Savings: $6.53 KitchenAid 4.5QT Mixing Bowl 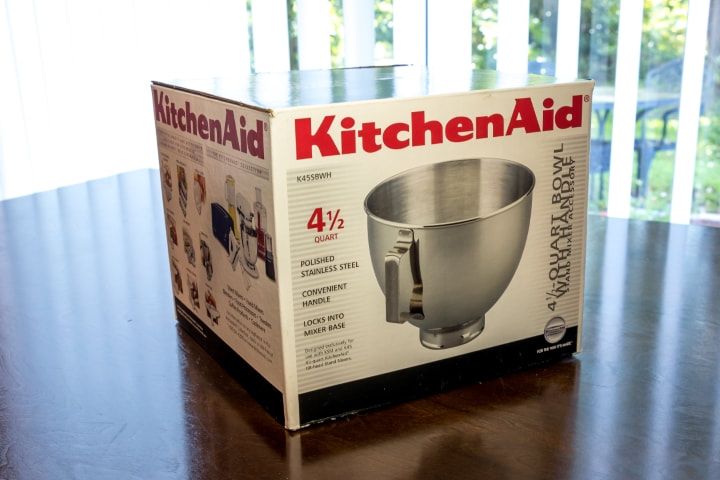 I needed a second mixing bowl for my KitchenAid stand mixer. I double a lot of recipes, or have multi-part mixing needs in single recipes. I usually just grab another mixing bowl and try to figure out what to put in each one so that I can keep the main one free to be attached to the stand mixer. With a second stand mixer bowl, I don't need to worry about that anymore. This is the upgraded version of the bowl that came with my mixer. Mine doesn't have a handle on it. I'm not sure how useful I will find the handle, or if it will just get in the way. After all, mixing bowls in general don't have handles. I found this at Dirt Cheap. Retail Price: $39.99 (Amazon) My Price: $17.64 Savings: $22.35 Home Brew Kit 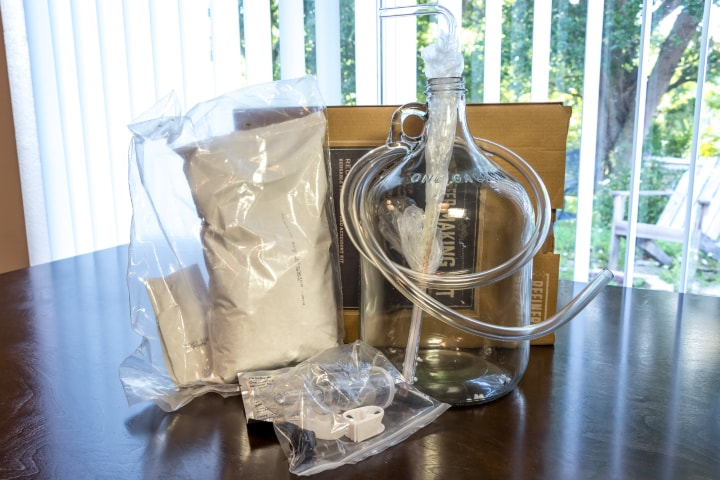 Ok, before all the home brewers out there laugh at me, as my home brewing buddy that was with me did, I only bought this for the tools within. Yes, I will be brewing the batch of beer that came with it, just to try it, but this was all purchased for a different reason. In the past couple months I started making my own ginger beer. I am using the ginger bug method before transferring to a ginger tea. The whole process takes a week or longer and I am just using glass cylinders and plastic 2-liter soda bottles. I have been interested in a small carboy like this. My brew buddy told me I should also invest in an airlock and wand to make the process easier. When we opened up the box, I was surprised to find all the parts inside, including the exact three items I was looking for! It also has a thermometer included, too. I will have future articles around making this batch of beer, as well as all the ginger beer I will make afterwards using these parts. This was one of the items I was most excited about finding at Dirt Cheap. This appears to be a Target exclusive item, as I can't seem to find it anywhere else. The box shows it's from "Refinery and Co." and it's just called "Beer Making Kit." I found it on Target's website, but with a different box and name. It's the exact same contents and is no longer sold. As a bonus, the grains and packaging inside are all still within date for another six months. Retail Price: $29.99 (Target) My Price: $6.75 Savings: $23.24 KitchenAid Pasta Roller Attachment (KSMPSA)  After rolling out my first pasta dough by hand, I realized I never wanted to do it again. A friend had a hand-crank pasta roller that she let me borrow to try out, and I absolutely loved using it. At that point I realized I must have a pasta roller.
I wanted the KitchenAid attachment, but it was way too expensive for my budget. I started looking for used units, but people were still asking too much for them. I finally found a winner on eBay! There was a seller that had this broken unit for $16, plus $11 for shipping. I inquired about what was broken. It turned out it was just the shear-shaft. While these shafts are not replaceable from KitchenAid, there was someone online that was making his own for these units for a reasonable price. I purchased the replacement part for $10. Once I received it, I realized it was for an older model. Being new to these attachments, I didn't know there were different models, and I thought I had the right one. I found the right part from the same guy for $20. So all-in, I have $56 invested into this $90 attachment. I ended up finding a brand new one someone was selling on Amazon for $60 shipped. A few weeks later knock-off models started showing up for $45 shipped. Oh well, I still saved something on an item I wanted and needed. You can't win them all. It was really easy to repair, and only took two minutes to swap the broken shaft out with the new one. If you can find a broken one cheap on eBay/CraigsList/etc., or know someone that has one, I would highly recommend getting it. But do factor in shipping, repair part, etc. vs. a knockoff or new unit. Retail Price at the time: $89.99 Retail Price Now: $59.95 Knock Off Price: $45.99 My Total Price: $56 Savings: $4-$34, or -$11 compared to the knock off Replacement Shafts found here: KPSA Repair Stuff I didn't buy I had one item I picked up at one of the Dirt Cheap stores that I carried around in my cart for an hour, deliberating on getting it or not. I didn't need it, but it would have been a nice upgrade, or could have easily been flipped. I found a Kitchenaid Professional 5 Plus Stand Mixer. They had a $550 tag on it with 60% off, bringing it to $220. This is $20 more than the price of the cheapest Classic series! After a short debate with the wife, I decided to leave it behind. I didn't really have the money since I couldn't guarantee I could flip it, nor would I make a ton off flipping it anyway. It would have just been a nice upgrade for the price, then I could sell mine. The model I have is the Walmart exclusive Deluxe model, that is basically the Artisan with the upgraded motor that I got for $199 around Christmas time when it went on sale, which was a bargain in itself! Mine is also the cobalt blue model, which I absolutely love. The Pro 5 I found was the standard silver color. Had the Pro 5 been any other color, I probably would have bought it to upgrade mine. The main differences are: Deluxe: 325W motor, 4.5QT bowl, Tilt Head Pro 5: 525W motor, 5QT bowl, Lift Stand Basically I could mix heavier dough, or be able to make double batches of certain recipes with the Pro 5 model. Well, I hope you all enjoyed checking out my latest kitchen upgrades. The next article will continue with the other categories of items I purchased on this trip. Thanks! Joe |
Categories
All
Archives
August 2022
|

- Home
-
Abandoned Travels
-
Abandonments
>
- 2014-2015 >
-
2013
>
- CMX Construction
- Orange House 01
- Fertilizer Plant
- Egg Plant
- Box Plant
- Ellaville Bridge Revisited
- Gold Kist Farms Silos
- Lafayette House 03
- Columbia House 01
- Columbia Barn 01
- Cash's Towing
- Coastal Revisited
- Suwannee Shack
- Hernando House 01
- Lafayette House 02
- Lafayette House 01 Revisited
- Lafayette Chimney Revisited
- Lafayette Quarry Revisited
- Williston Urbex
- Elljay Garage
- 2012 >
- 2010-2011 >
- Travels >
- Nature >
- Water >
-
Abandonments
>
-
Games
- Food
-
VATS Sucks
- Stuff
- About


 RSS Feed