|
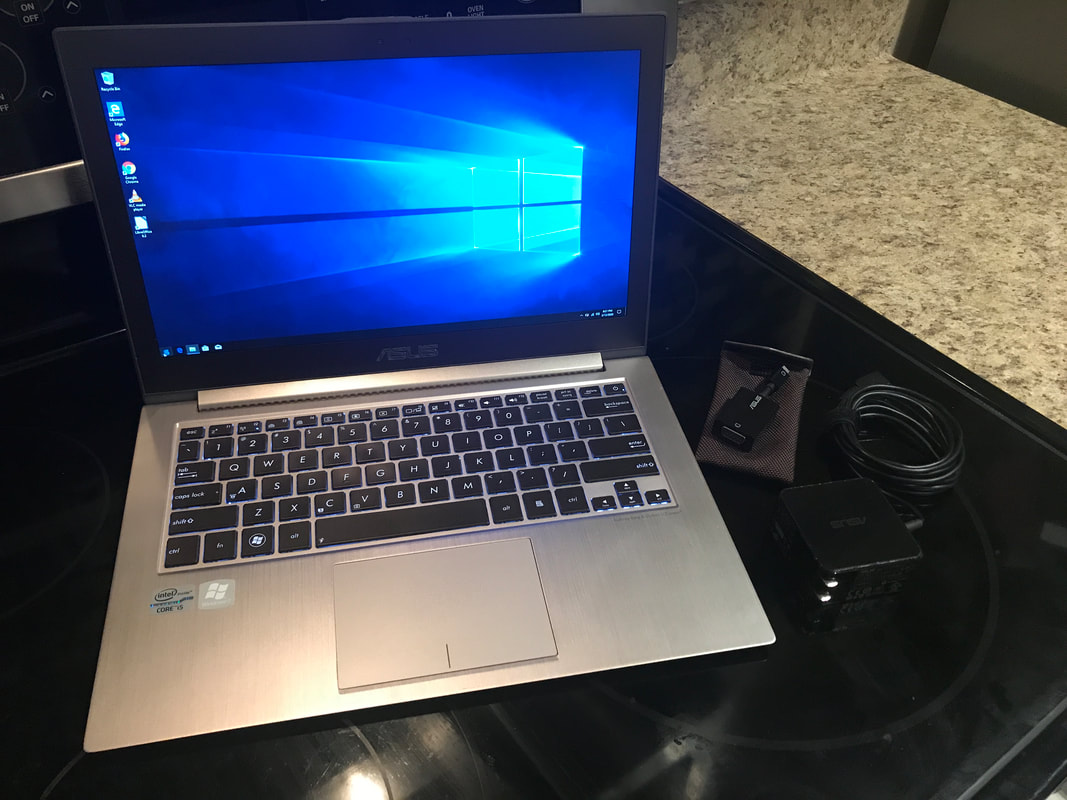
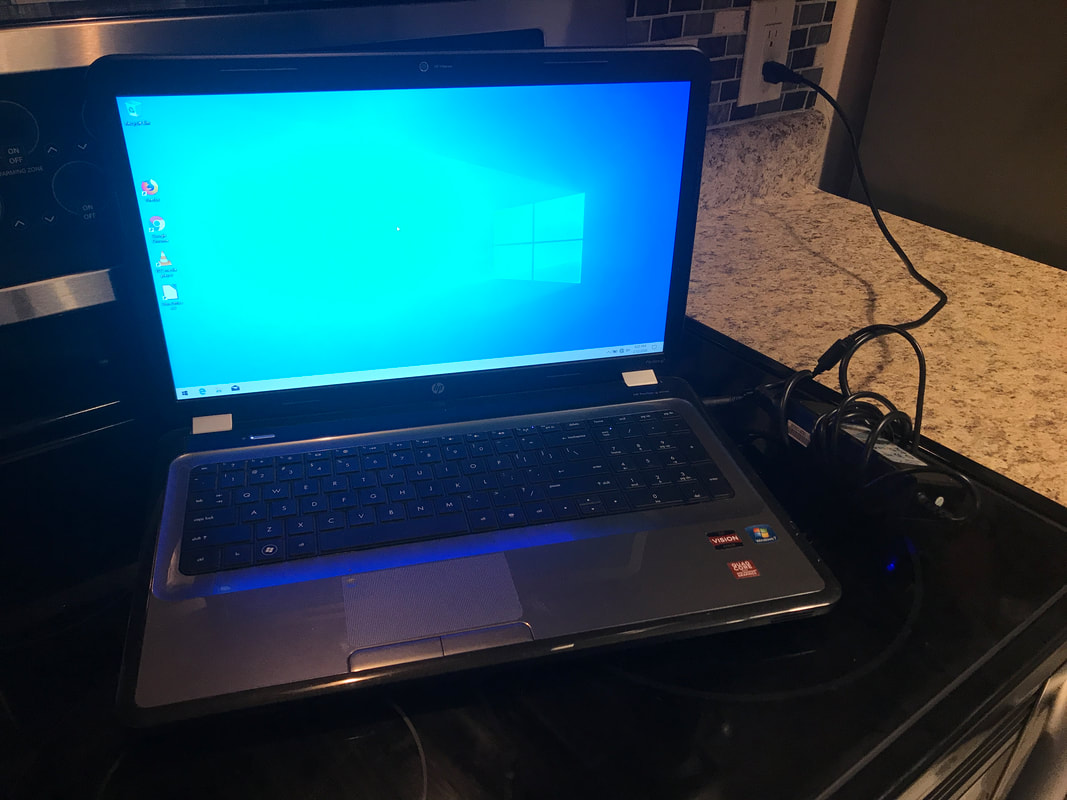
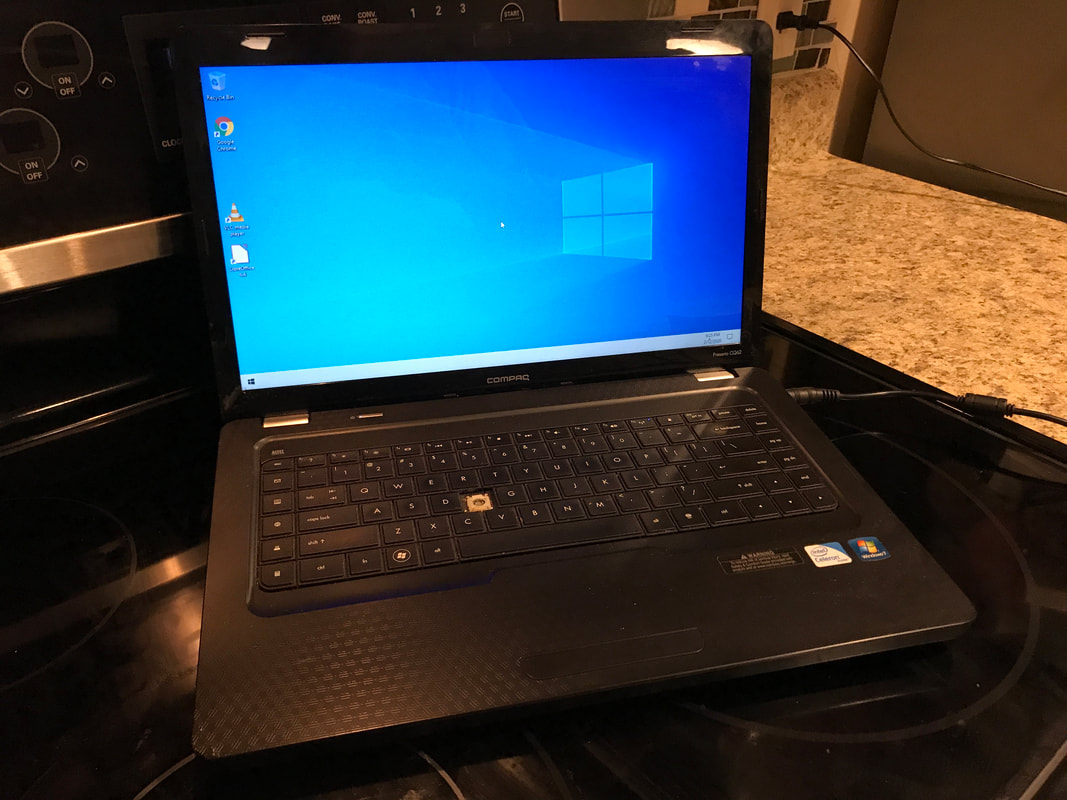
It's time to do another purge of stuff. I buy/sell/trade computers and other electronics, and have a lot of stuff that needs to go. I have a large amount of Magic: The Gathering cards for sale as well, cheap! Local pickup only (Orlando/Mt Dora, FL Area), no shipping. Everything sold As-Is. No Refunds. Please contact me for more info. Laptops For those with no AC adapter, they are generally $15 on eBay, I can also order you one for the additional cost if you commit to buy. Batteries all in unknown conditions. The newer models I would assume still work fine and have some life left, the older models, just assume they don't work, or hold a shorter charge. Most show signs of wear, a few have surface scratches or cracks in the plastic. Contact me for more specific details on anything in particular. Unless otherwise noted, everything is in good working condition. I did not test any DVD drives as I do not use them. WiFi works on everything. All laptops have a fresh clean install of a legit Windows 10 license and all updates as of when I refurbished the unit.
Other Stuff
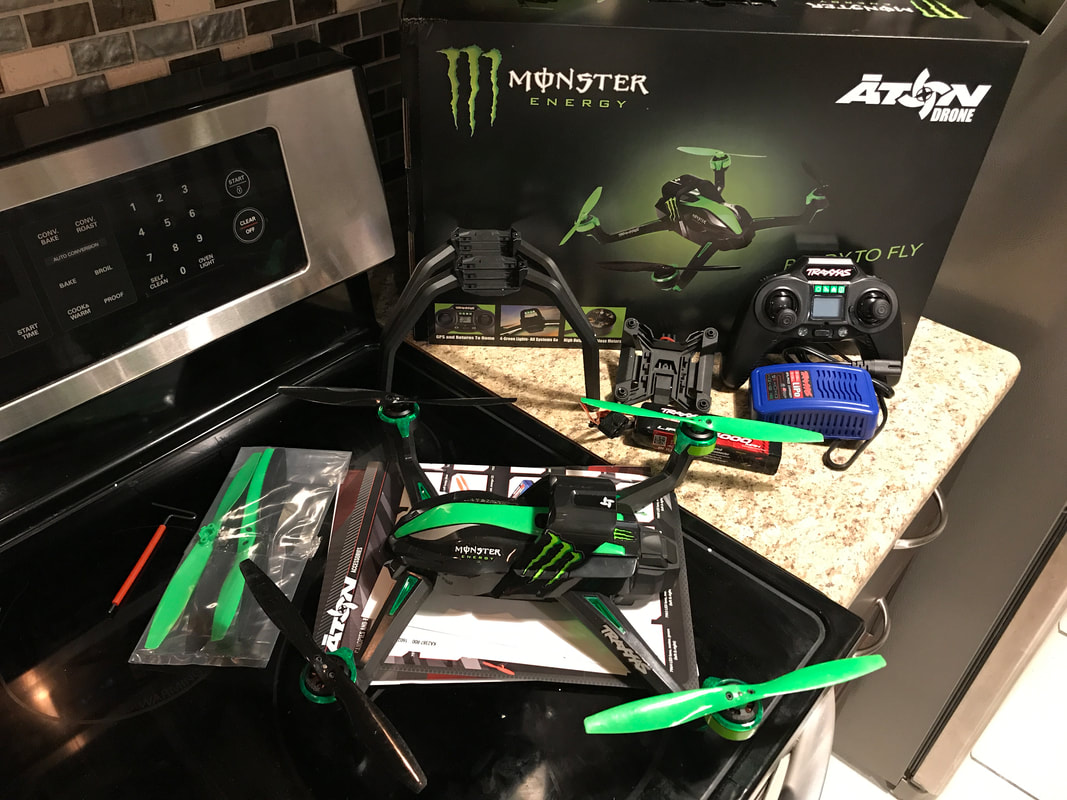 New-ish in box. Has about 10 minutes of flight time on it. Only signs of wear are a few gentle landings in the grass. Works great, never wrecked. I just realized it wasn't for me after flying it around for a few minutes. I'm not really an RC guy. Has brand new upgraded 4000mAH battery, direct from Traxxas, with only a couple minutes of flight time on it. Includes everything it came with in the box. https://traxxas.com/products/models/heli/Aton Magic: The Gathering
Pauper / Common Playsets 2/12/20 PRICE DROP! ALL sets $5/ea!!! As of early July, 2019, Wizards of the Coast announced that they are officially recognizing Pauper as a fully sanctioned format! This means that they will have official events and tournament support for both local game stores and at larger events. New to Magic Arena and want to try your hand at Pauper? You can own physical copies of many of the cards you play with daily online. This is a cheap way to get into paper Magic. Many of these sets are out of print, so get them while you can! I am also willing to trade sets. I am looking for War of the Spark common playset, and anything else not listed here. I am also looking for vintage cards. Let me know what you got! Also available: If you want some "almost" full sets, and don't mind some missing cards, let me know, I will give steep discounts on multiple sets of your choice. If you want to buy all the remaining bulk (roughly 50K+ cards), it's all for sale too, all boxed and sorted by set, color and alphabetized. Start your own online store! $500 for all of it ($.01/ea per card). ALL sets $5/ea!!! I will be happy to meet you somewhere nearby 32822 for delivery. The following sets are still available:
------------------------------------------------------- *Missing Cards / Partial Sets – Please ask what’s missing if interested in a partial set, I have them documented on each set’s box. *Amonkhet 99% - includes only 2x Essence Scatter, otherwise 100% *Amonkhet 98% - includes only 1x Essence Scatter, otherwise 100% *Guilds of Ravnica partial sets – ask about what’s missing, it ranges from 6 – 30 cards (out of ~400ish) – I can make a deal on these, let me know if interested. *Ravnica Allegiance partial sets – ask about what’s missing, it ranges from 32-55 cards (out of ~452ish) – I can make a deal on these, let me know if interested. *Iconic Masters – missing: Mana Leak, Thought Scour, Mind Stone, Star Compass and includes only 1 x Lead the Stampede. ------------------------------------------------------- Cards are all Near Mint condition. All prices adjusted to reflect any missing cards, and the included uncommons. If dual/special lands were not included in the set, it means I just don’t have any, so don't ask. Cards come in a mix of MTG bundle deck boxes, plain white card boxes, and empty booster boxes. Boxes may have markings on them left over from the previous owners. If there is a card missing that wasn’t mentioned, please let me know. I’ve handled hundreds of thousands of cards while putting these sets together. My hands, back, eyes and brain are tired, and sometimes things get miscounted by mistake. If the card was not mentioned as missing, then I probably have it and can get it to you.
1 Comment
 Steak for a King! This past Father's Day, I wanted to make my dad a meal fit for a king. I wanted to spend some quality time with my parents, so we had them over to our home for a Father's Day lunch. I asked my dad what he would like for lunch, and he said steak, loaded baked potatoes and some kind of dessert so long as it had ice cream. While many families were going out to eat, and spending quite a bit of money at restaurants, I decided to go in the opposite route. If you already read my Baller on a Budget articles, you'll know that I like to see how much I can get for the least amount of money, while still maintaining high quality. Where do I shop? I am a big fan of shopping at smaller grocers, such as Aldi and Save-A-Lot. Many people think these grocery stores are "discount" chains, and have sub-par offerings. In fact, they do not. What they do is focus on smaller stores while focusing on their own house brands and only offering single options for each item you are looking for. Do you really need 20 brands of ketchups to choose from? No. Do you need 32 brands of pasta? No. Quality is quite high for these stores. Aldi's house brands, meats and cheese are top notch. Save-A-Lot has excellent produce and meats. I often combine trips to both stores to maximize savings. Thankfully, I live one block from the Save-A-Lot, and about a mile from the Aldi. There is also a Wal-Mart Superstore between both of the stores that I use when neither store has what I am looking for. I try to avoid overly expensive stores such as Publix, Whole Foods and Lucky's. I like the prices of Winn Dixie and their new store Fresco Y Mas, but I refuse to shop at stores that force you to sign up for a "loyalty" card in order to get the better prices. The Menu:
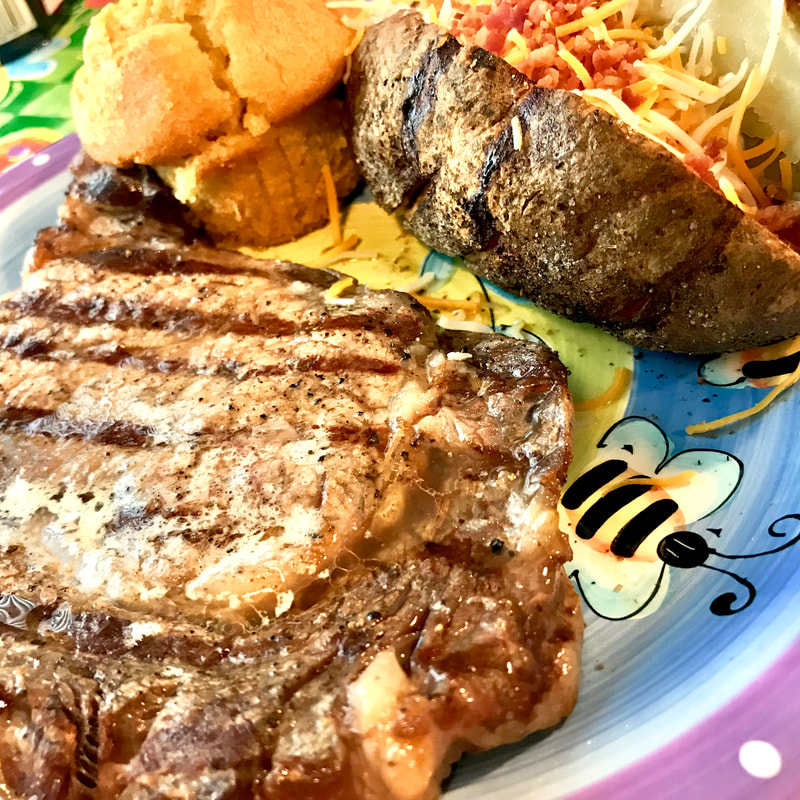
Save-A-Lot had T-bone steaks on sale this week for Father's Day. Score! My dad was talking about T-Bones the last time we were at a steakhouse. For the rest of us, I chose ribeye steaks. I grabbed a bag of baking potatoes and a few other items and was on my way. Earlier in the week we were at Aldi noticed they had avocado oil sitting next to the olive oil, so I decided try some out and bought a bottle. 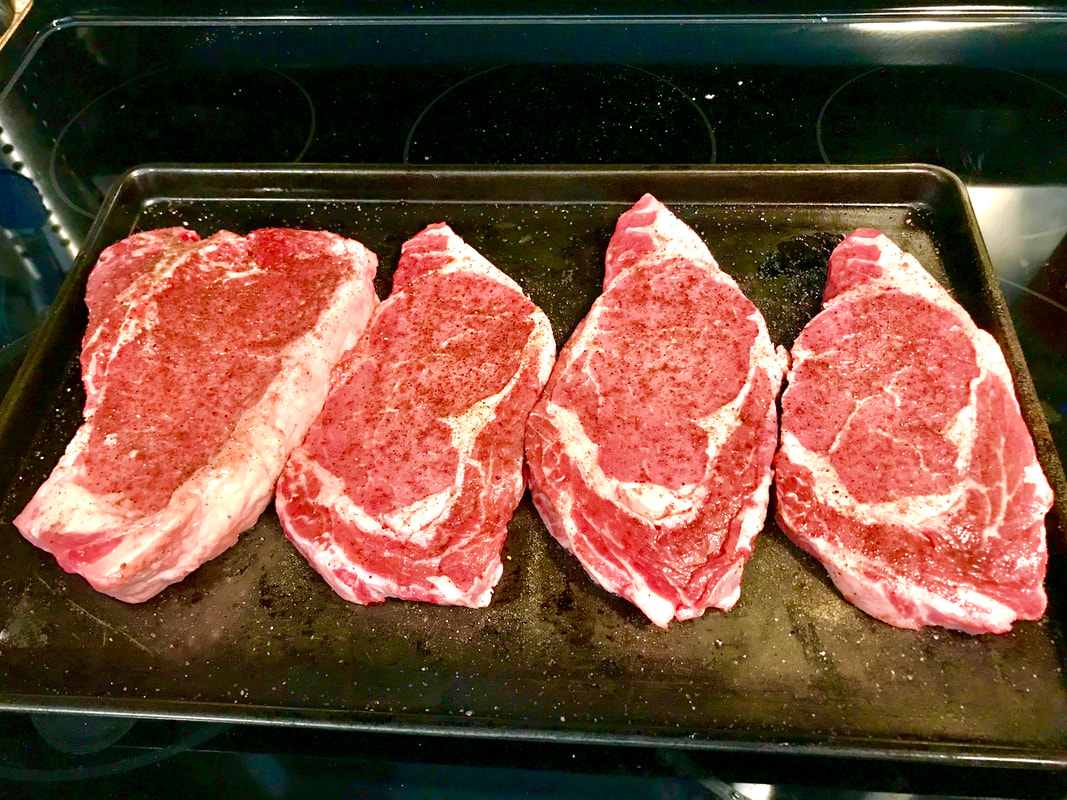 1 T-Bone and 3 Ribeyes The smoked salts, that I will mention using, were purchased at a local spice and tea shop. I really enjoy cooking with smoked seasonings. The tellicherry pepper I use is the same thing as regular black peppercorns, except they are larger. The larger size of the peppercorns loses some of the heat, but adds in a larger more fragrant aroma to your cooking. You can pick up a grinder of these at nearly any grocery store. The champagne vinaigrette dressing we got at Wal-Mart. Steaks Everyone is an expert on steaks. Everyone has their own opinions and methods of how to cook the perfect steak. My opinion is no different from any other method(s). In fact, I usually just try other ideas every time I cook one so that I can formulate my own opinion and learn from them. The method I decided to try today was a quick and simple method I had not tried before. I started by taking the steaks out of the refrigerator an hour before I was ready to cook them. I want to bring them down to room temperature before cooking. There is a multitude of opinions on when to season your steak. This is the method I used on this occasion. I coated both sides of the steaks in avocado oil (you can use olive oil for the exact same effect). The oil helps the seasonings stick better, and it helps it brown nicely (crust) when you sear it later on. I then sprinkled a generous amount of smoked alderwood salt and tellicherry pepper on it. Cooking the steaks was very simple and easy. Do not over complicate steaks with tons of methods you read about or see on TV. It is just seasoning it how you want it and then heating it up to the right temperature and doneness to your liking. That is it. Your only goal is to not overcook it. Otherwise, do whatever you want to them. There is no wrong way to cook steaks if you like how they turned out. I take that back. Do not put steak sauce on a good cut of meat. Ever. The actual taste of beef, and what you season it with, are more than enough to create one of the best meat flavors out there. Covering it all up with sauce is an insult to the cow that the steak came from. Please do not sauce your steaks! Enjoy the taste of the meat and your seasoning choices. I heated my grill up to around 500*F, put the steaks on and closed the lid. The method I was following said to leave it on for 2 minutes. Do not check them. Do not touch them. Do not flip them. Just let them sear for 2 solid minutes. Once 2 minutes is up, flip them and sear the other side for exactly 2 minutes. After searing them on the grill, I put them on a baking sheet, put two small pats of butter on each steak and put them into the oven at 425*F for 5 minutes. I chose this temperature because it is what it was already at when I took the baked potatoes out. I employ the KISS method. Keep It Simple Stupid! After 5 minutes, I took them out and covered the entire baking sheet with aluminum foil to let the steaks rest for a few minutes. The T-bone was a good inch+ thick, and came out medium. The ribeyes were a little thinner and came out medium well. What I learned was I would have cooked them a couple of minutes less in the oven to keep them slightly more rare. 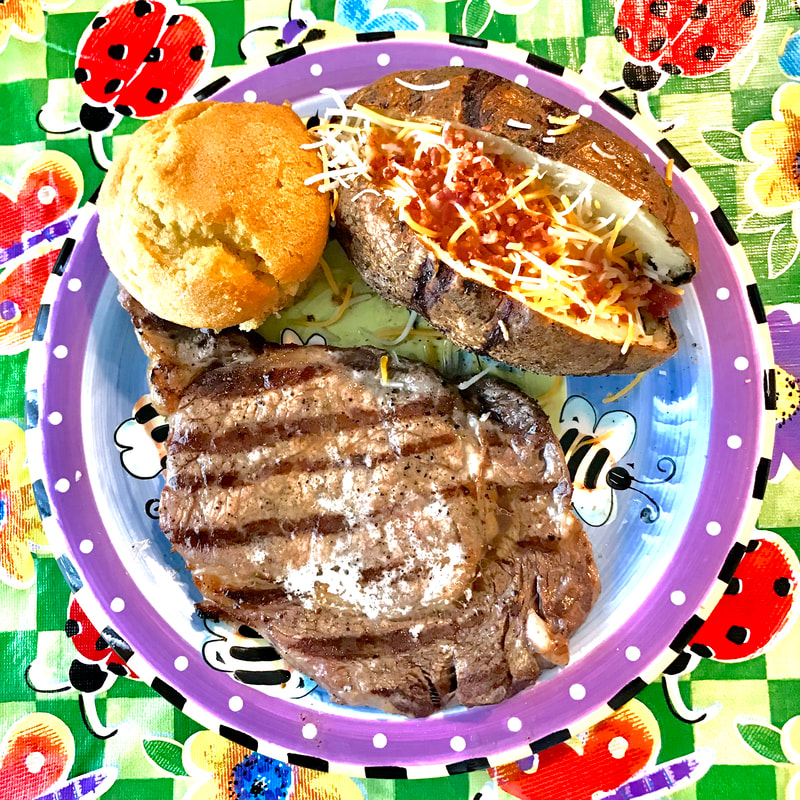 Baked Potatoes There is not much to baking a potato. I preheated my oven to 425*F. I first washed and dried the potatoes. I then slathered them in avocado oil (you can use olive oil for the exact same effect), and coated them with hickory smoked salt and tellicherry pepper. Using a knife, I cut slits in the tops of each potato to help them breath while cooking. I then baked them for 1 hour. After baking, I cut mine in half, chopped up the middle, and covered it in butter, cheese, bacon and sour cream and some Texas Pete's hot sauce. The rest of the foodSalads are self-explanatory. The cornbread muffins, ice cream and pecan pie was store bought and on sale for much cheaper than I could make them, so I just got those. The point of this meal was eating like a king on a budget, not necessarily making it 100% from scratch.
 I looked at several recipes for marinara sauce and found most had the same base, using whole peeled tomatoes and olive oil. The nice thing about this is that this is your own homemade sauce, you can make it exactly as you like it! Garlic and seasonings can be added to your taste. One trick if you like the flavor of onion, but don't care for the texture it gives marinara sauce, is to add half of an onion to the sauce while it cooks, skipping the mashing step and removing it before serving. My wife and I like chunky sauce, so we add more ingredients than most of the recipes out there. For our take on the sauce, we add mushrooms and Italian seasonings, but no salt. 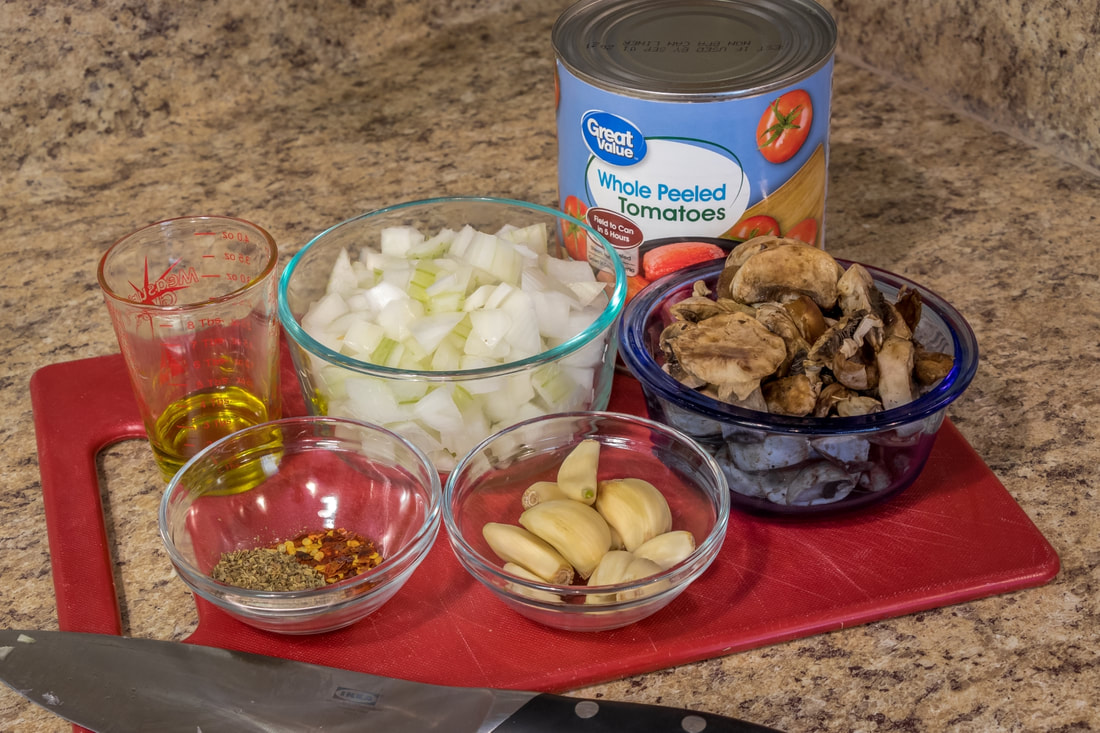 All the beautiful ingredients! Ingredients
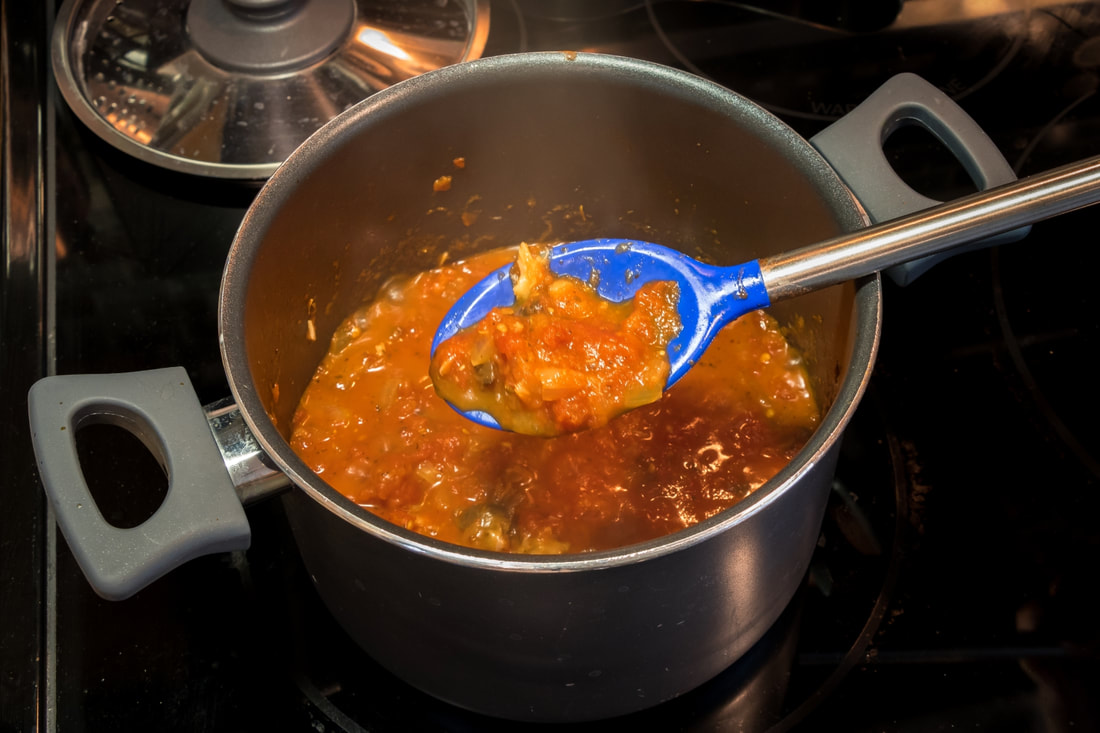
Directions 1 - Pour all ingredients into a small sauce pan.  Pour everything into a small sauce pan 2 - Stir them gently to fully mix, taking care not to break the tomatoes.  Stir everything together 3 - Bring to a simmer over medium/high heat, stirring occasionally. 4 - Lower the temperature, cover with a lid, and let it simmer for 20 minutes. 5 - Mash all the ingredients together, using a potato masher, or other hard utensil, then stir together. This should break up the tomatoes and garlic to start forming the sauce. 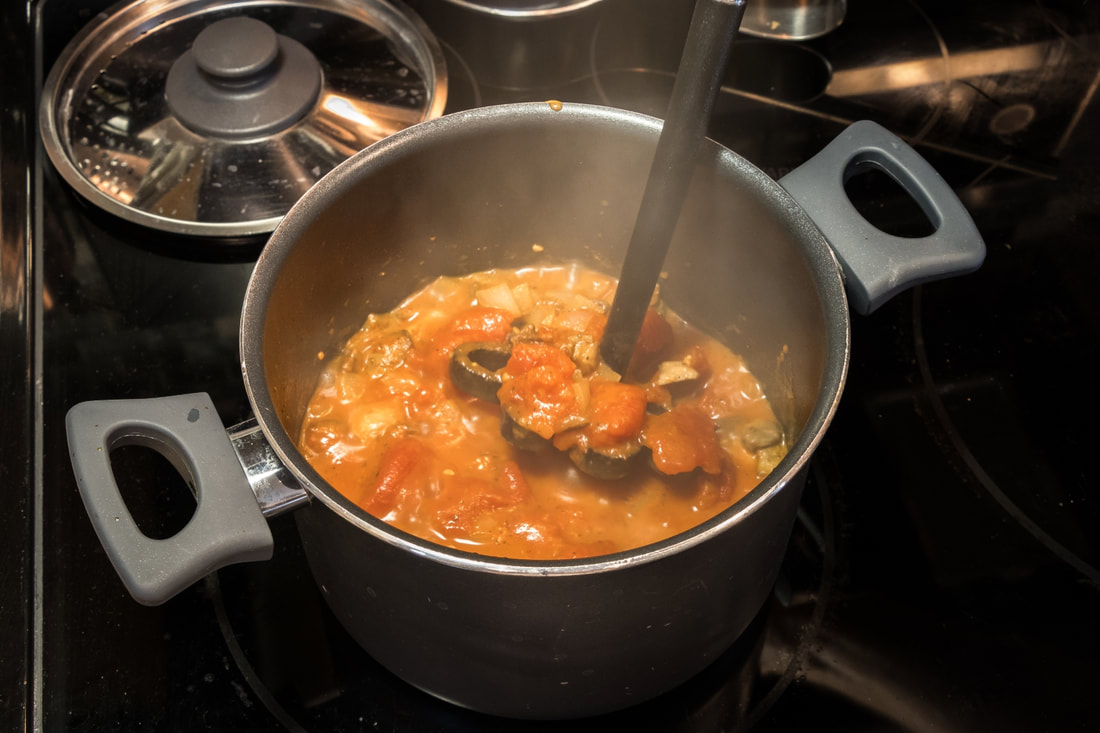 Mash it all together after it's simmered a while 6 - Let it simmer, covered, for another 30 mins. Stir occasionally. 7 - Mash the ingredients once more to break apart the onion and anything else that’s still in larger chunks, then stir together. 8 - Let simmer, covered, for another 10-15 mins or so, stirring occasionally. You may need to mash several more times every 5 mins or so while it's simmering it's final minutes. Awesome Sauce! 9 - It is pretty much done at this point. You can remove it from heat and set it aside. We will now go back to our pizza dough.
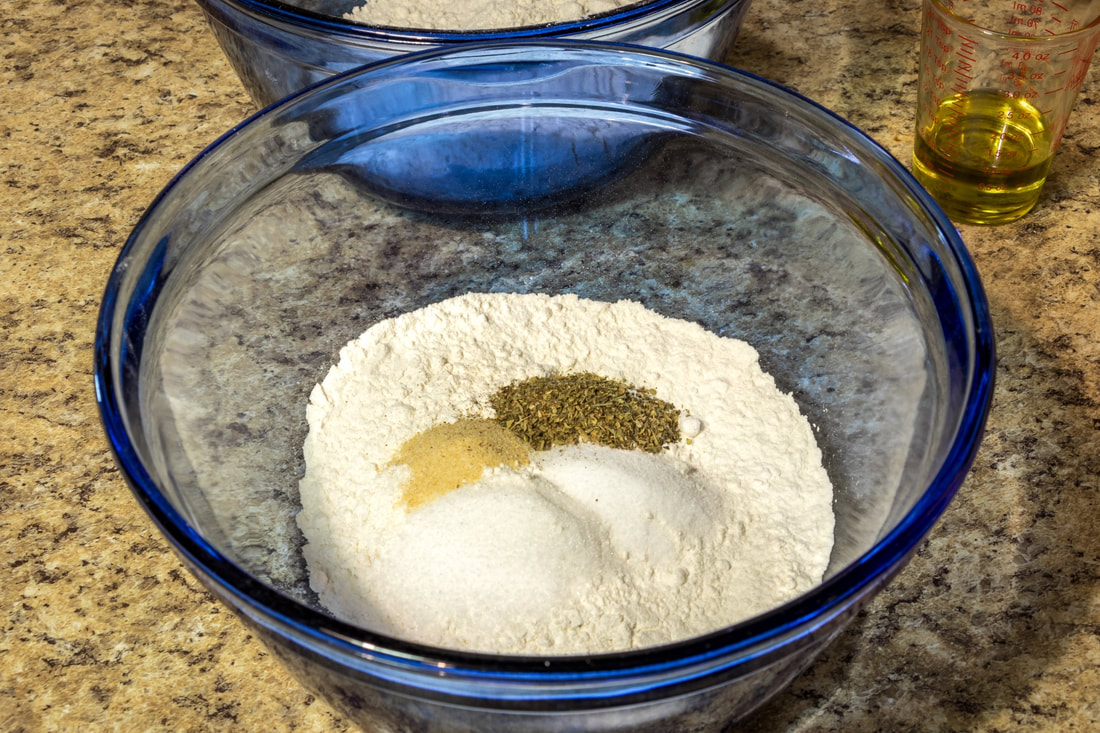
If you want the sauce less chunky, you can run it through a blender before using. You will have a lot of leftover sauce if you’re only making one pizza. There is usually enough left over to save for a nice pasta dish for a future dinner. Keep that in mind if you plan to blend it smoother for pizza use, you may want to set some aside for pasta or other uses. It makes great bread stick dipping sauce too! 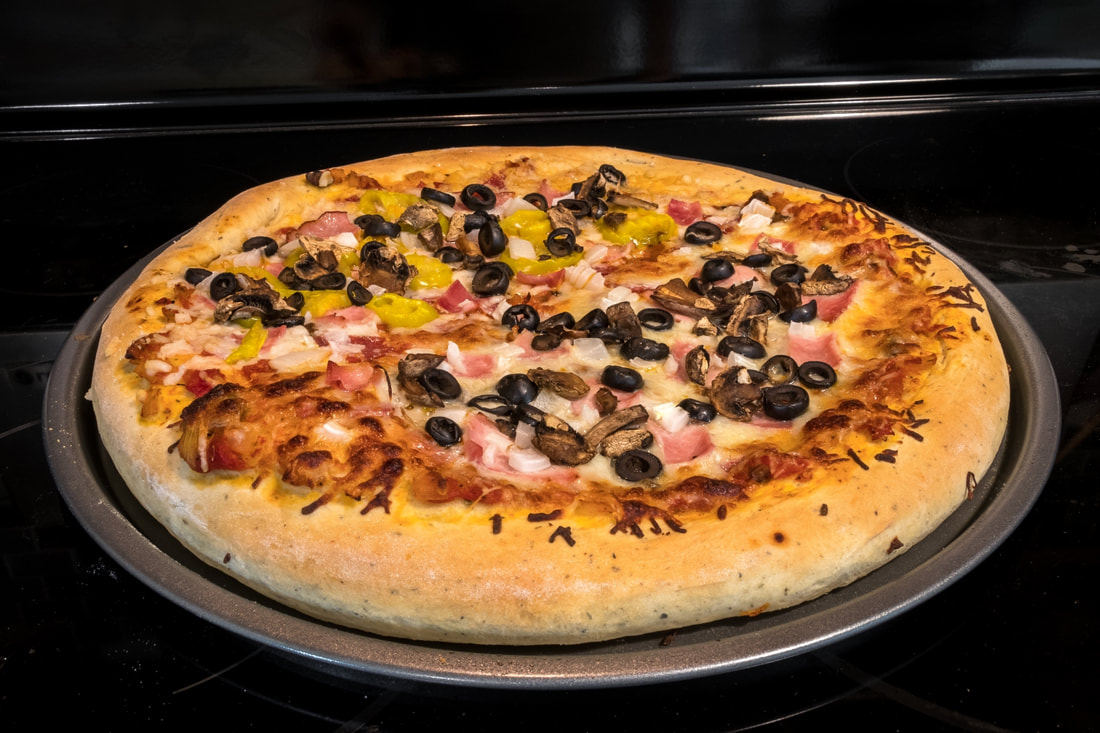 Have you ever wanted to make a gourmet pizza from scratch, but thought making your own dough and sauce would be complicated, difficult or expensive? You might be surprised that it is quite cheap and easy to make your own specialty pie. Restaurants may charge $14-18 for a pizza, but making your own only requires a little bit of physical work, and about an hour of waiting. I will walk you through doing all of this by hand with affordable ingredients, using utensils you most likely already have in your kitchen. For those with stand mixers, I will have alternate instructions at the end of the recipe. I find that many recipes also add too many steps into a recipe that are just not necessary. My goal with these recipe articles is to take either my own, or existing recipes, and re-write them to make them less complicated and easier to follow. I find that a lot of recipes miss out on important things that they assume people should know, or they just omitted an important step that is hard to figure out after the fact. This is very frustrating to new cooks, and I aim to fix that. Personally, I use a stand mixer for everything now, but I was at a friend’s house over the weekend and I wanted to make stromboli for his family for dinner. He did not have a stand mixer, so I showed him how to do it all by hand. I have not made it that way it in a while and forgot how easy it was to do. Now, let's make some pizza! Flour and Yeast For flour, I just use all purpose (AP) Flour. Nothing fancy, I use whatever store brand is the cheapest. For yeast, you can use either instant or active dry yeast. Both will work, but instant will make your dough rise faster. I bought a jar of Fleischmann’s Rapid-Rise Bread Machine Instant Yeast. I bake a lot, and it stores safely in the refrigerator for a long time. Unless you plan to bake a lot, I would recommend just picking up two packets of either type of yeast. I say two in case one is bad. This happened to me and it wasn't fun running to the store for more yeast in the middle of baking. Proofing Yeast How will you know if your yeast is "bad"? By proofing, or blooming, the yeast. I had no idea what proofing yeast was until well after I started baking. I noticed occasionally that my dough did not rise, but did not know why. I found out that it was most likely due to bad yeast. This can happen sometimes if the yeast is too old from sitting on a store or pantry shelf too long. Most dough recipes include water as an ingredient, which is the only thing you need to proof yeast. The simplest way to do this is to put your yeast in the water before adding it to your recipe. You will need to make sure the water is warm. Not steaming, but warm (100-110*F). I just let my kitchen faucet run on hot until it gets warm, then fill my measuring cup to the appropriate amount of water needed for the recipe. I then dump all the yeast into the water, give it a good stir, and then let it sit for several minutes. You can go ahead and prepare the rest of your ingredients while you wait, and when it is time to add the water, your yeast should be ready to go. 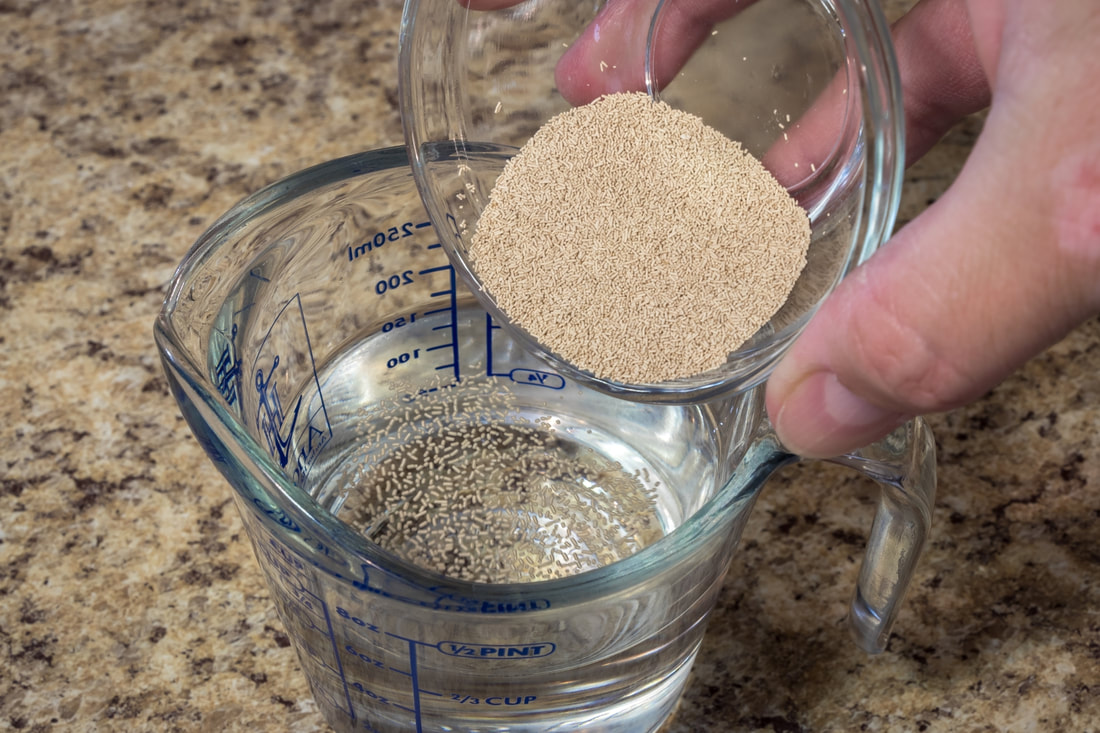 Pouring Active Dry Yeast into warm water What you are looking for is that the yeast granules have puffed or are dissolving and that the water is frothy. If you do not see any froth, stir again and let it sit a few minutes longer. If it still does not produce any froth, then the yeast is bad. Pour it out as you do not want to use it. Set your other ingredients aside and try again with new yeast. 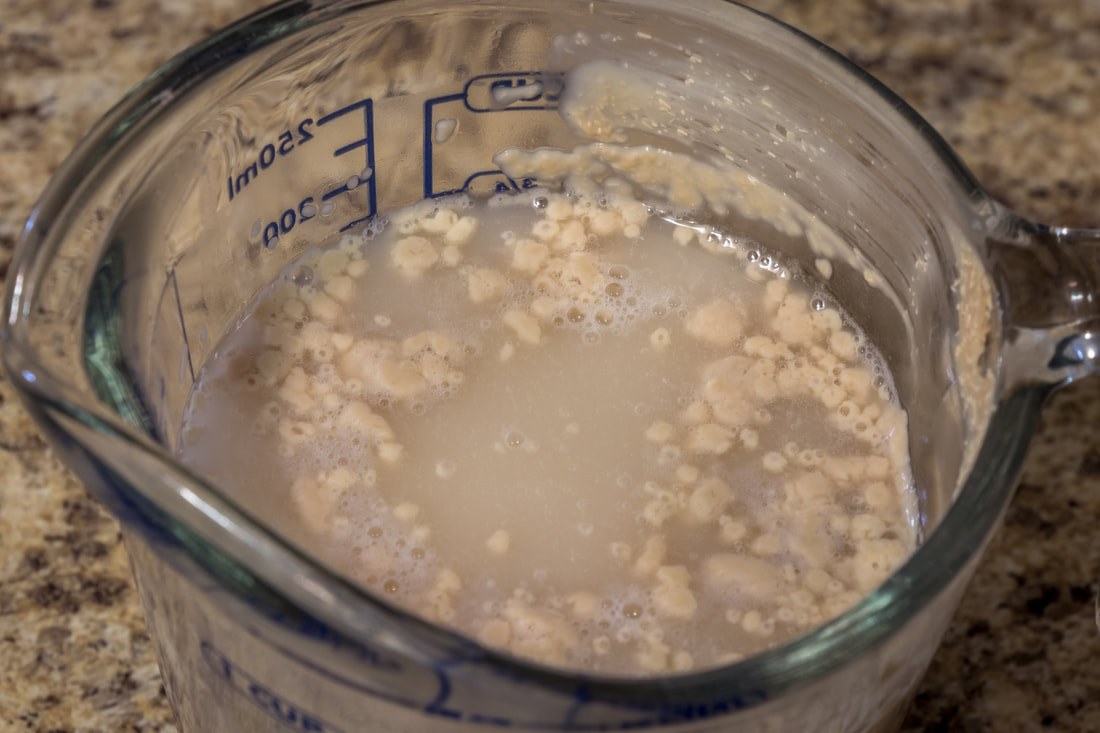 Blooming Yeast If using yeast in a packet, hopefully the next packet is good. If from a jar, it is possible the entire jar is bad. A second proofing attempt will tell you if you should continue with your recipe or not. Now, do not let any of this scare you. Once you have done this and have seen it work, it becomes a routine step you will do any time a recipe calls for yeast. Instant Yeast Technically, you do not need to proof instant or rapid-rise yeast. Instant yeast is always ready to use. The granules are tiny and can be directly added to your dry ingredients without having to proof them. However, I had one experience where I was using packets of instant yeast, and one packet was bad. My dough did not rise, and I had to throw everything away and start over. Because of this, I even proof my instant yeast now, as I cannot trust what I am using is good or bad, and there is no way to tell except by proofing. I also like that the yeast dissolves more thoroughly using water before you put it into your dry ingredients. That is just my personal preference, you don't have to do this if using instant yeast. I have also just poured the yeast right into the dry ingredients and produced the exact same dough that rose in the exact same amount of time. Now that you know how to proof yeast, let us get on to the recipe! Pizza Dough I have tried several recipes over time and came up with this one for my own liking. For all the newer bakers out there, I will be explaining some of these steps a lot more in depth than usual. I know I would have loved to have known these tips when starting out, but I had to figure it out the hard way since many directions are not very well written. 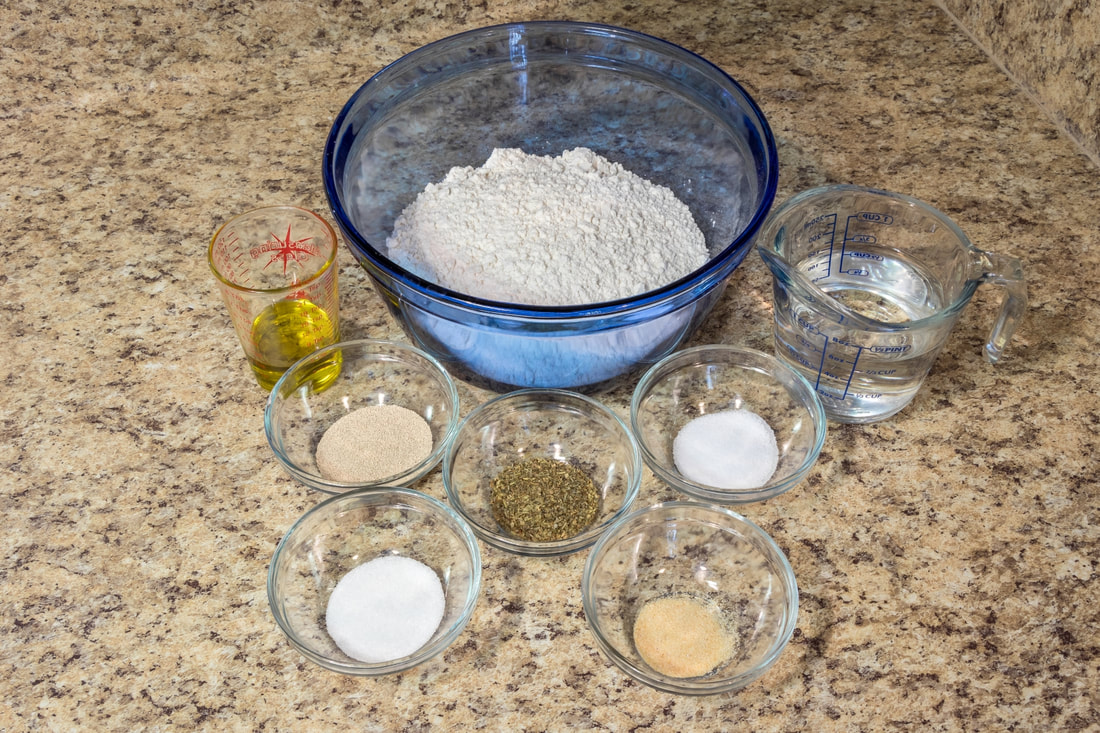 All Ingredients
Directions: 1 - In a large bowl, separate out 1 cup of the dry ingredients, and mix it with all of the wet ingredients. It will turn into a soupy mixture. 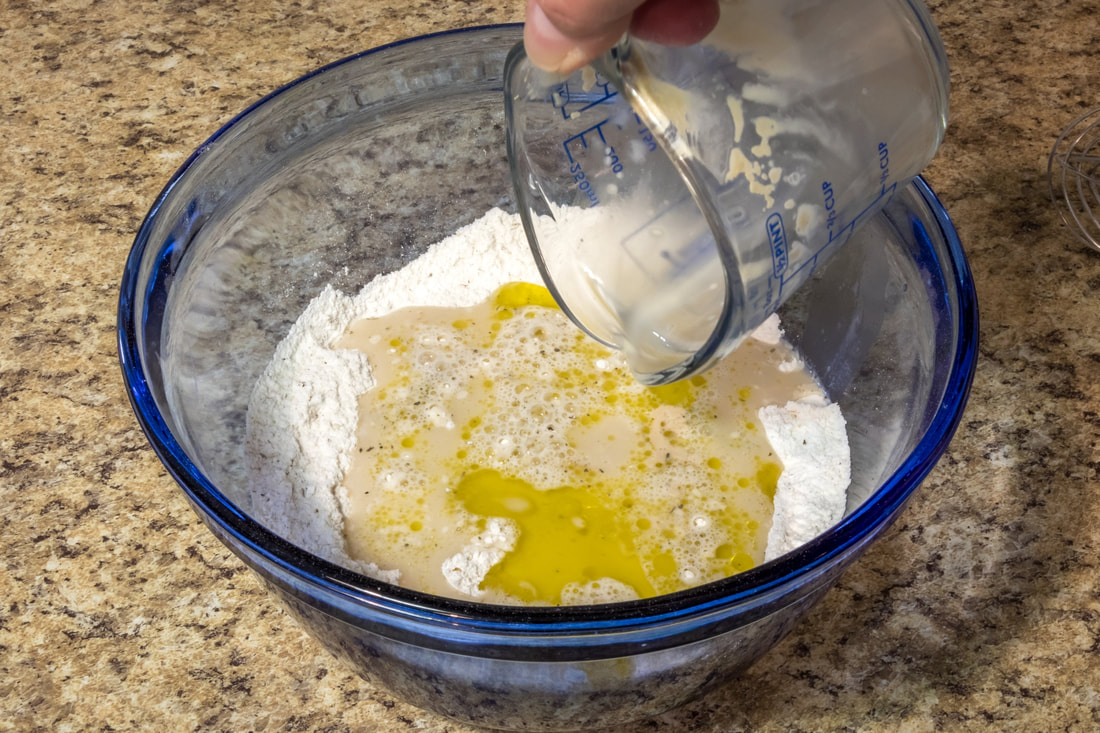 Pour wet mixture into roughly 1/2 of the dry mixture 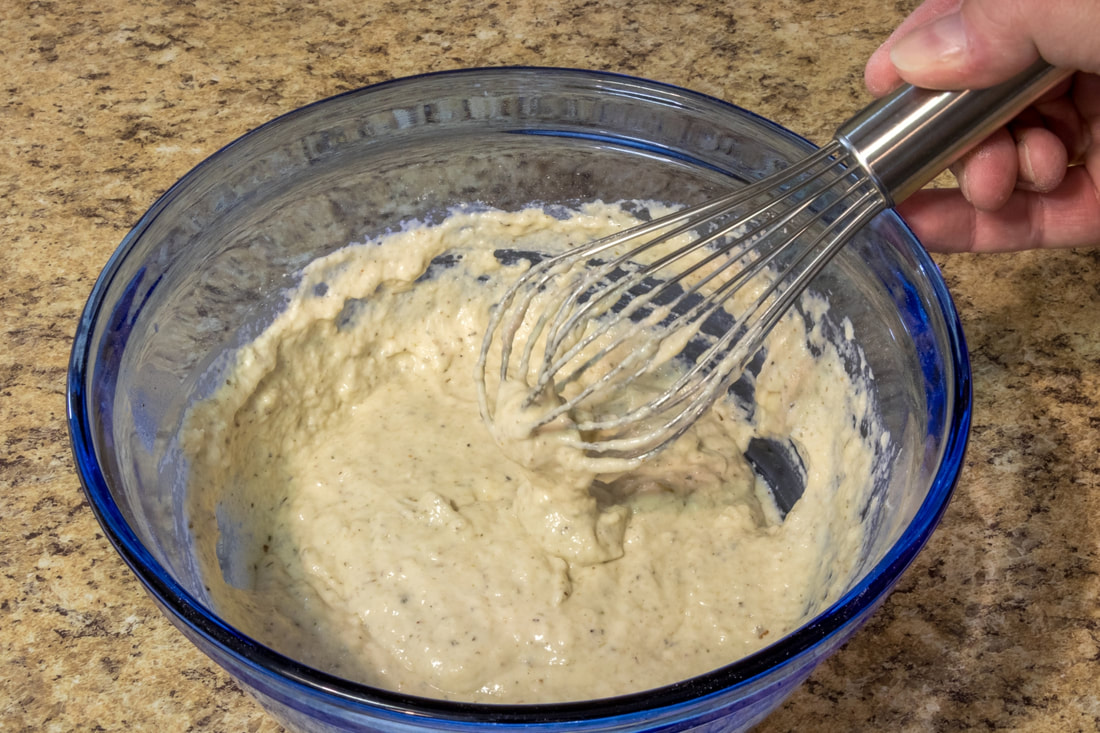 Mix well. Should look soupy 2 - Add ¼ cup of the remaining dry ingredients at a time, and keep mixing until a solid dough starts to form. 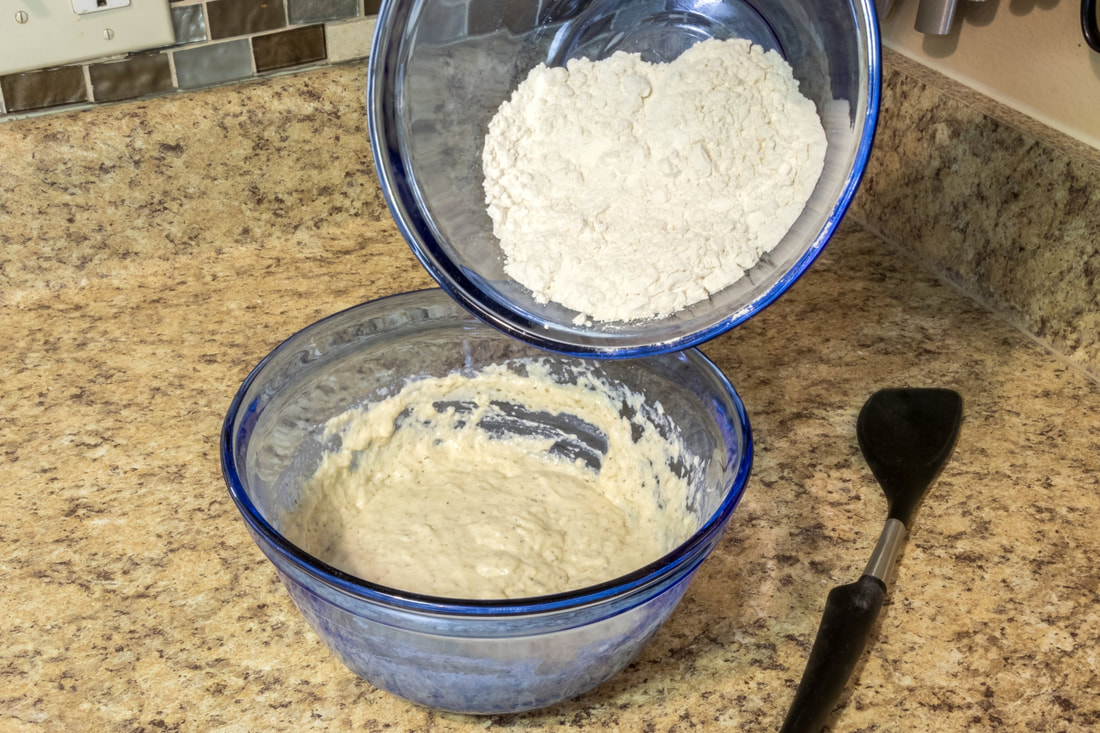 Keep adding 1/4 cup at a time between mixing 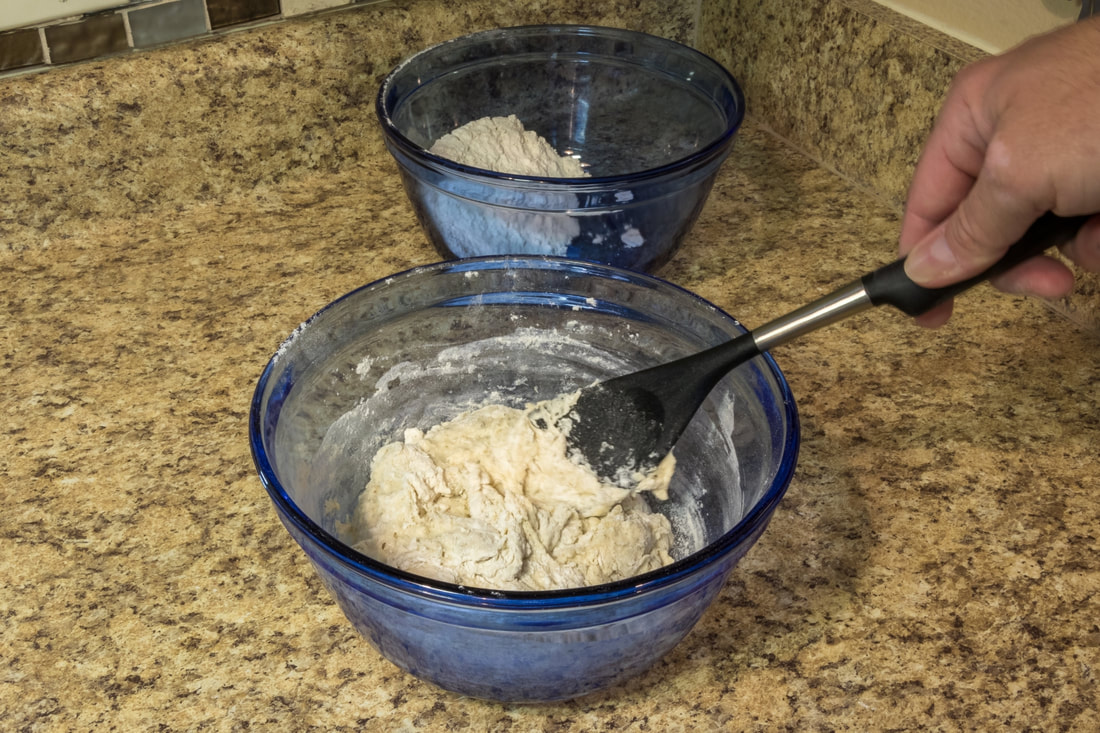 Dough starting to form 3 - If it is too dry, and the flower is no longer sticking, add the tiniest amount of water at a time until it starts to form a good dough again. By tiny amount, I mean barely ½ teaspoon. That is all you need to get it moist enough to take in more flour. Adding too much water will make the mixture too sticky. 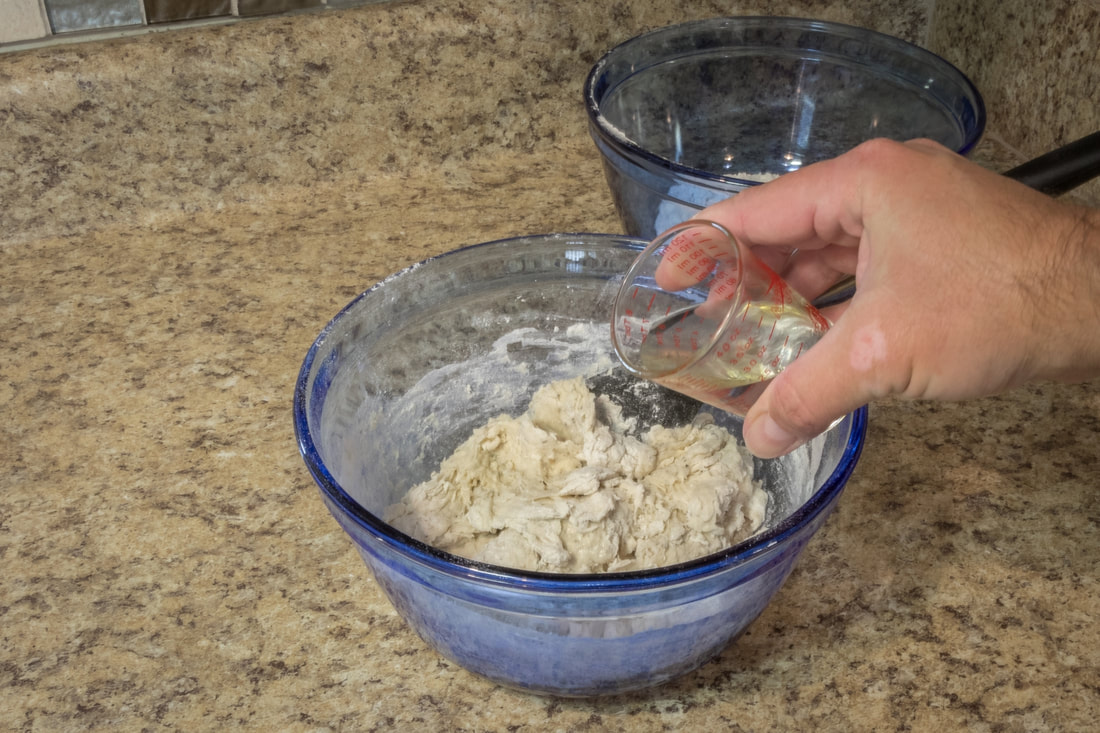 If dough too dry, add just a tiny amount of water. 1/2 teaspoon will do! 4 - Continue adding the flour ¼ cup at a time, adding tiny amounts of water as needed to get the flour to stick. You should have no dry ingredients left. The dough should be tacky, but not gooey or sticky. It should not heavily stick to your fingers when handling. If so, add a tablespoon of flour at a time and keep mixing it until it is no longer sticky. Once it is no longer sticky, it is ready for kneading. 5 - Sprinkle flour over a flat surface, I just use my counter top. Grab a small amount of flour in your hand, hold it a foot over your surface, and sprinkle it all over, giving it a nice dusting. Use more or less as needed, depending how sticky your dough still is. It should look like a light snow covering your surface. 6 - Take the dough out of the bowl and place it on the floured surface. It may be in a nice ball or may be in lumps like mine is in the photo. Either is fine. It will turn into a ball when you are finished with it. 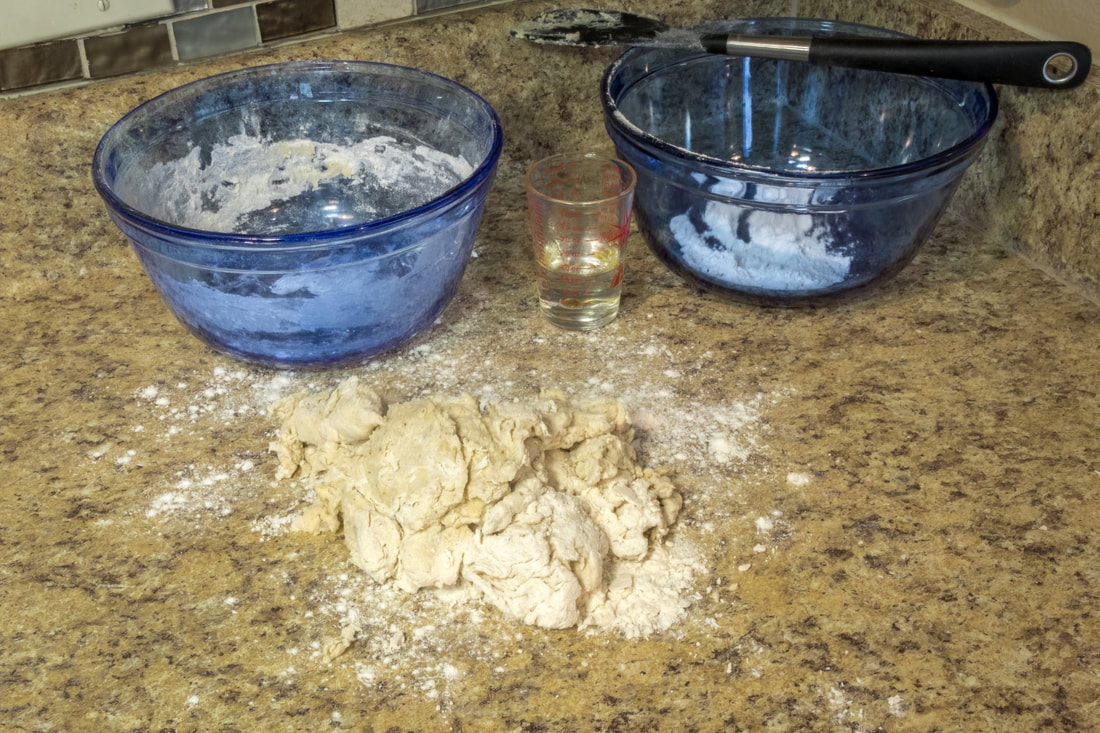 Remove dough and knead on hard floured surface. 7 - Knead the dough for a few minutes, pressing it out, folding it over itself, etc. until it has good elasticity. Make sure it is stretchy. If it is sticking to your fingers at all, sprinkle more flour on your work surface and on top of the dough and continue to knead it. Knead it gently into a ball shape when you’re finished. You should have a nicely formed dough ball by now. 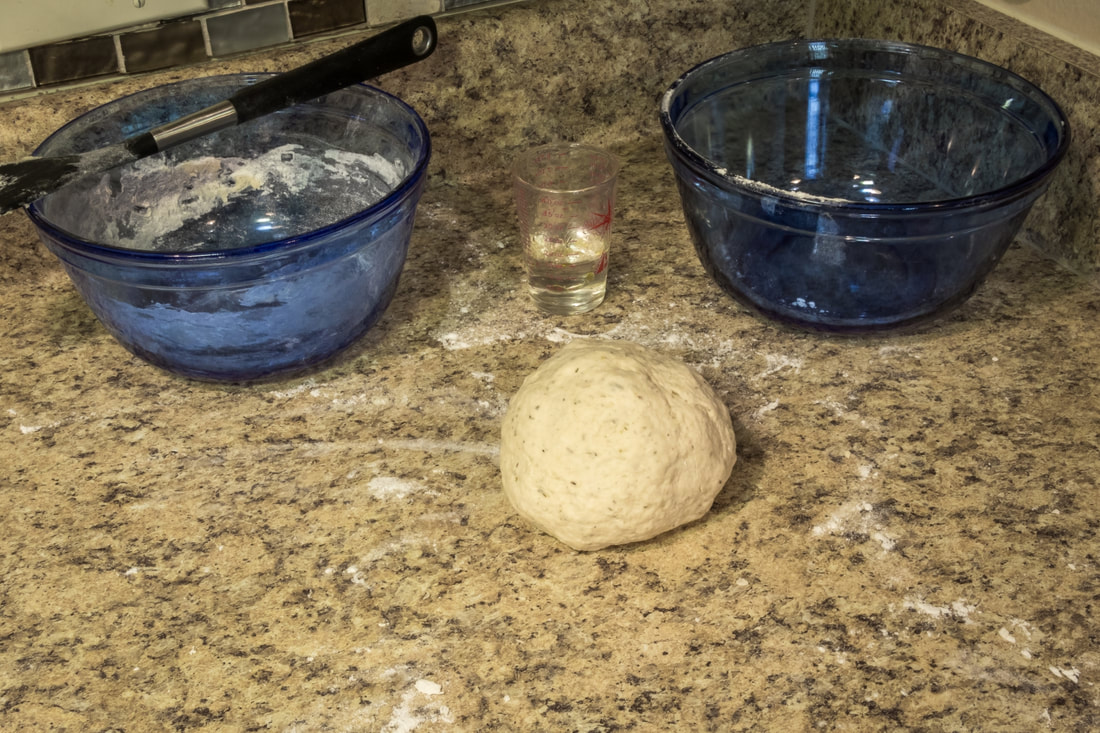 Knead until you can form a nice dough ball. Should be firm and pliable, but not sticky 8 - In a large clean bowl, spray (or wipe) a light coating of olive oil on the inside of the bowl.  Spray or wipe olive oil in a bowl 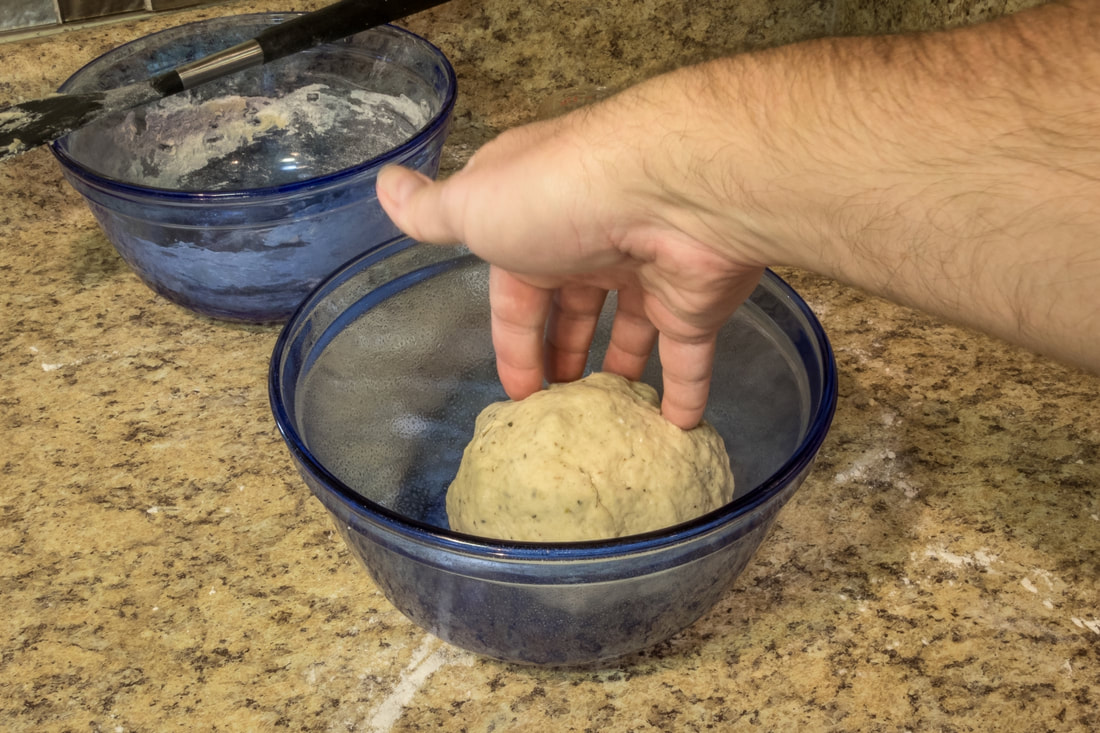 Set dough ball in bowl, then roll it around once to coat the entire ball with the olive oil 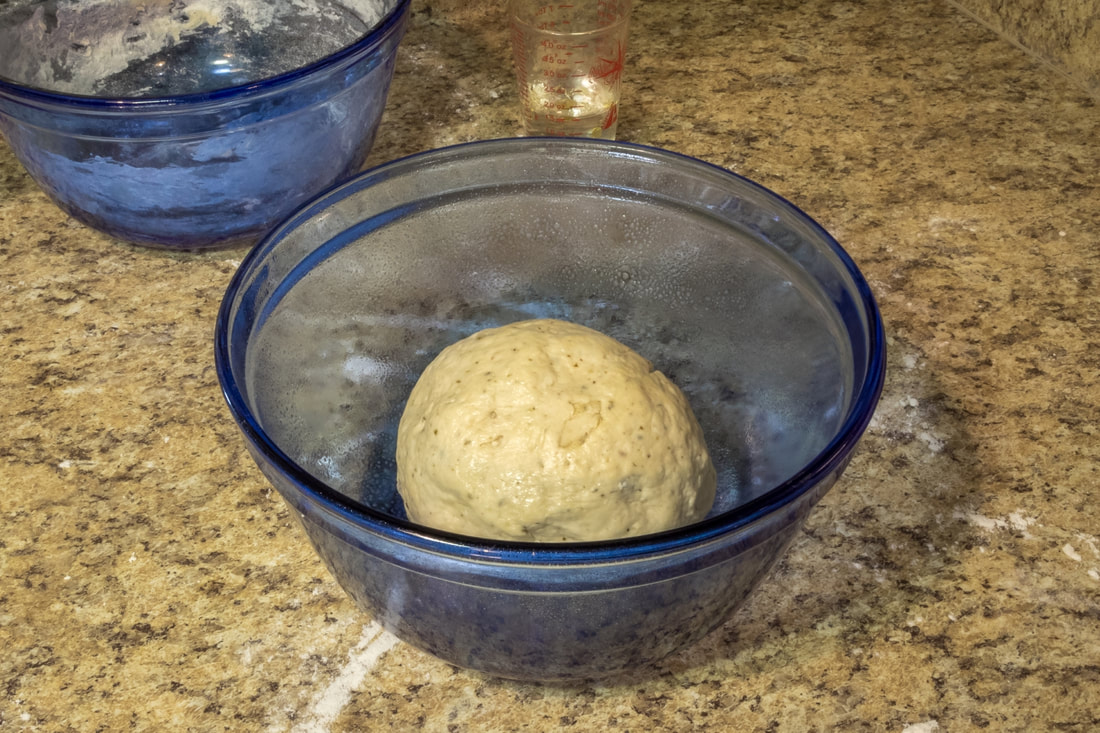 Finished oiled dough ball, ready to start rising! 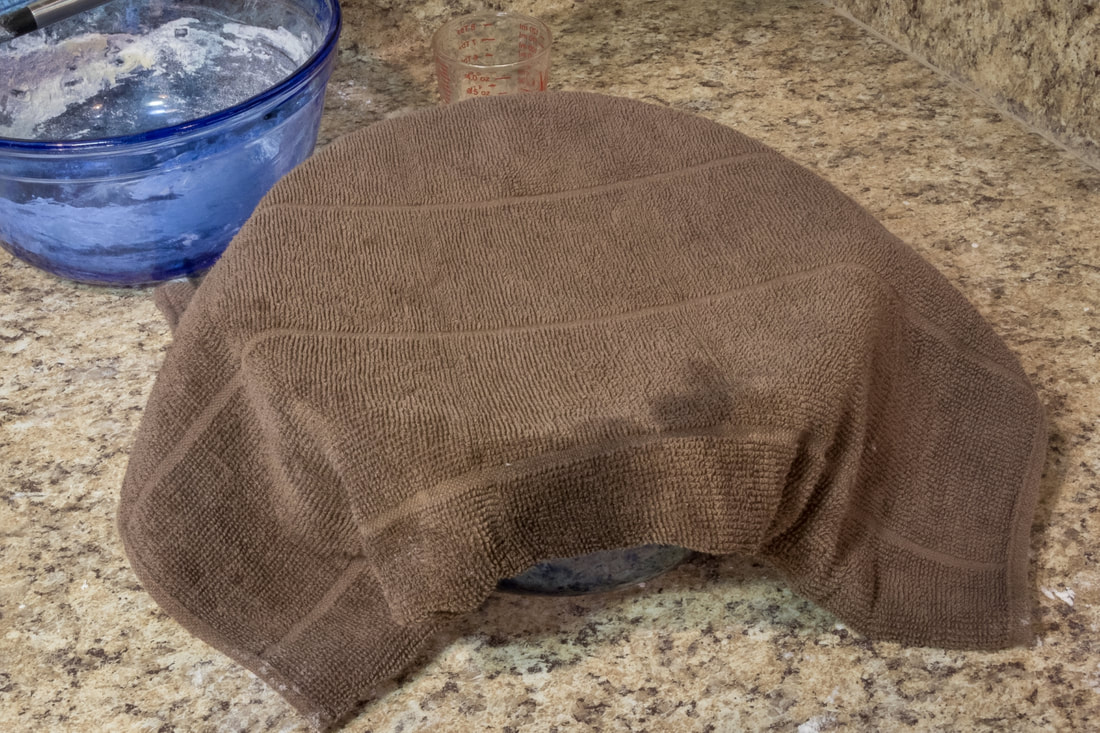 Cover with plastic wrap or a towl While the dough is rising, you can make your marinara sauce. Since I wanted to make this as one start-to-finish recipe, I will keep these two recipes in the same article for ease of use. Marinara Sauce Rather than make one huge post, you can click here to see the Marinara Sauce how to. Once your sauce is ready, or if you are going to use sauce from a jar, then continue on. Making our Pizza Now comes the fun part. Building your very own gourmet pizza, using the dough and marinara sauce you just made! 1 - Check your dough; it should have risen fully by now. Notice the dough in my photo has doubled in size from the small dough ball to nearly filling the bowl with soft, puffy dough. 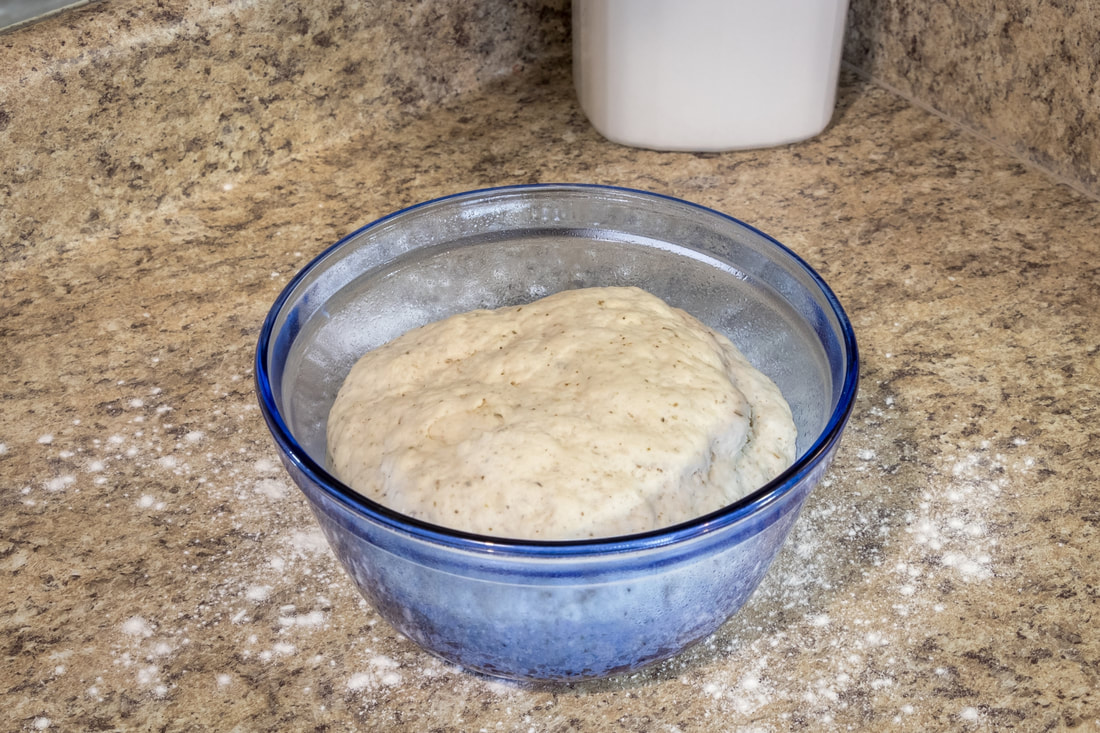 Risen Dough 2 - Gently punch the dough down with your fist to let all of the air out. You only need to press gently, you don’t need to pummel it. 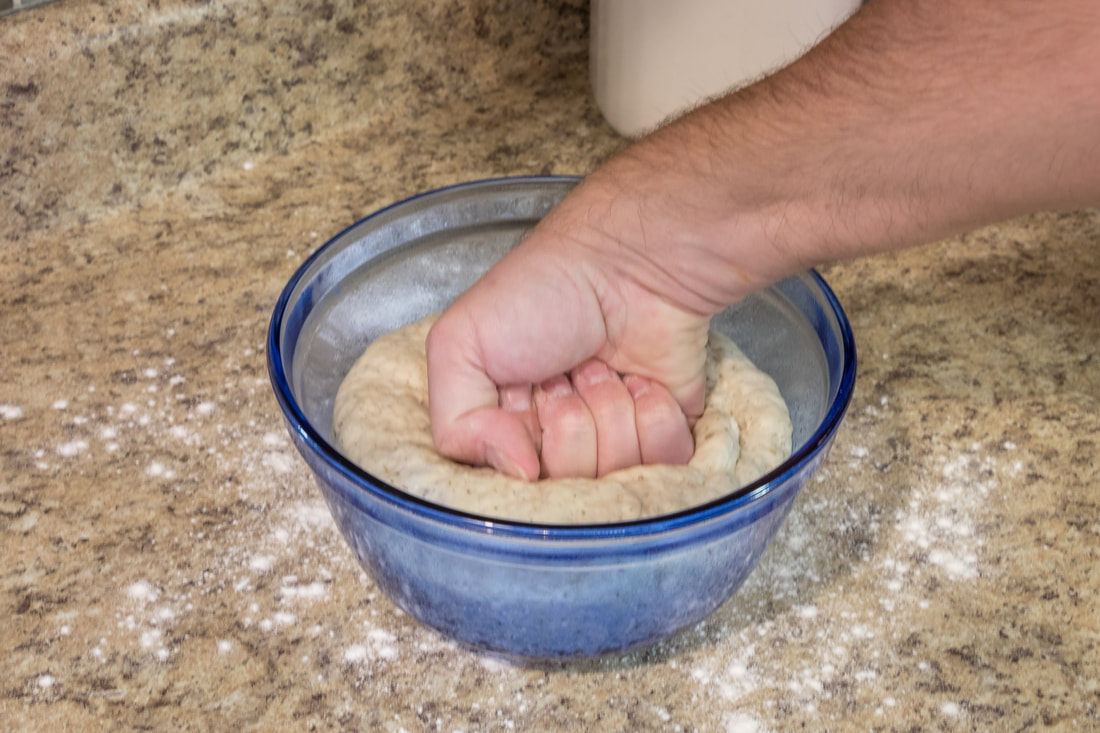 Gently let the air out 3 - Remove the dough from the bowl and knead it for another minute on a clean, floured surface to form a nice dough ball again.  Need to Knead 4 - Roll your dough out into whatever shape you wish. In this instance, I am making a round pizza. You can make a square pizza, you can roll it into a Stromboli, you can fold it in half for a calzone. You can cut it into pieces and make bread sticks. This dough can be used for whatever pizza dough creations you like. 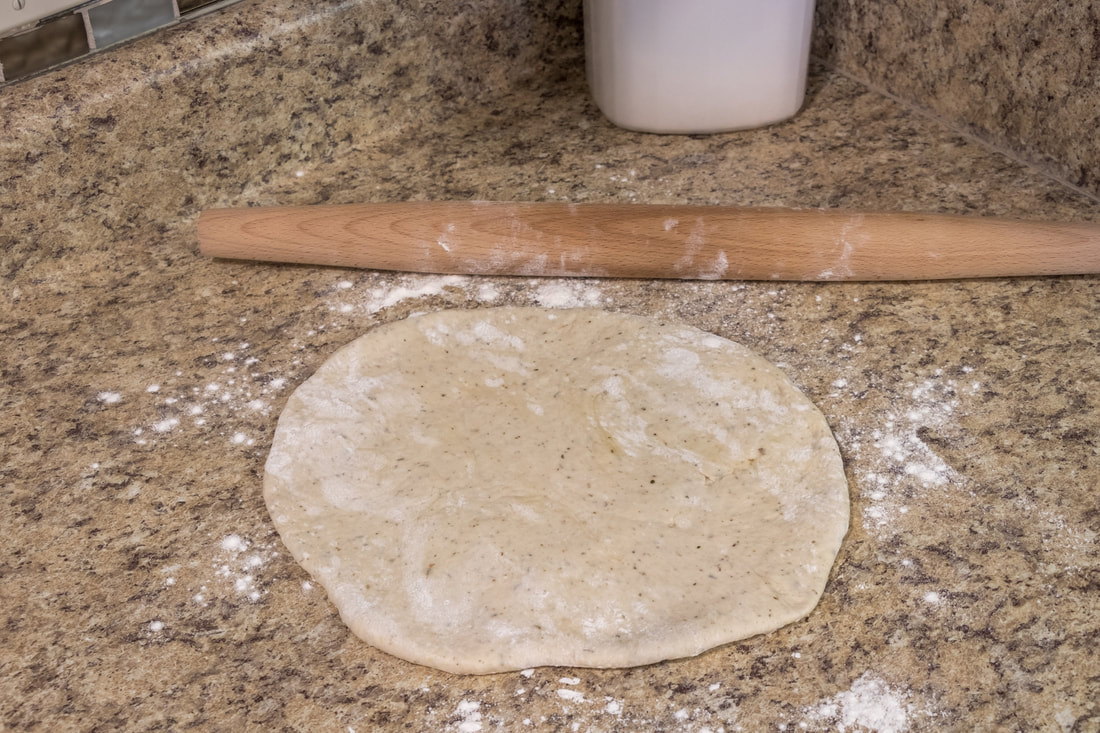 Roll your own For ease of use, I use a pizza pan. I used to use a stone, but I just can’t get the pizza to slide onto it very easily into the oven, so I just use a pizza pan to make it easier on myself. You can use a rectangular baking sheet too. There is no wrong way to do this. Just make sure the shape of your dough fits whatever you are putting it on. 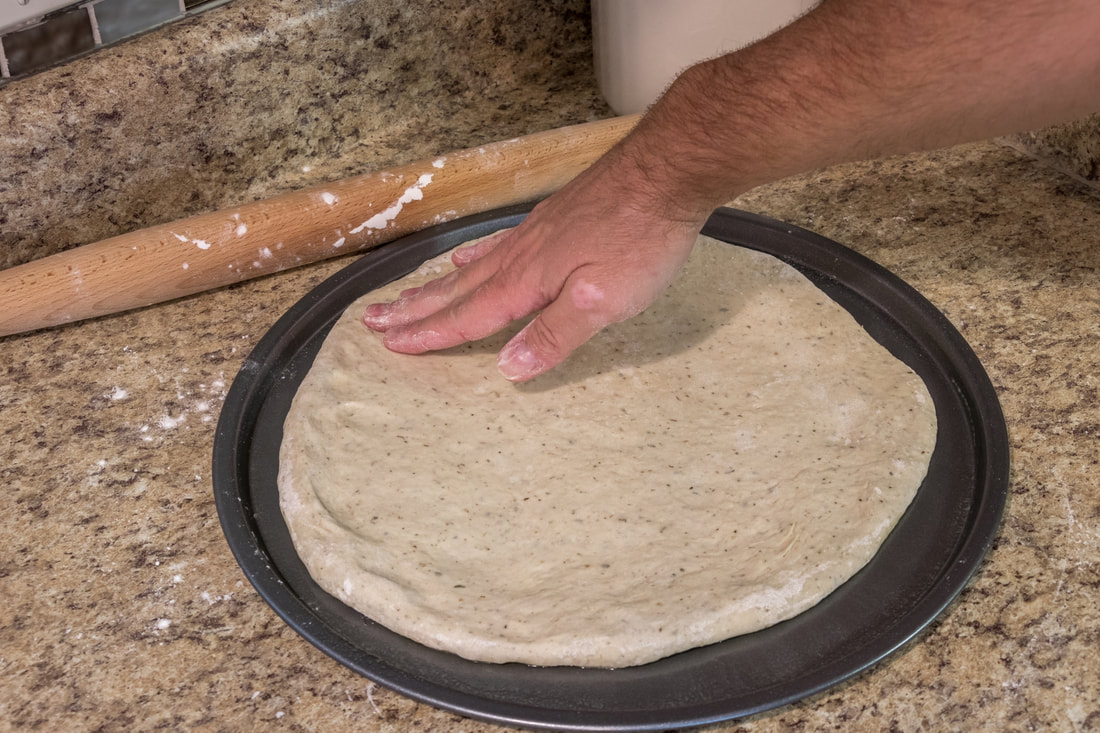 Form to whatever pan/surface you're goign to use in the oven Pizza Toppings What do you put on a pizza? Whatever you want! There are no right or wrong ingredients for your homemade pizza. My wife has a dairy intolerance and will be using non-dairy mozzarella, and for some reason she likes banana peppers, so her half will have those. My half will have regular mozzarella cheese and no banana peppers. The rest of the pizza will have the same shared ingredients across both halves. For veggies, I went with onions, mushrooms and olives. For meats, I went to my local grocery store deli, and bought all Boar's Head meats. I got four slices each of hard salami, sandwich pepperoni and a bourbon smoked tavern ham. The meat only cost about $4 total, which is as much as a small package of cheap pepperoni. The taste is so much better using higher end meats. 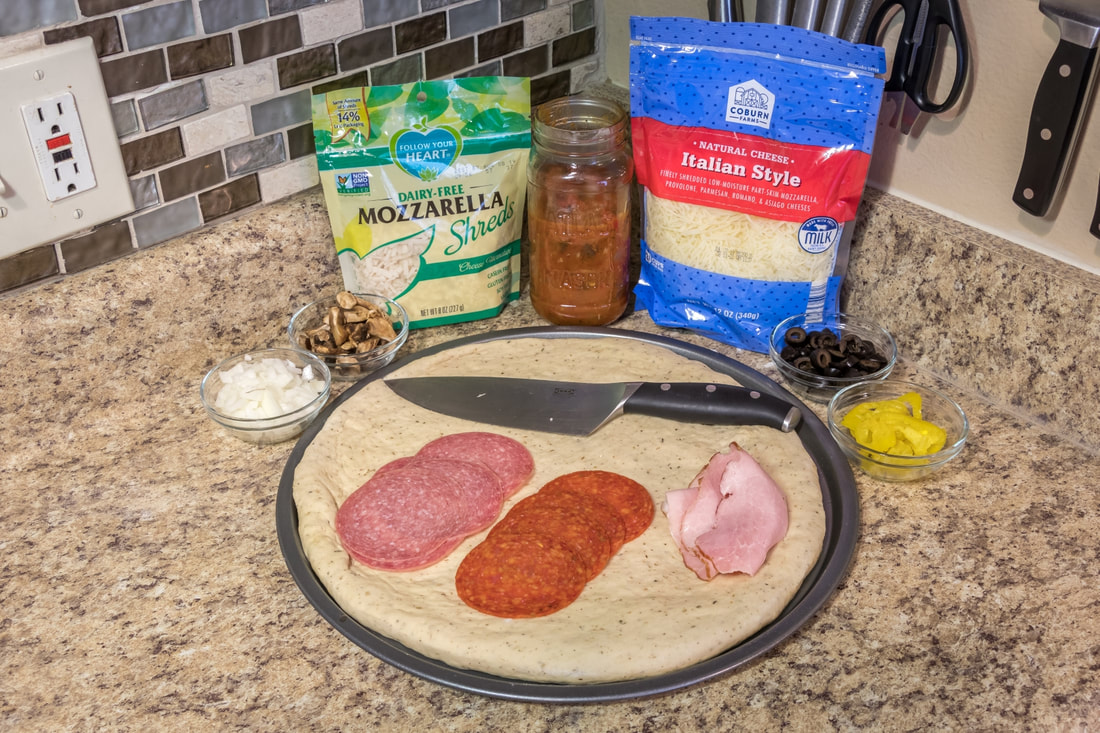 There is no shame in using whatever you have around the house. Typically, we just use cheap pepperoni and whatever random lunch meat we have in the refrigerator. If using lunch meats, cut them into smaller pepperoni sized pieces so you aren’t biting into large pieces of meat that will tear and slide off later. Layering your toppings: Typically, I start with sauce, followed by a meat layer or two. I then add my cheese layer, then another layer of meat (if you have more) followed by the rest of the toppings, such as veggies and mushrooms. If you want more cheese, add more to the top! 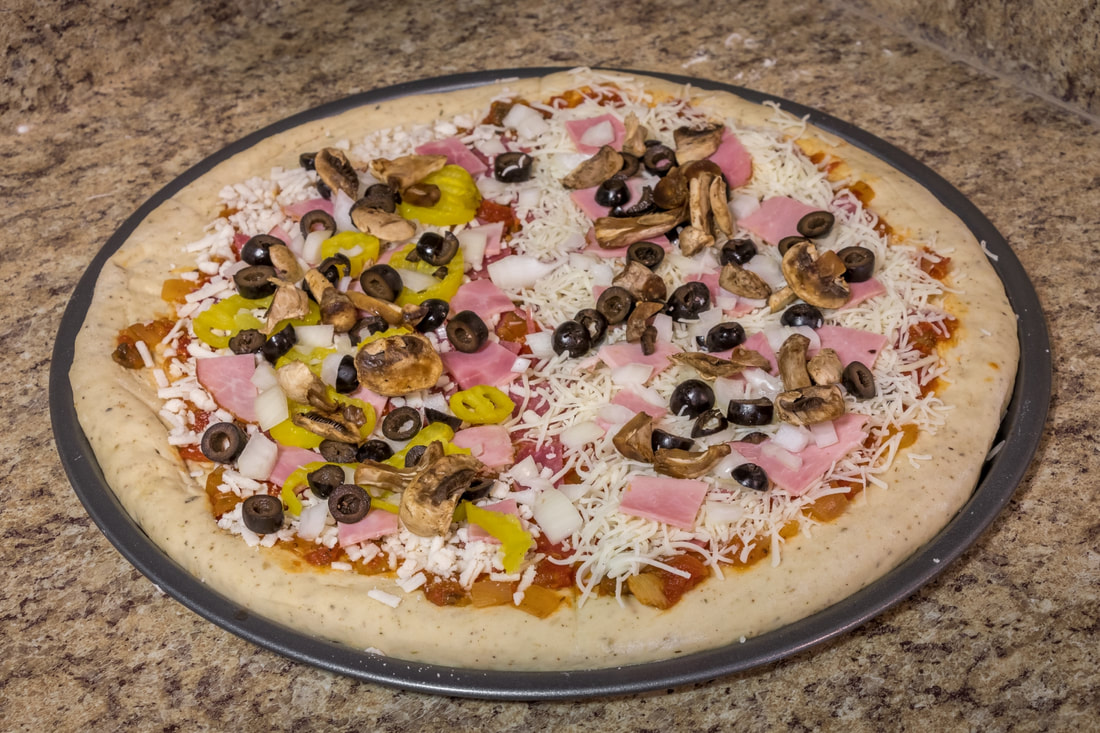 Baking the Pizza Cost Breakdown
I hope you enjoyed this recipe. My wife and I make this a few times a month. We typically save the left over marinara sauce for making a nice meaty pasta dish. That sauce is amazing! If you have any suggestions for future recipe write-ups, please leave a comment or write me an email. Dirt Cheap and Goodwill Hauls Last week I had an out-of-town friend stay with us. While he was here, we hit up a couple of thrift stores. At the end of the week, we road tripped back to his house, and stopped by a couple more thrift stores in various towns along the way. I stayed with him over the weekend, and on one of the days, we went out to visit a trio of Dirt Cheap stores for some crazy bargain shopping. For those that have never visited a Dirt Cheap store, they are located mostly in the southeastern United States. These stores appear to buy liquidated items from WalMart, Target, Sam's Club, various home improvement stores and clothing stores. The majority of the items are either overstock, returned items or items that made it to clearance at their respective stores and still didn't sell. This is the store where things come to die... I mean, find a loving new home! I am going to break this trip down into multiple articles with multiple categories of interest. We found home improvement items, toys and games, kitchen items and more. I try to find some excuse to travel to this area every few months, just so I can shop at Dirt Cheap. There are two areas with three stores each. The Columbus/Phoenix City/Auburn area and the Dothan/Enterprise/Ozark area. There are three stores in each of these two areas that are all within 20-30 minutes apart from each other, making it a good solid day of shopping. Thankfully, I have friends and family that live in both areas, which is about 6-7 hours away from where I live. My friend had never been to a Dirt Cheap, so I was ready to blow his mind with bargains. Since I can't remember what all I got at which stores, this will be a mix of everything broken down into categories from all of the stores combined. We visited four Goodwill and three Dirt Cheap stores over three days. Here's a camera phone shot of our total haul when we got back to his house after Day 3. This is everything from the multiple Goodwill and Dirt Cheap stores from both myself and my buddy. 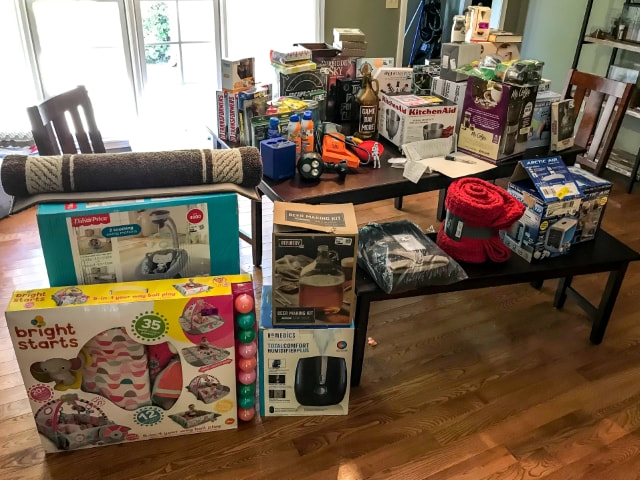 Let's start with the kitchen items. Teavana Perfectea Maker 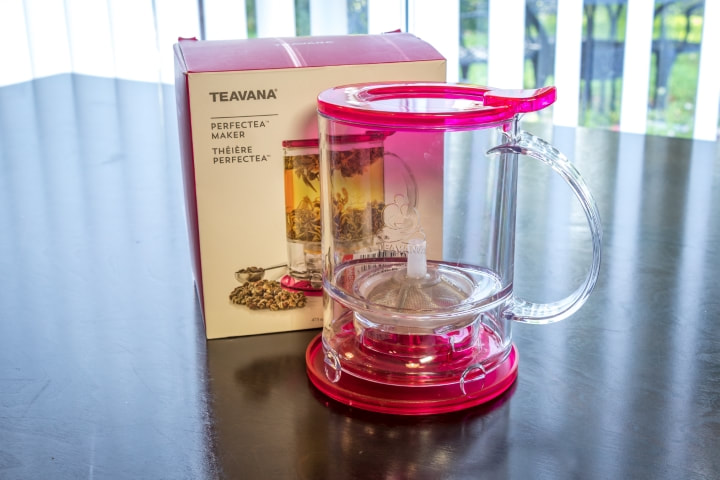 Got this at Goodwill. My wife loves hot tea and I remembered seeing these in use before all of the Teavana stores closed down. I thought I remembered these selling for $25 at the time in stores, but the only price point I can find now is new on Amazon for about $20, depending on the color. This was an especially great score, since my wife loves hot pink. These tea makers allow you to put in your water and loose leaf tea to steep. When it's ready, you simply set the tea maker on top of your cup. The rim of your cup will press up into the tea maker and allow it to release all of the tea down into your cup. You then just wash the tea maker out as you would any other type of cup. It's easy to clean and simple to use. This is the third one we've seen at Goodwill, and the second one we purchased. I would encourage picking these up any time you see them. They make excellent gifts, too! Retail Price (Pink): $16.95 (Amazon) My Price: $2.99 Retail Price (Black): $21.99 (Amazon) My Price: $.99 Total Savings: $34.96 Silicone Utensils and Sauce Containers  I am always on the hunt for high-end silicone utensils. I am trying to replace all of my worn-out cheap plastic and pan-scratching metal utensils. The utensils are all nic and stiff in the center with soft edges. Some utensils are very floppy and cheaply made, but not these. The red ladle is an expensive brand and will be perfect for all of my soups and sauces. The yellow "spoonula" is made by Wilton, one of the better baking brands. The blue spatula has no brand on it, but has the same shape and hole cutout as Wilton. It looks exactly like the Wilton one that I found on Joann's site, so we're going to go with Wilton, or a very good knockoff, for pricing purposes. The ketchup and mustard bottles I am planning to use for some of the custom sauces I am experimenting with. It's also easier to drizzle sauces with this type of container when creating plated food art. I make homemade BBQ sauce from time to time that I would like to have a container for, instead of just leaving it in a jar. These are perfect for that. Now that I am thinking about it, I should have picked up another pair. These are unbranded, so when looking for price comparisons, I just went with the cheapest generic ones I could find on Amazon. These were all found at Dirt Cheap. Ketchup and Mustard containers Retail Price: $3.58 My Price: $.54 Get It Right Ultimate Ladle (red) Retail Price: $15.99 (Amazon) My Price: $5.40 Wilton Silicone Spoonula (yellow) Retail Price: $5.49 (Joann's) My Price: $2.69 Wilton? Silicone Spatula (blue) Retail Price: $5.49 (Joann's) My Price: $1.35 Total Savings: $20.57 Ball Mason Jars 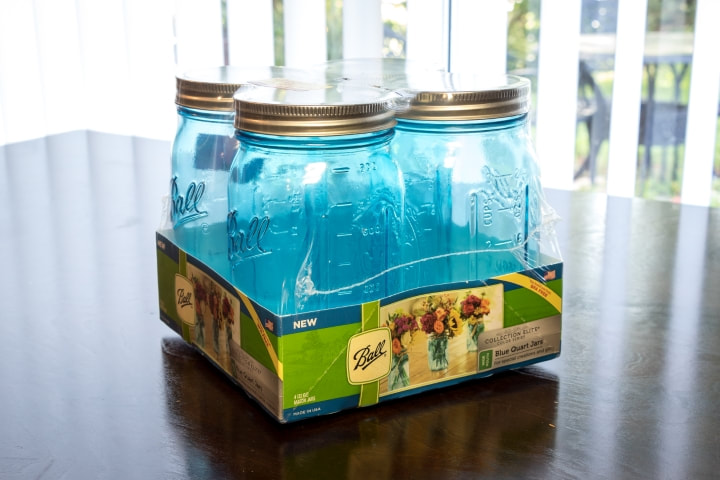 I have been needing more mason jars, but didn't want to pay full price for them. I've been looking for mason jars at Goodwill, but often they are worn and priced too high. I ended up finding this bargain at Dirt Cheap. These are nice because they are brand new and they are the special aqua blue color, which I happen to love. I use these mainly for homemade salsa and marinara sauce. But we also use them for other storage as well, such as large batches of marinade or dry rubs for my BBQ. The used ones in Goodwill have been about $2-3/ea. These came out to $1.34/ea brand new. Retail Price: $11.92 (Amazon) My Price: $5.39 Savings: $6.53 KitchenAid 4.5QT Mixing Bowl 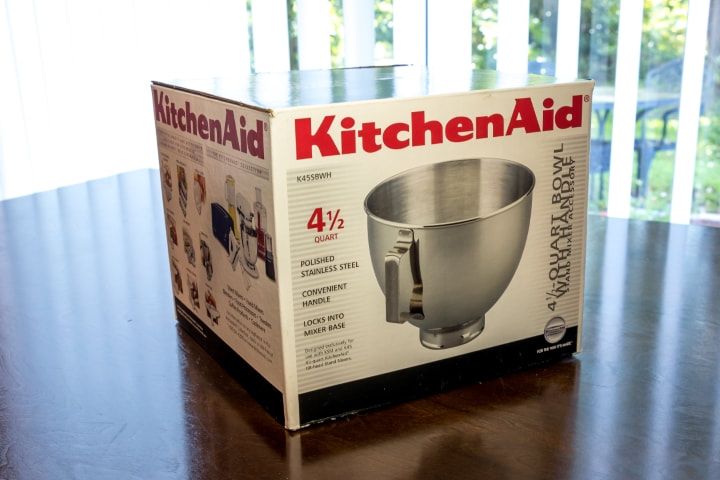 I needed a second mixing bowl for my KitchenAid stand mixer. I double a lot of recipes, or have multi-part mixing needs in single recipes. I usually just grab another mixing bowl and try to figure out what to put in each one so that I can keep the main one free to be attached to the stand mixer. With a second stand mixer bowl, I don't need to worry about that anymore. This is the upgraded version of the bowl that came with my mixer. Mine doesn't have a handle on it. I'm not sure how useful I will find the handle, or if it will just get in the way. After all, mixing bowls in general don't have handles. I found this at Dirt Cheap. Retail Price: $39.99 (Amazon) My Price: $17.64 Savings: $22.35 Home Brew Kit 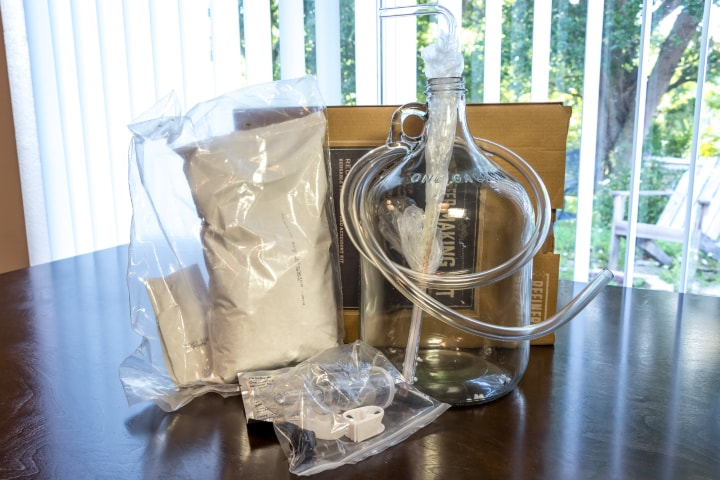 Ok, before all the home brewers out there laugh at me, as my home brewing buddy that was with me did, I only bought this for the tools within. Yes, I will be brewing the batch of beer that came with it, just to try it, but this was all purchased for a different reason. In the past couple months I started making my own ginger beer. I am using the ginger bug method before transferring to a ginger tea. The whole process takes a week or longer and I am just using glass cylinders and plastic 2-liter soda bottles. I have been interested in a small carboy like this. My brew buddy told me I should also invest in an airlock and wand to make the process easier. When we opened up the box, I was surprised to find all the parts inside, including the exact three items I was looking for! It also has a thermometer included, too. I will have future articles around making this batch of beer, as well as all the ginger beer I will make afterwards using these parts. This was one of the items I was most excited about finding at Dirt Cheap. This appears to be a Target exclusive item, as I can't seem to find it anywhere else. The box shows it's from "Refinery and Co." and it's just called "Beer Making Kit." I found it on Target's website, but with a different box and name. It's the exact same contents and is no longer sold. As a bonus, the grains and packaging inside are all still within date for another six months. Retail Price: $29.99 (Target) My Price: $6.75 Savings: $23.24 KitchenAid Pasta Roller Attachment (KSMPSA)  After rolling out my first pasta dough by hand, I realized I never wanted to do it again. A friend had a hand-crank pasta roller that she let me borrow to try out, and I absolutely loved using it. At that point I realized I must have a pasta roller.
I wanted the KitchenAid attachment, but it was way too expensive for my budget. I started looking for used units, but people were still asking too much for them. I finally found a winner on eBay! There was a seller that had this broken unit for $16, plus $11 for shipping. I inquired about what was broken. It turned out it was just the shear-shaft. While these shafts are not replaceable from KitchenAid, there was someone online that was making his own for these units for a reasonable price. I purchased the replacement part for $10. Once I received it, I realized it was for an older model. Being new to these attachments, I didn't know there were different models, and I thought I had the right one. I found the right part from the same guy for $20. So all-in, I have $56 invested into this $90 attachment. I ended up finding a brand new one someone was selling on Amazon for $60 shipped. A few weeks later knock-off models started showing up for $45 shipped. Oh well, I still saved something on an item I wanted and needed. You can't win them all. It was really easy to repair, and only took two minutes to swap the broken shaft out with the new one. If you can find a broken one cheap on eBay/CraigsList/etc., or know someone that has one, I would highly recommend getting it. But do factor in shipping, repair part, etc. vs. a knockoff or new unit. Retail Price at the time: $89.99 Retail Price Now: $59.95 Knock Off Price: $45.99 My Total Price: $56 Savings: $4-$34, or -$11 compared to the knock off Replacement Shafts found here: KPSA Repair Stuff I didn't buy I had one item I picked up at one of the Dirt Cheap stores that I carried around in my cart for an hour, deliberating on getting it or not. I didn't need it, but it would have been a nice upgrade, or could have easily been flipped. I found a Kitchenaid Professional 5 Plus Stand Mixer. They had a $550 tag on it with 60% off, bringing it to $220. This is $20 more than the price of the cheapest Classic series! After a short debate with the wife, I decided to leave it behind. I didn't really have the money since I couldn't guarantee I could flip it, nor would I make a ton off flipping it anyway. It would have just been a nice upgrade for the price, then I could sell mine. The model I have is the Walmart exclusive Deluxe model, that is basically the Artisan with the upgraded motor that I got for $199 around Christmas time when it went on sale, which was a bargain in itself! Mine is also the cobalt blue model, which I absolutely love. The Pro 5 I found was the standard silver color. Had the Pro 5 been any other color, I probably would have bought it to upgrade mine. The main differences are: Deluxe: 325W motor, 4.5QT bowl, Tilt Head Pro 5: 525W motor, 5QT bowl, Lift Stand Basically I could mix heavier dough, or be able to make double batches of certain recipes with the Pro 5 model. Well, I hope you all enjoyed checking out my latest kitchen upgrades. The next article will continue with the other categories of items I purchased on this trip. Thanks! Joe Continuing on my objective to build my baller kitchen from thrifting, I present to you today another haul, full of mostly kitchen items. I did find a few non kitchen type things as well that have upgraded both our daily life for storage, but also a fun item as well! This haul was all from the multiple Goodwill stores in my area. I have two Goodwill stores within a mile of my house in opposite directions, which makes it really easy (and dangerous?) to itch that shopping scratch. Once I have finished with the majority of my kitchen haul articles, I will start presenting my creative recipes that have been made from all of these new kitchen upgrades. All retail pricing reflects the "real world" price at the time of this writing. This means that this is what you can find these items for at Walmart, Amazon or if it's no longer sold, eBay sold listings. All of the kitchenware items are things I am looking for and need. They will be replacing cheap, worn out or worse versions of themselves. Pyrex Glassware I've been wanting a few more small Pyrex glass dishes for a few different purposes. I wanted some to bake small test batches in the oven with, some to store small batches in the fridge with and some to put ingredients in while baking and photographing later for blog use. These types of dishes photograph well and are all oven safe and hit all those marks at a fraction of the cost. Another reason my wife and I are looking for these types of dishes is that we're trying to replace all of our cheap plastic storage containers with glass. When we find a glass version of something we have in the plastic-ware drawer, we buy it, then either throw the plastic version away, or if it's a brand name item, we donate it back to Goodwill. Most of our plastic-ware are from lunch meat containers. They're great, they stack well, and were a nice free waste byproduct from already buying lunch meats. But, glass is just better. Pyrex 2 Cup Round Bowl 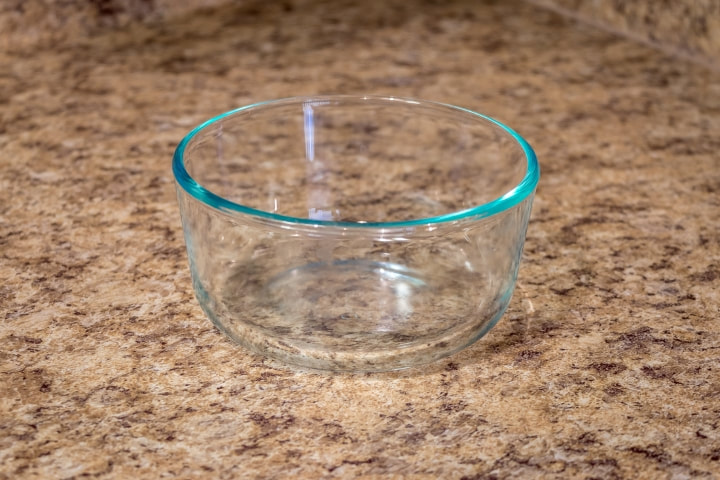 This is a perfect bowl for mixing up small batch ingredients, or for moderate amounts of ingredients before mixing into larger recipes. This type of dish also makes for good storage for homemade salsa, sauces and other foods of that type. I didn't find the lid for it, but plastic wrap works well for these small bowls. This bowl has seen very heavy use each week since purchasing it. I found this specific dish comes in a 2 pack with lids for $11. Adjusting the price, I believe this is worth about $4 new by itself. Retail Price: ~$4 My Price: $.99 Savings: $3.01 Pyrex Custard Bowls 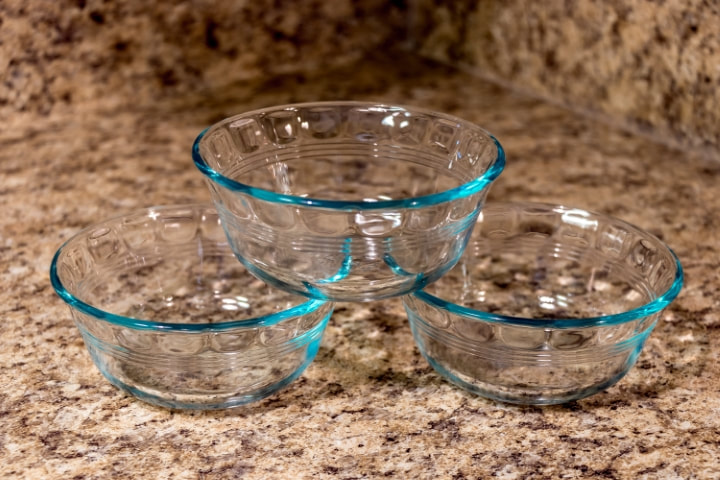 I have been looking for a matching set of the ceramic custard bowls, but figured these would also make for great photogenic ingredient bowls for blog posts, as well as small serving bowls for side dishes, condiments and more. Being that the rims are straight, they are easy to cover with plastic wrap if needed. I don't use these nearly as much as the previous bowl, but these see some pretty moderate use each week for meal prep. They are also used for fruit snacks, such as apple slices and grapes. These were originally part of a 4 pieces set, for $8.50, so I figured these to be worth around $6 with the missing bowl. While the discount wasn't as steep, there's a few items, such as Pyrex, that just tend to cost more at thrift stores. So long as you don't pick up any obviously abused dishes, Pyrex tends to last forever, so it is still worth buying used for the discount. Retail Price: $6 My Price: $3.99 Savings: $2.01 Pyrex 4 Cup Square Dish 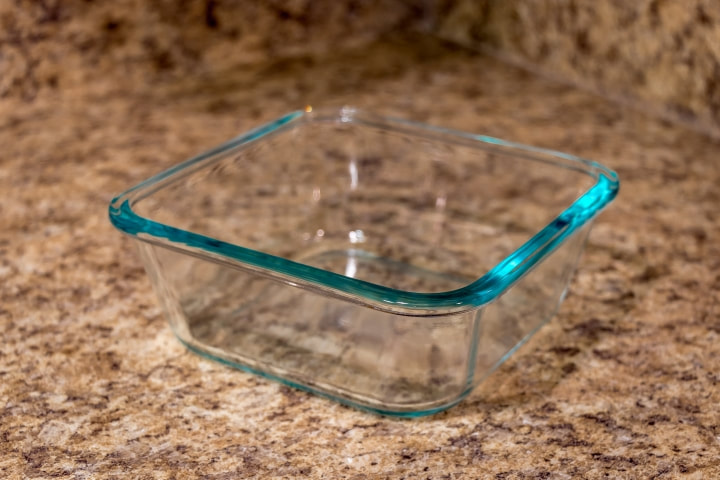 I was on a kick to making more dairy-free stuff for my wife, but since I usually made the dairy version for myself, I wanted a smaller dish so that I could make her a small non-dairy batch of whatever I was making. Think fancy baked mac-n-cheese, etc. I also bought this so that I could make small test batches of food for future recipe articles. I haven't used this dish as much as I had planned, but that will probably change in the future as I start to ramp up on food related articles and get back to baking more. This dish originally had a lid, but that wasn't present when I found it. Lids are worth roughly $1-2 online for various Pyrex products, so I took off $2. The dish is small enough that plastic wrap is still a great solution for covering it. For my uses, I didn't really need a lid anyway, so I was glad for the additional savings. Retail Price: $6 My Price: $2.99 Savings: $3.01 Pampered Chef Cut n Seal
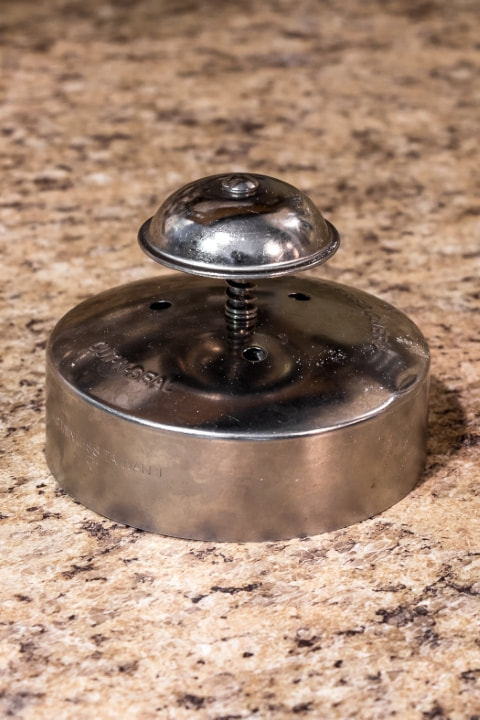
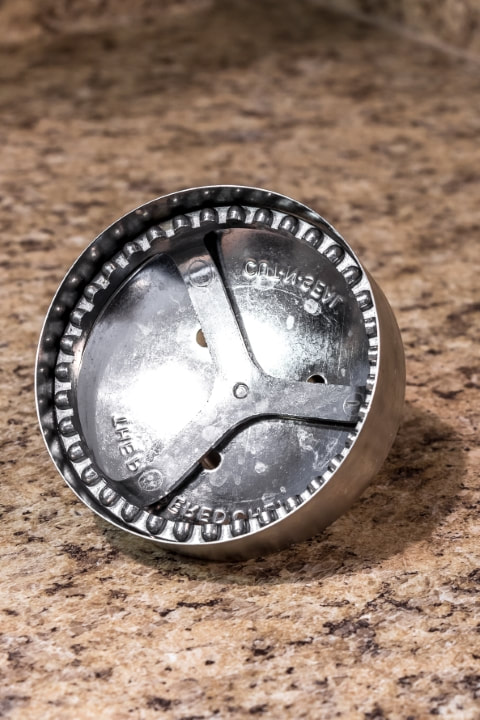
I will be the first to say that while I love gadgets, I am not a huge fan of single-use kitchen gadgets. I think the large majority of kitchen gadgets out there are solving a problem that doesn't exist. Most of the tasks can easily be performed by stuff you already have, or just by learning good knife skills. This gadget gets a pass. I have been learning to make all types of dough, including breads, crusts and pasta. Something that I was experimenting with a while back gave me a need to make a sealed dough pocket, much like a pirogi. Sure I could use a circle cutter and pinch the edges down, but this gives it that nice crimped look and cuts it all in one single smash. This gadget actually does save steps and time. I have about 4 uses for it that you will see in future food articles. I've used the Cut n Seal a few times already with great success, so long as it is heavily floured. The time saved vs trying to do it by hand with multiple other tools is well worth the storage space in the miscellaneous utensil drawer for this small gadget. Retail Price: $11 My Price:z $.99 Savings: $10.01 Silicon Utensils
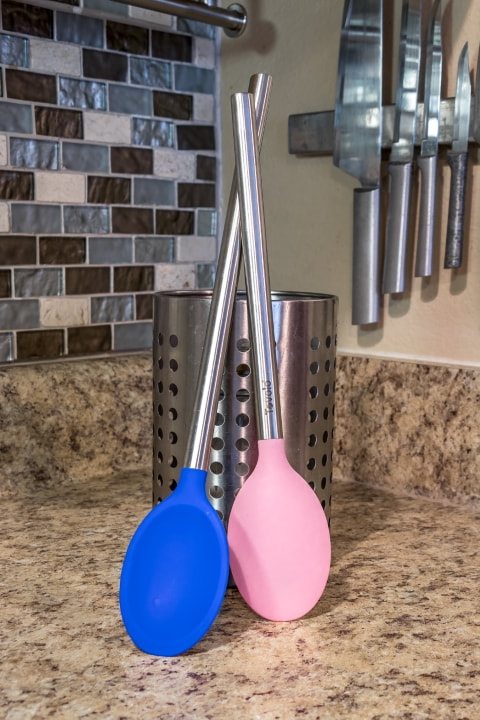
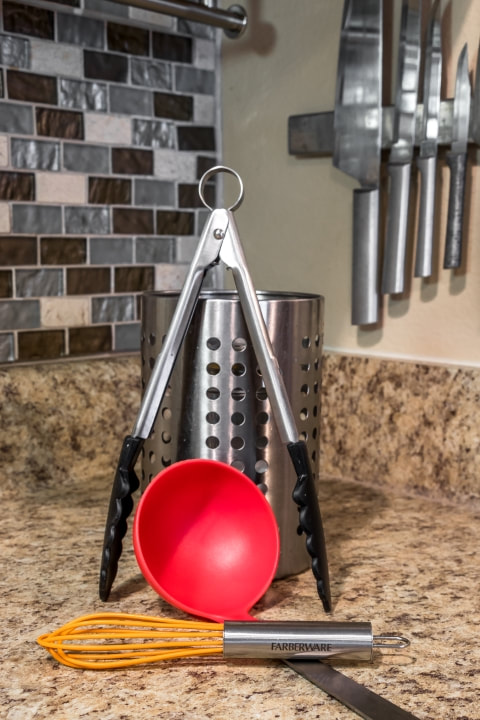
While experimenting with lots of new recipes and foods, I've noticed a few things about a lot of my utensils. Most of them are cheap plastic or metal that either get disfigured from high heat or can scratch my cookware and non-stick surfaces. I also found a lot of things stuck to my utensils or stained them, whereas with silicon, it usually wipes right off and doesn't leave a stain. Also, with the non-stick pans, and our non-stick air fryer basket, I was starting to see more scratches on them, even though we try our best to be careful. It was time to start replacing all the tongs with silicon tipped tongs. Nice silicon utensils are not cheap, so I usually avoided these in the past. On this trip to Goodwill, however, that all changed. Because of the items I found, I now make it a point to dig through all of the utensils and seek out the more expensive branded items. I found this mix of 5 different utensils across multiple Goodwill stores. I was really excited for the matching spoons, found in two different stores! These 5 utensils are heavily used each week, with at least 3 of them seeing daily use, sometimes multiple times a day. The tongs are used almost daily in the air fryer, or for making breakfast in the frying pan. The mini whisk is also used daily for making a single scrambled egg in the microwave egg puck cooker. (I like my H/E/C Biscuit Sammie egg pucks, don't judge!) Prices:
My Price: $3.15 Savings: $31.85 Personal Blender Cup Set 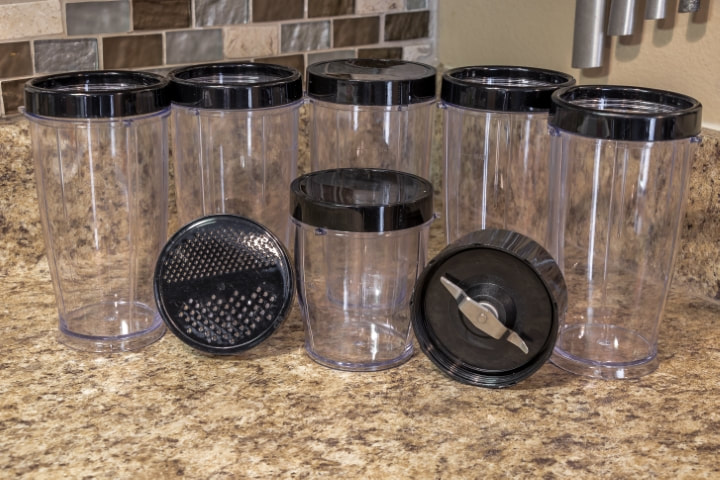 On my previous trip, I had found a Rival Personal Blender. It only included one cup and the blade. I ended up using it way more than I thought I ever wood, so when I found this package of cups and another blade, I jumped on buying it. It was all bagged together unceremoniously in an old zippered plastic comforter bag. While I couldn't verify this would fit my blender, it looked like it would just by eyeballing it. I figured these were a generic brand and that most of the small blenders were a standard size. I guessed right and it did fit! I don't think this was a good purchase though. There's nothing wrong with any of it, but the way I use my personal blender, I found we just don't have a need for all the extra stuff. We don't do shakes or juices. Whenever I grind seasonings in it, I put them into a small spice or mason jar for long term storage, so the shaker lid and smaller container haven't been used. I'm not sure what this style flat blade is for, grinding smaller things like spices perhaps? It's different from my other blade (a more traditional multi level blender style), but I don't ever find myself using this blade. I will probably give it all away as a full set whenever I get around to upgrading to a Ninja system. It's a nice set, we just don't use any of it, and as you can see, it takes up a good bit of space to store. Retail Price: ~$20 (I couldn't find this exact set, so guessing off similar ones found on Amazon) My Price: $3.99 Savings: $16.01 Keurig K-Cup Holder Stand 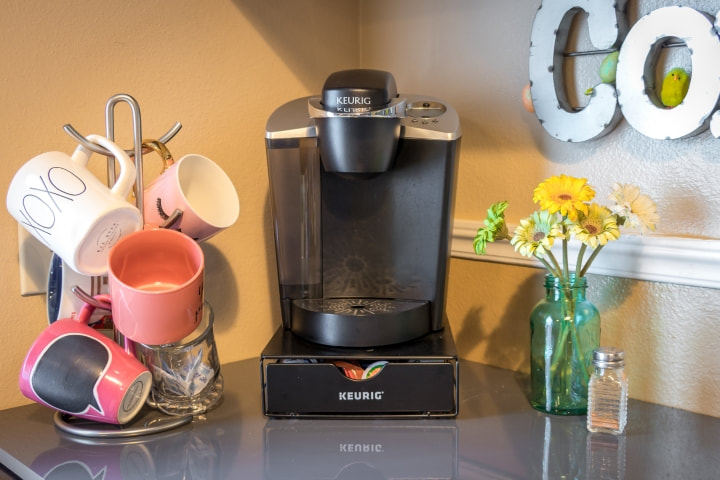 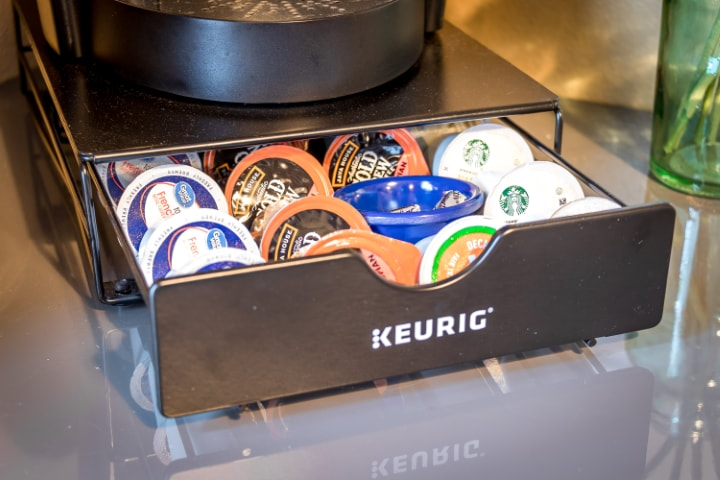 My wife loves her Keurig, so I am always looking for accessories for it. The Keurig itself we got for a few dollars from someone over 10 years ago. If you keep it regularly cleaned, they keep on going forever. This Keurig was originally a thrift bargain for us too. We had one of the little spinning tree style K-Cup holders already, but in an effort to reclaim some counter space, I wanted to see if she would switch to this drawer stand style. She tried it, liked it, and now it's a permanent part of her cozy coffee corner. I see K-Cup holders of all types quite often at the Goodwill stores. I see one in nearly every store on most visits. If you're looking for one, check a few thrift stores first. Retail Price: $17 My Price: $1.99 Savings: $15.01 Risk 2210 AD 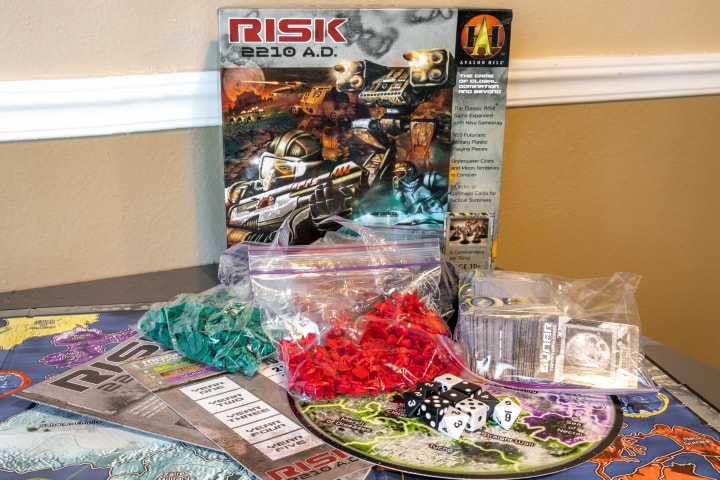 This isn't a kitchen item, but I am a huge tabletop gamer. I found this at one of the Goodwill stores, with all the pieces intact and spotless clean.
This is one of the more expensive Avalon Hill/Wizards of the Coast large campaign style war games based on Risk. Board games aren't cheap, especially games with many small pieces. I have the regular Risk in a special anniversary version that is styled after the very first original version. My dad and I enjoy playing that together. I thought this might be a more in depth fun modern take on the game that my dad and I could play. I have yet to play it, but the same goes for quite a few of the board games I own. Too many games, not enough time or people to play them with. I always look at all the games at Goodwill as I can sometimes find a gem in the sea of dull boring games like Cranium and Scene It. Another awesome deal I found on another trip was the $50 Ticket To Ride, for a bargain price of $4.99. I was with my sister at the time, so I insisted she buy it for her gaming shelf, as I already had a copy. Cheap board games can be found, you just have to look for them. You can check out more of my game related articles, if you're into that. I talk about strategies for a few collectible card games, and will be going more in depth with some of the board games I play in future articles. Retail Price: $28.99 - $50, depending where you look. My Price: $6.99 Savings: $22 - $43.01 I hope you enjoyed my latest haul! I have a few more in the works to write about in future articles. As always, if there is anything specific you would like me to look for, or other thrifting ideas you would like to share, please let me know in the comments below. Thanks! Joe After quitting my job, I wanted to do something different. One of my ideas was to create new food ideas and cater them, or sell them to local stores. The state of Florida's food industry laws quickly shut most of those ideas down due to cost, so instead I decided to blog about my creations and will be creating video content for them with how-to's and lots of tasty food glamour shots. In preparation for this, I needed to outfit my kitchen with some new tools. Of course without a job, it's hard to buy new stuff. So, how does one go about doing so? Second hand, of course! This will be a running series. I will write new articles on as I find new and interesting items to upgrade my life via thrifting. This first haul was pretty decent. I was just looking for new kitchen gadgets to try new things out and ended up finding a few other cool items as well. We are lucky and live in an area with over a dozen Goodwill stores. We even live between two of them, each 2-3 minutes away! I love thrift shopping. It's almost as if you're walking into an entire unboxing video, except you're the star, and you're also trapped inside the unopened box. I like to go early before all of the pickers get there. YouTube and other sources are making thrifting really popular right now, especially for the retail arbitrage market. This causes competition among pickers. Being that I want this stuff for myself, and not for resale, it's even more important that I get an early start. I first head straight to the electronics and appliances aisle, then loop around to kitchen wares, then to the games, then the other general stuff. Here's what I found on this haul: 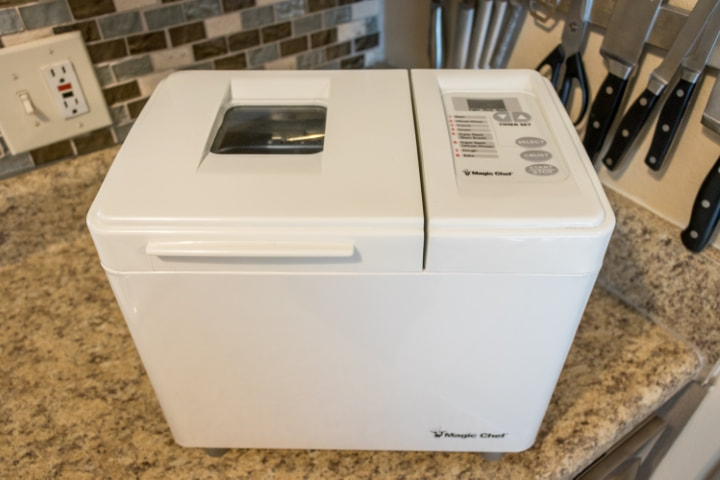 Magic Chef 310 Magic Chef 310 I had always wanted to try out a bread maker. I was just beginning to learn about dough and bread and the crazy science involved with that. I thought, why not give this gadget a try? Thrift stores are always flooded with bread makers. Good intentions that nobody ever ended up using. It's first loaf was excellent, I just made a basic white bread out of it. I was completely amazed at the automation vs. making bread by hand. It does take up a lot of space, so it sits out in the garage now on a shelf dedicated to other small kitchen appliances. Since buying this bread maker, I've made 3-4 loaves in it, even showing my wife how to use it. She was proud of the custom, seasoned loaf she made, and was blown away at how easy and inexpensive it was to make bread. It's only a few simply ingredients that cost less than a quarter of what a typical cheap loaf of bread cost. Will I keep using this? I will most likely use it occasionally. Worst case, I take it back to the thrift store. The few loaves of bread I've made with it have paid recouped the cost, twice over. It appears MagicChef is a WalMart licensed product. This model is a much older unit that has long been discontinued. While I could not find this model's price anywhere, similar models were going for about $60 new.
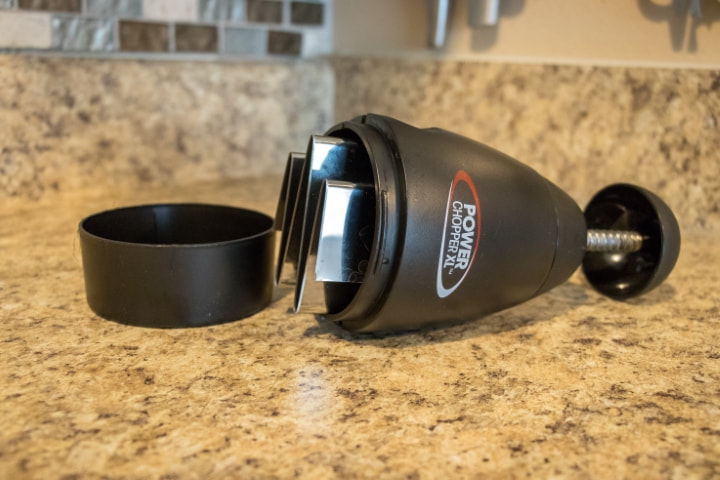 Power Chopper XL Power Chopper XL Ok, I know what you are all thinking, "Why did you buy this? You aren't a real chef!" I totally agree. But it was cheap, and I always wanted to try one so I can form my own opinions on "useless" kitchen gadgets. The thrift stores are usually loaded with these gadgets. And for good reason.They are pretty useless. Unless you have issues with your hands (pain, motor control, etc.), or you just have terrible knife skills, then do not buy one of these things. I tried chopping half an onion with this. It did a terrible job! I had to slap the plunger with more effort and for a longer period of time to get a good rough chop. It left a lot of long pieces. It also crushed and mangled some of it as well. It wasn't pretty. In comparison, I can rough chop an entire onion in a few seconds with a good chef's knife, and further mince it with only an added few seconds. On top of that, you then have to clean this thing. It has a lot of nooks and crannies in it, making washing it a pain. And then you have to store it. This is most likely going back to the thrift store. The only reason it is still around is that I am trying to find some creative use for it that is just way outside of the box. Unfortunately, any idea I have is quickly crushed by the fact that a chef's knife can do it better and faster.
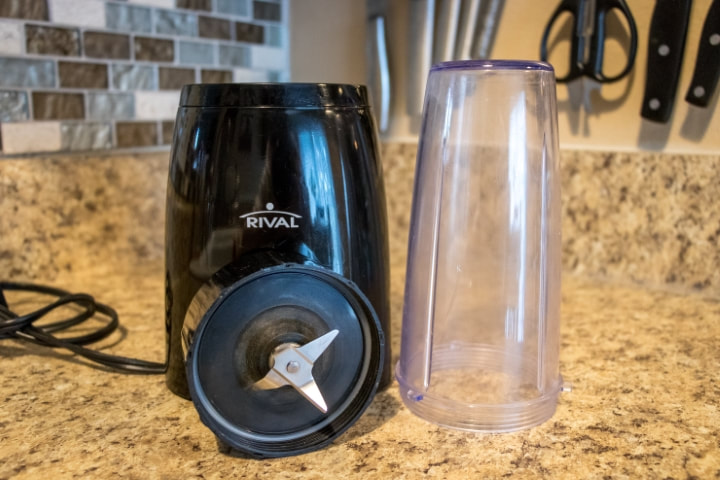 Rival Personal Blender Rival Personal Blender I have been wanting a small bullet blender for a while now. I often want to blend something small, but don't want to get the full size blender out, clean it, etc. Thankfully this came with all its pieces, it worked when tested in the store, and the gasket seal was still good. This has turned out to be a very heavily-used kitchen gadget in our house. We've made shakes and salsa, crushed nuts, blended spices and pureed meat with it. This has quickly become one of my favorite cooking gadgets. Now, there's some things it won't do well, but that's based on the blade and power of such a small motor. I've been shopping around for a new blender system (I'm looking at you, Ninja) that includes not only a full-sized blender, but also one of these bullet blenders, and a food processor (I hate my old food processor). Getting this personal blender really opened my eyes up to what a small, easy-to-use gadget can do for you. It made me realize that I want to invest in a nicer blender system when money allows. We really use this little appliance quite a bit, usually several times a week. This was an excellent buy. I see these now and then in the various thrift stores I've visited, so I would definitely pick one up if you have any interest in these. Well worth the thrift price.
Followup Late 2019: I liked this so much that I made sure my new Ninja kitchen system had a more heavy duty version of this, which I am now constantly using. I ended up giving this little Rival blender away with good memories. 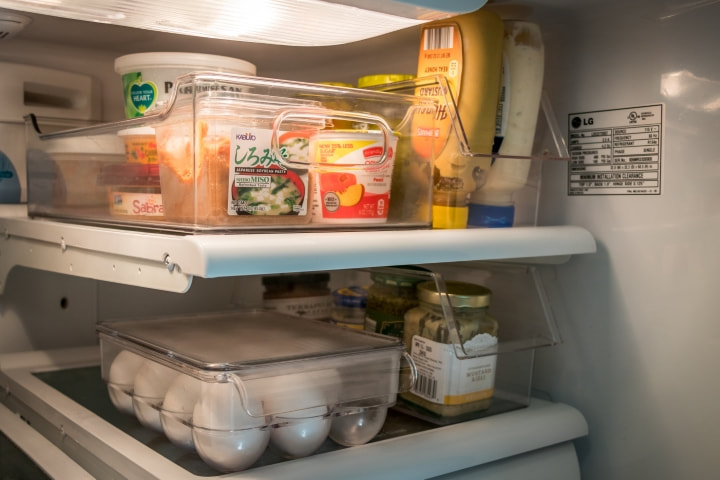 Clear Food Storage Bins - Fridge  Clear Food Storage Bins - Pantry Clear Food Storage Bins Have you ever wanted that Pintrest look in your fridge and pantry? Well, you have to pay to play. These bins are very expensive for some reason. It's just plastic. They are trendy, they are handy, they look good. You can't afford them. The good news is that these often turn up in the thrift stores, priced alongside the cheap Sterilite bins and other storage items. These will appear in various orders throughout this series. I forget where and when I bought the bins, so I will just generalize in this article based on the prices I logged in my thrift haul spreadsheet. (Yes, I keep a spreadsheet of all of these bargains! I'm a stats nerd. I want to save the most! I will out save you all MUHAHA!) As stated before, these bins are not cheap. Celebrities hire professional organizers to put these in their fridge and pantries so that they can blog about it and show them drinking an expensive milkshake their personal chef made for their breakfast while they stand in front of their fridge and pantry full of these beautiful clear plastic storage bins. Who doesn't want to have that look? mDesign is one of the brands I like to look for, or those similar. Checking Amazon, the larger bin in the fridge photo goes for roughly $7-$10 per bin. The narrower bins are in the $8 range. While that doesn't sound terribly expensive, keep in mind you need a lot of these bins. In the photo of my fridge above, I've only been able add a few bins of bling so far, and those would have totaled $38. In the pantry photo, you can see I have only been able to find 3 bins so far, and those are worth another $26. That's $64 in storage bins. They just hold things. That's a lot of money to just hold things. But they look so good holding my things! I must have more! I must have all the bins!
 Technics Record Player SL-D20 Technics Record Player SL-D20 I found this laying sideways in the big "to be shelved" bins in the Goodwill store. I quickly rescued it, plugged it in and checked for as much function as I could. The needle was still good and everything moved freely and the automatic functions seemed to work properly. The only thing missing was the dust hood. I took this gem home and realized it must be either plugged into the phono input on my receiver or I would need some kind of signal converter to put it in my office where I wanted to keep it. I have a rather nice sound system on my computer desk, and this is where I spend most of my time, so I wanted to keep it here. I ended up grabbing a cheap Pyle PP444 Phono PreAmp for under $20. I can now use my turntable anywhere. I needed to test this first for tracking and make sure it wasn't going to destroy my good records, so I took my beat up copy of Van Halen's "1984" album and spun it up. Everything worked. Tracking and all was spot on. I read up on the interwebs how to adjust the balance weight and check for all the various things turntable snobs say to check for. Everything checked out! I then moved on to play the rest of my nice records the rest of the day. This is one of my most favorite finds, as I have been wanting a nice turn table for many years, but couldn't afford to shell out the money for a decent cheap one (taking advice from the turntable snobs on the interwebs to not buy cheap or it will ruin your records). I was so proud of my find that I am keeping the ugly price sticker right on the top just to flaunt my thriftiness as I play my hipster music device. While I did need to spend an additional $15ish for the pre-amp, and it's missing the hood, which is a $30+ replacement cost, I am only counting the turntable itself in this price since it doesn't technically need the other items to function perfectly. I keep a microfiber cloth covering it when not in use.
In Conclusion I hope you enjoyed my first thrift haul post. If you want to see more, please comment or send me an email for thing you might like to see me find. I love a good challenge. I will keep this series going as this is a huge part of what my wife and I enjoy doing. I want to share the joys of thrifting with those that may not typically look at a thrift store, such as Goodwill, as a place they want to shop at. It's a great place to try new gadgets out without spending a lot of money, or finding something you've always wanted to try but just aren't sure how well you'll like it. I will be showing my totals for each trip, how much was saved, and what the total "real" retail street pricing was at the time. By "real" street pricing, I am referring to what I would pay at Walmart or Amazon, or eBay if it's something not currently sold anymore. These will not be MSRP prices. These will be prices that people actually pay in real life. This first haul, since I included talking about some of the storage bins I got on various trips, will have a different price reflection than everything talked about above. The missing costs will show up in future haul articles. Totals for this trip
|
Categories
All
Archives
August 2022
|

- Home
-
Abandoned Travels
-
Abandonments
>
- 2014-2015 >
-
2013
>
- CMX Construction
- Orange House 01
- Fertilizer Plant
- Egg Plant
- Box Plant
- Ellaville Bridge Revisited
- Gold Kist Farms Silos
- Lafayette House 03
- Columbia House 01
- Columbia Barn 01
- Cash's Towing
- Coastal Revisited
- Suwannee Shack
- Hernando House 01
- Lafayette House 02
- Lafayette House 01 Revisited
- Lafayette Chimney Revisited
- Lafayette Quarry Revisited
- Williston Urbex
- Elljay Garage
- 2012 >
- 2010-2011 >
- Travels >
- Nature >
- Water >
-
Abandonments
>
-
Games
- Food
-
VATS Sucks
- Stuff
- About


 RSS Feed