
Part 1 - The TL;DR ADHD VersionThis help article was written with the intent to help those that may be running into performance issues with Magic: The Gathering Arena. This is not intended to be a fix, this is only to help give some possible improvement in performance, hopefully enough to make some of your experience go from "Unplayable" to "It is tolerable now". For those that want more info, even if you are not tech-savvy, I will be writing a Part 2 of why this is all happening, what it means, and why it's important in easy to understand wording. Note that before you start reading this, don't let the legth of the article scare you. Depending on which hardware you have, you will be skipping 2/3 of these sections! Terms and what stuff does A few terms to understand while you read this article are:
The CPU thinks about all the stuff behind the scenes, then sends it to the GPU to show you what it's doing. Everything you see on the screen, such as your web sites, your text document or your YouTube video that you're watching is processed by the CPU then sent to the GPU to draw on the screen for you to see. As far as gaming is concerned, the CPU thinks about all the complex things Arena is doing, such as how the card is moving across the screen and what it's doing, such as making an animated effect, etc. It then sends this information to the GPU which processes it and draws it on the screen. The end result is you seeing a cool card flipping out of your hand onto the battlefield and a big creature animating out of it. They work together to make all of this happen. Even though cards are a 2D object (they're just cardboard), you need to realize that they are running in a complete 3D rendered virtual environment. This takes a lot of power to make happen. If your computer is not up to the task, it's going to run very slow because the CPU and GPU just can't process all of the data fast enough to make it appear smooth on your screen while you play. Because of this, it is only able to process and show you only a few frames at a time, and then just skips all the rest in an attempt to catch up. This is what gives you low Frames per Second (or FPS). 60 FPS is what you want to aim for, but I found that anything steadily over 25 FPS seems perfectly playable, albeit not very crisp or sharp looking. The more we can go over 30 FPS, the smoother and more fluent it becomes. My goal here is to get your closer to 25-30 FPS if we can. Anything over that is just icing on the cake for you. I go much more in depth in Part 2 of this article if you care to read it. If not, continue on to some possible performance improvements. How To Improve Performance I am only going to go over a few basic changes that nearly anyone can do. There are a lot more advanced options out there, but most of it is not really necessary and will only add to your issues. Don't fall down the path of bad advice on the internet and disable and delete half your Windows files. That kind of advice will only make things worse and will not fix your game being slow. I do this for a living, and see people bringing me computers all the time that won't boot and run slow because they followed bad advice on the internet to attempt to fix their problems. These quick performance tweaks are quickly reversible with a few clicks and have no permanent ill effects on your computer. One requirement is that if you are using a laptop is that you absolutely must have it plugged in in order to have maximum performance. A fair warning, setting everything to maximum performance will really heat up a laptop quickly. Please play on a hard flat surface. If you are on a couch, or bed, please set a large book or magazine or other hard flat object under your laptop. Fabrics will block the vents and cause your laptop to overheat. Another fair warning is that if any of these GPU driver updates or changes cause your computer to crash, then you have other things going on that are a lot worse than trying to make your game run faster. If this happens, you should seek local help in getting your computer working again. I take no responsibility for anything that happens to your PC, you have been warned. This help article will be broken down into 4 sections:
I will only focus on the easy and free options in this article. Step 1 (0f 5) - Find CPU and GPU Model Number Lets start by updating your GPU drivers first. There may or may not be any updates for your GPU depending how old your PC is. You will need to find out what your GPU is first, and maybe your CPU, depending on what you have, and whether your Windows version is 64bit or 32bit. To get this information without too many clicks, you can hit your Windows key, and type "command", then hit Enter. It will open a command prompt. At the prompt, type in the following:
This will output two separate lines with the model of your CPU and the model of your GPU. Write these two lines down. 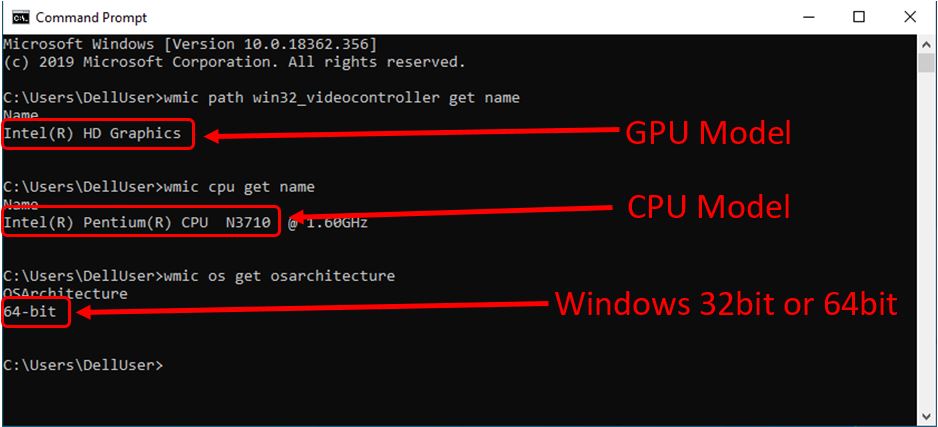 Command Prompt, finding your CPU and GPU model 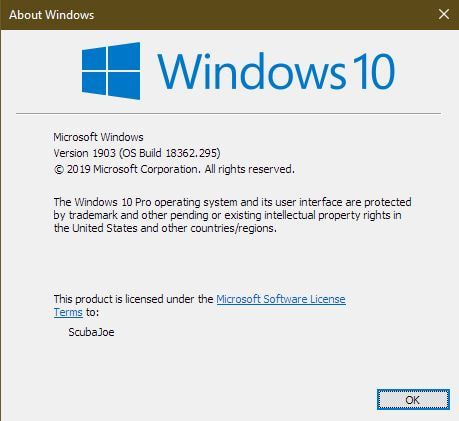 winver popup window, this version is Windows 10 As you can see in the screen above:
Now that we have this information, we can move on to updating our GPU drivers. Step 2 (0f 5) - GPU Driver Update nVidia Driver Update For those with nVidia GPUs, you can click HERE to go directly to nVidia's driver download site. From here, use the drop downs menus to select your exact GPU model, then click Search 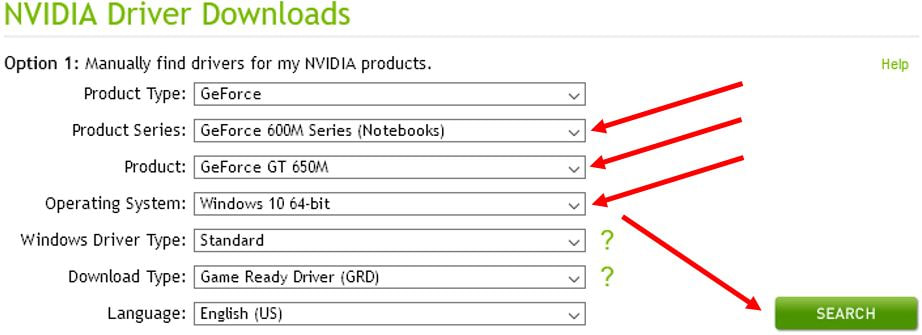 nVidia Driver Selection On the next page, you should be presented with a Download button. 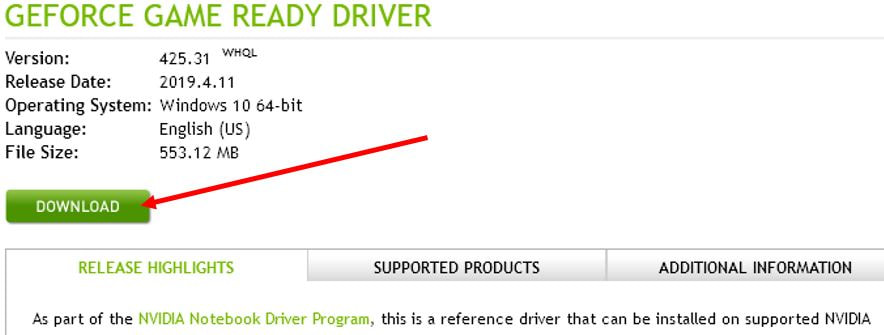 nVidia Driver Download Download the driver and install it. Reboot your PC when it has completed. Skip down to Step 3. AMD Driver Update For those with AMD GPUs, you can click HERE to go directly to AMD's driver download site. Once here, use the sliding boxes to select your exact GPU model, then click the Submit button. 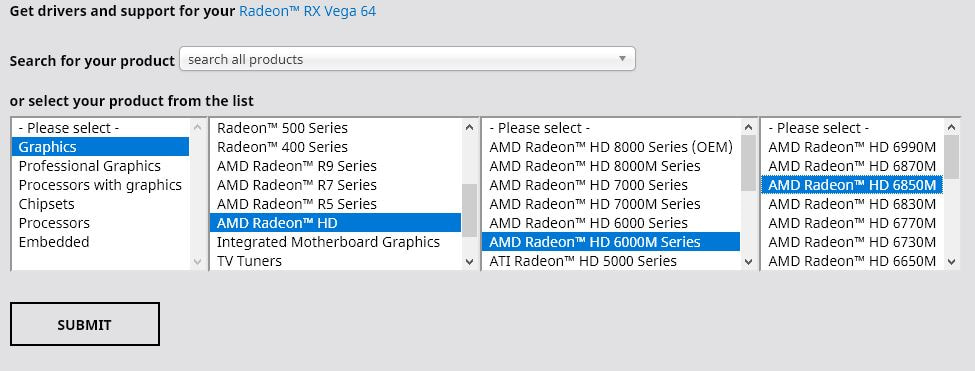 AMD Driver Selection Screen On the next page, find the correct download for your version of Windows and click the Download button. 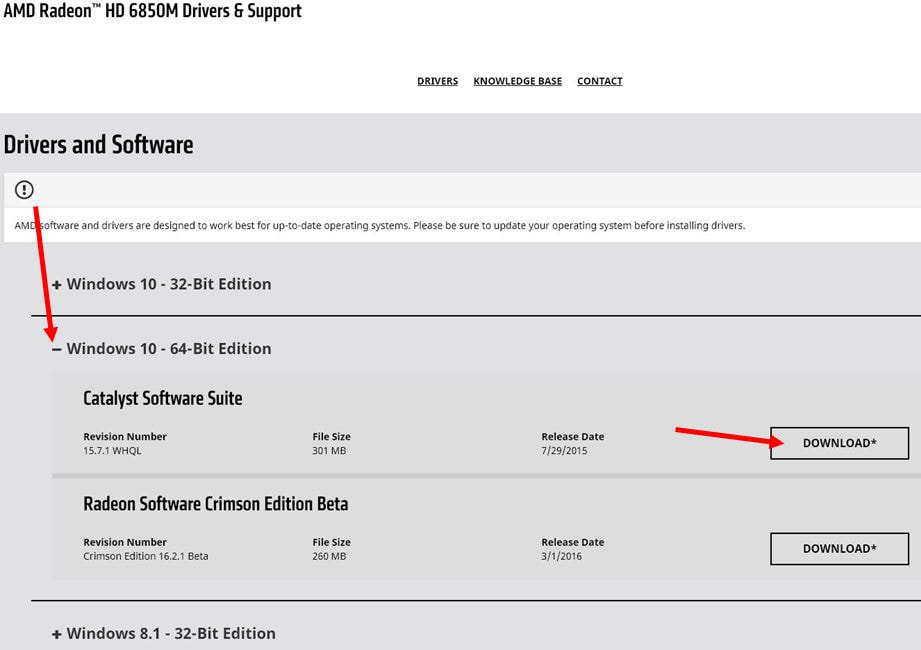 AMD Driver Download Screen Download the driver and install it. Reboot your PC when it has completed. Skip down to Step 3. Intel Integrated Graphics For those with Intel Integrated Graphics, you may need to do a bit more work to find your driver update. In the first step above when you looked up your GPU model in the command prompt, if it gave you the exact model number, you can skip ahead and go right to the download instructions. If it didn't specify a model number, you will need to do a bit more digging to figure this out. Often it just says "Intel HD Graphics" and does not give you a model number. 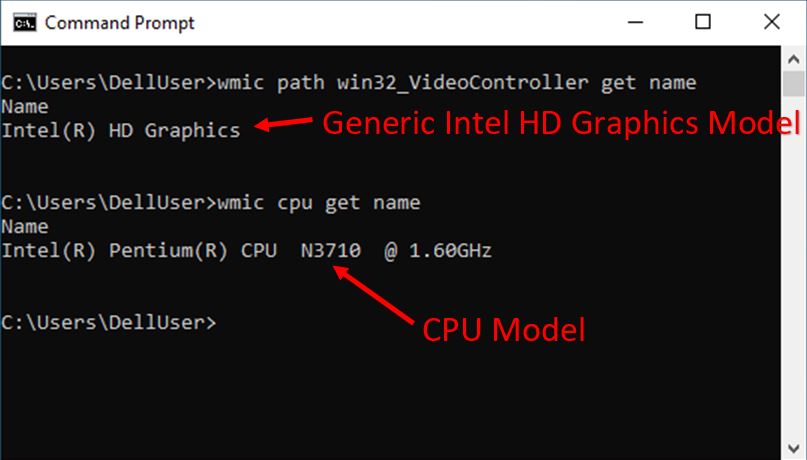 Generic Intel HD Graphics model and CPU model name If this is the case, you will need to look at the CPU Model number you wrote down earlier in Step 1. The CPU listed here is a Pentium N3710. The first number in the model number will be the generation that it is. In this example the number is 3, so this is a 3rd Generation Intel CPU. This information will be needed in the next step. Click HERE to visit the Intel Graphics Drivers support page On this page, scroll down and click the appropriate generation link. 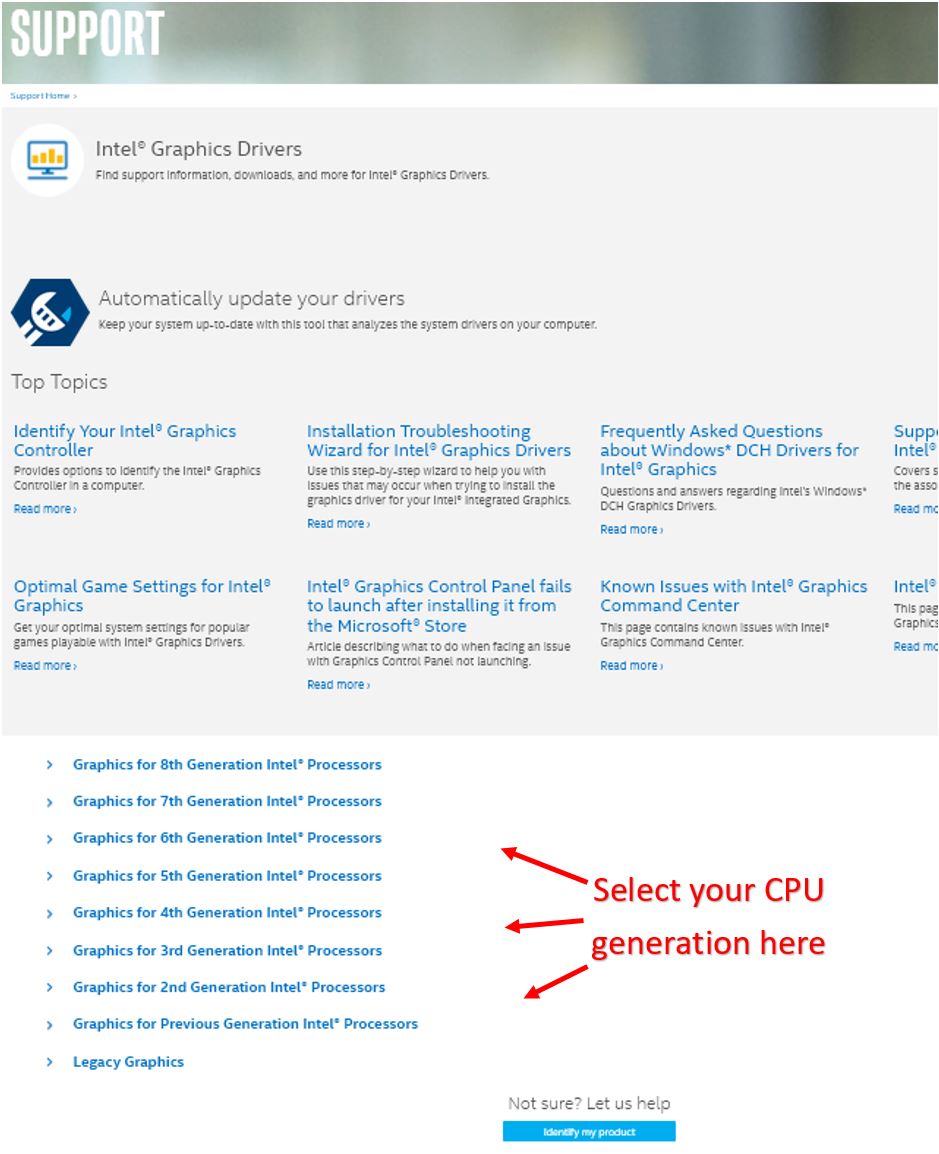 Select the appropriate generation CPU Next select the appropriate driver for your version of Windows. 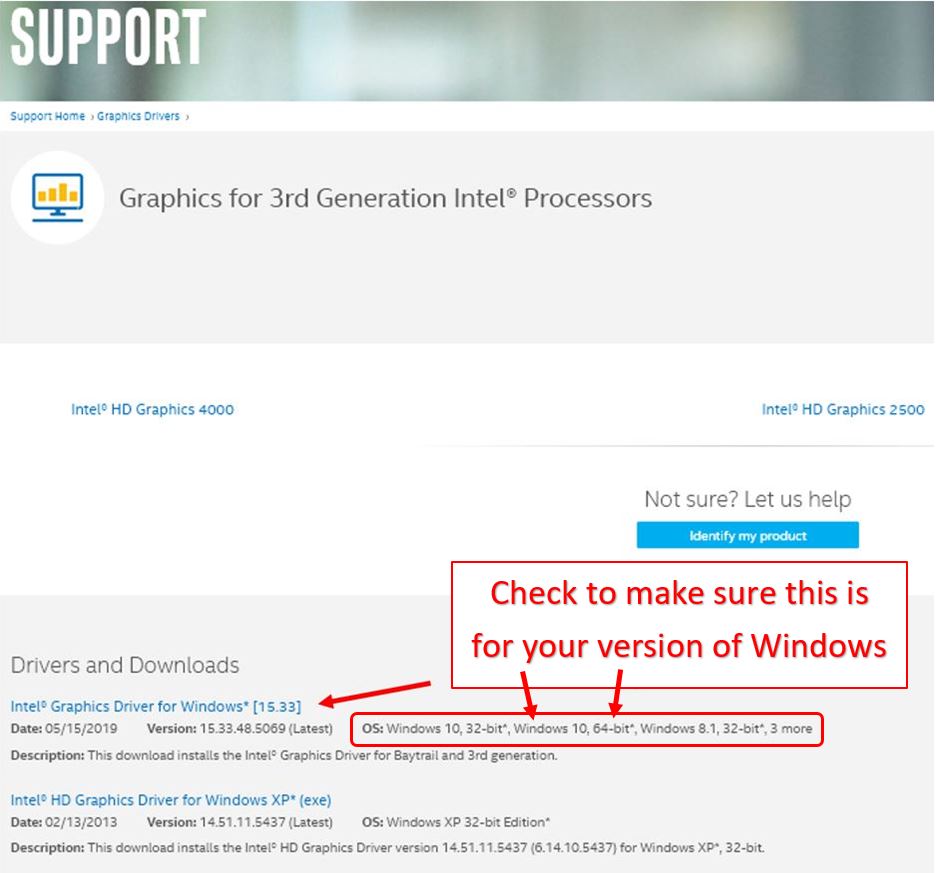 Click on the appropriate driver, most likely Windows 10 64bit or Windows 7 64bit On the final screen, again look for the appropriate download option for the version of Windows that you have. Typically the top one is the one you need. Note that it says Windows 10 64 bit, this will also include Windows 7 in the same download. 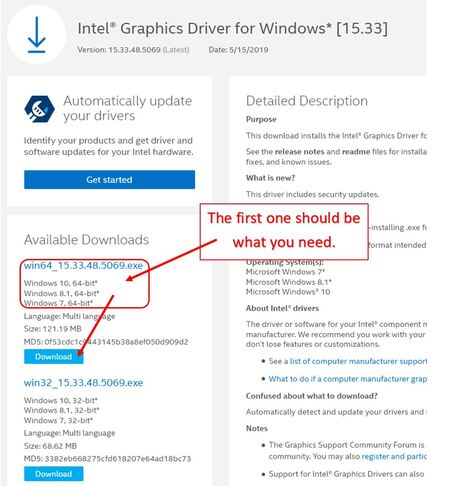 Click Download on the appropriate driver. Most likely Windows 10 or 7 64bit On the final screen, again look for the appropriate download option for the version of Windows that you have. Typically the top one is the one you need. Note that it says Windows 10 64 bit, this will also include Windows 7 in the same download. Click the Download button. Download the driver and install it. If you get a message about you already having the latest driver, then you can cancel the install and continue on to the next step. Reboot your PC when it has completed. STep 3 (0f 5) - Windows Power Settings Now we need to change the Power Plan in Windows. For the Windows power settings: On your keyboard, press the Windows Key + R This should bring up the Run box. In the Run box, type in control powercfg.cpl and click OK.  In the Run box, type the command in the above image. It should open the Power Options in the Control Panel. 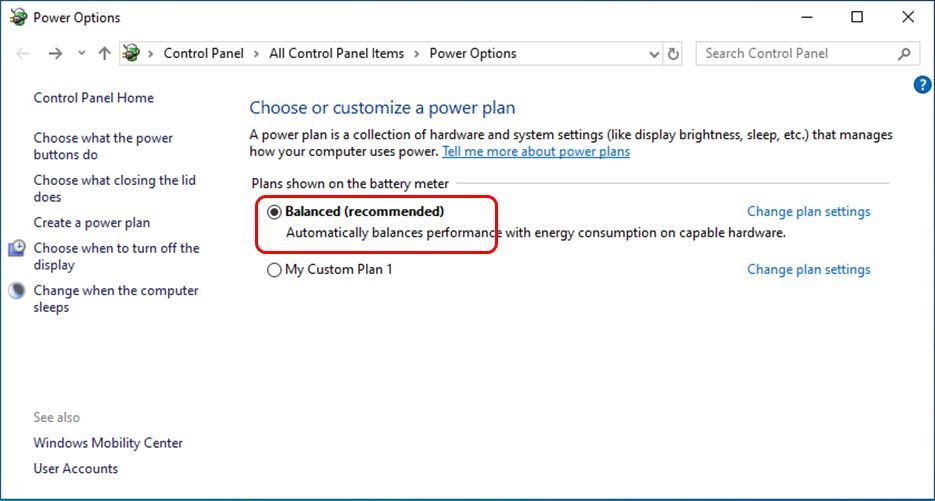 Balanced is usually the default selection. Note that it defaults to Balanced. You will need to change this to High Performance.  Change your plan to High Performance Select High Performance and close the window. You may skip down to Step 3 to change your GPU Power Settings. If you don't see High Performance in the list of power plans, you will need to create one. Click the Create a power plan link to the left. 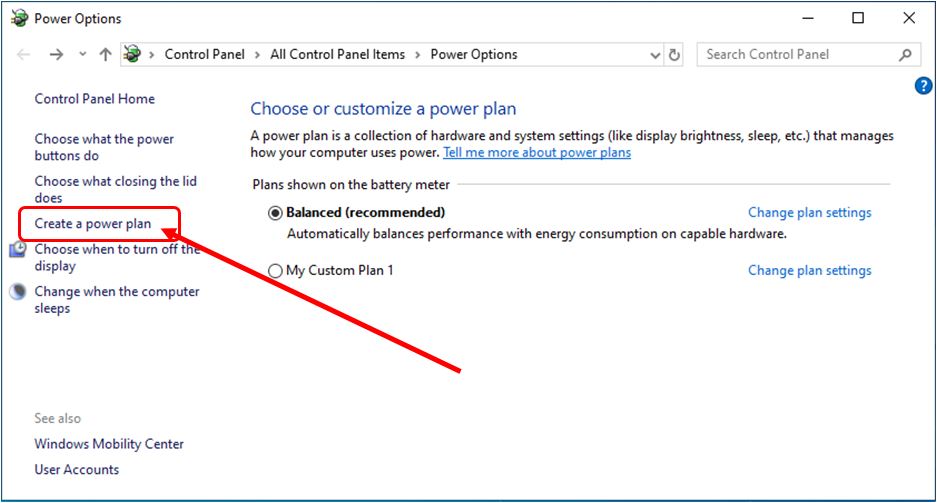 If you don't see High Performance, click Create a Plan Next select High Performance Give it a name in the field below. I called mine High Performance, you can call it whatever you like. 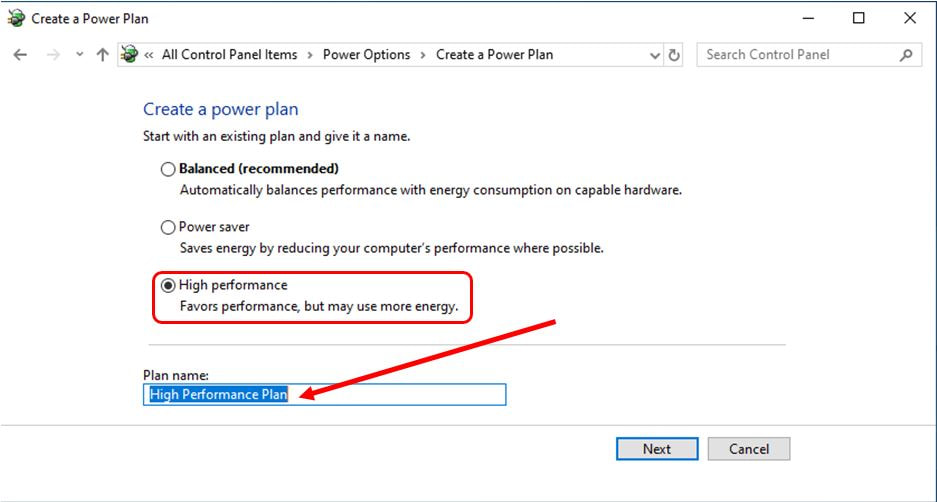 Select High Performance, then give it a name, then click Next When you are finished, click Next, and you should now have a High Performance power plan to select. Make sure your new High Performance power plan is selected and close the window. WARNING: When you start up Arena or any other program that takes a lot of power to run, if using a laptop, it may heat up very quickly, and the fans may spin up very quickly and run loud. Please make sure your laptop is on a hard, flat surface so it has adequate cooling. Cloth surfaces, such as a bed, couch or your lap, may block air flow to the cooling system under or around the sides of the laptop. This can cause it to overheat and shut down, or cause it to slow down to the point it's running even slower. I take no responsibility for your computer overheating or becoming damaged. STep 4 (0f 5) - GPU Power Settings Next we will look over settings to change for the GPU driver software that you have. Remember which one you have, it will be either Intel, nVidia or AMD, and skip to the appropriate section below. Intel GPU Power Settings For those of you with Intel integrated graphics, please follow this section. If you have AMD or nVidia GPUs, then skip this section and look for the appropriate heading below the GPU that you have. Right-Click on your desktop, and select Graphics Properties. Note that it should have a little blue icon exactly as you see below. Only this specific option will launch the correct Intel graphics screen to edit in the next step. 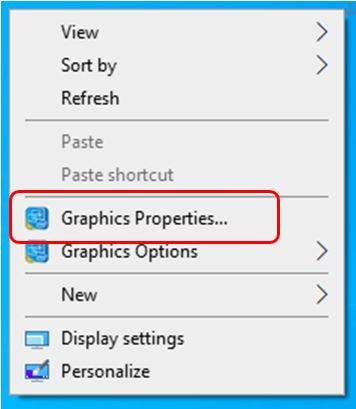 Select Graphics Properties. Make sure it has the little Intel logo in front of it as you see here. Next, it should open the Intel HD Graphics Control Panel. Click on the Power icon. 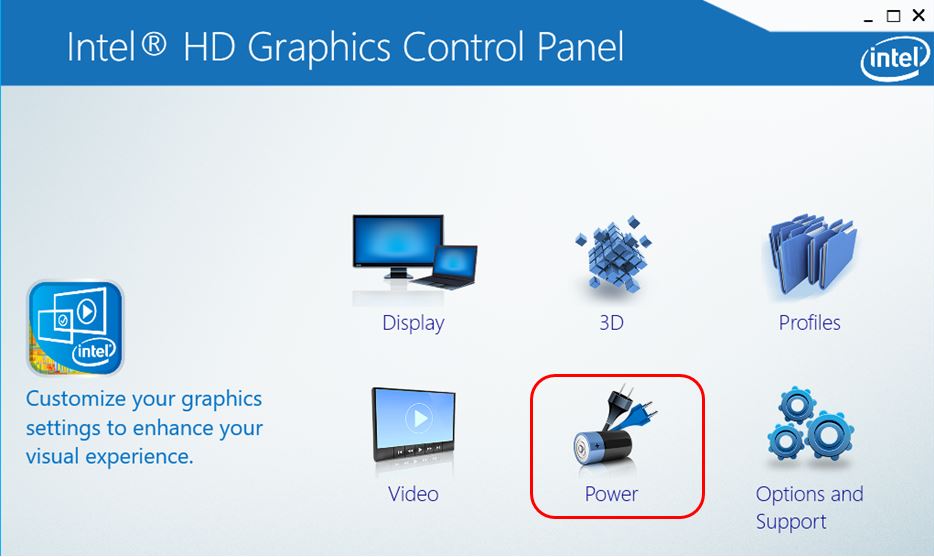 Click the Power icon. Select Maximum Performance. Click the Apply button at the bottom of the window and then close the window. Skip ahead to Step 5 for Arena Graphics Settings. 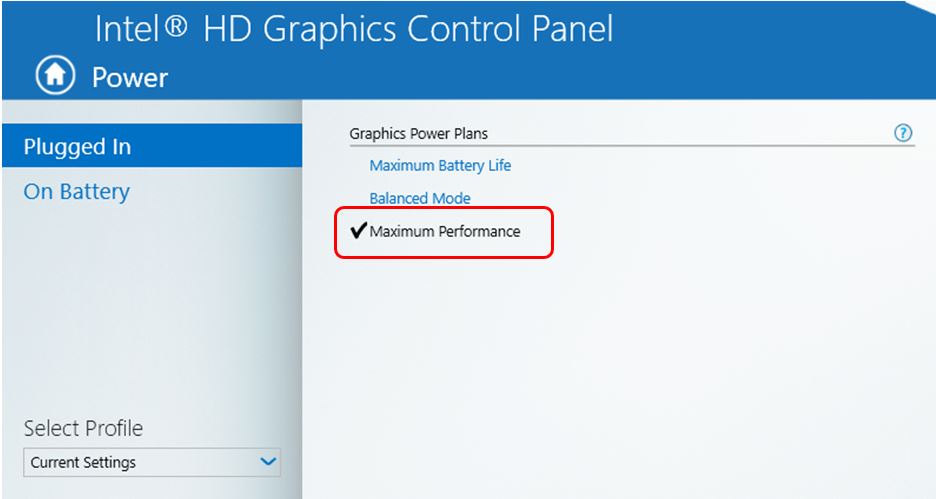 Select Maximum Performance, click Apply, close the window. nVidia GPU Power Settings For those with nVidia GPUs, please do the following. If you have an Intel or AMD GPU, then please see the appropriate Graphics Settings sections above or below this section for your specific GPU. Right-click on your desktop, and select NVIDIA Control Panel  Right-Click Desktop, select NVIDIA Control Panel Navigate the menus on the left to find Manage 3D Settings Scroll down on the main window and change Power management mode to Prefer maximum performance. 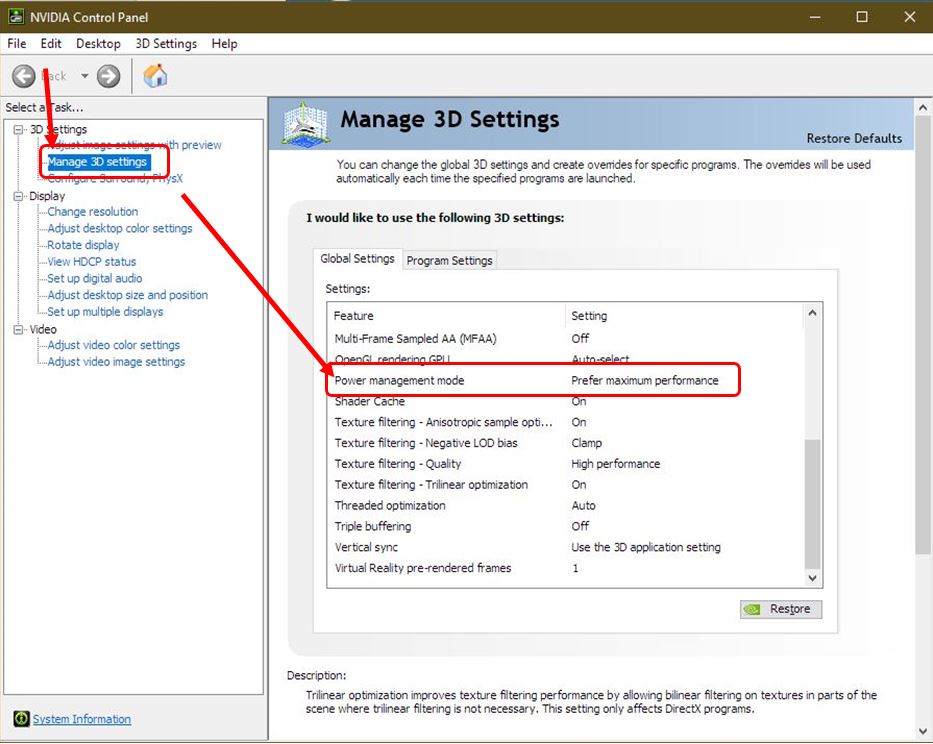 Change Power management mode to Prefer maximum performance Once you have made this change, close the window and skip to Step 5 for Arena graphics settings. AMD GPU Power Settings For those of you with AMD GPUs, you will follow this section. If you have an Intel or nVidia GPU, you will need to look for the appropriate section above for your GPU's settings. Right-click on your desktop and select AMD Catalyst Control Center 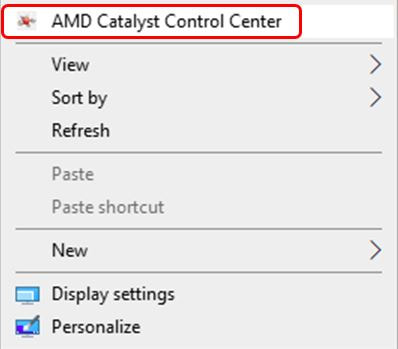 Right-click desktop, select AMD Catalyst Control Center If your screen does not look like the one below, then click the Preferences button on the top right, and select Standard View. It should then take it out of advanced mode and show you the more simplistic settings that you will see on the following screenshots. Select Power 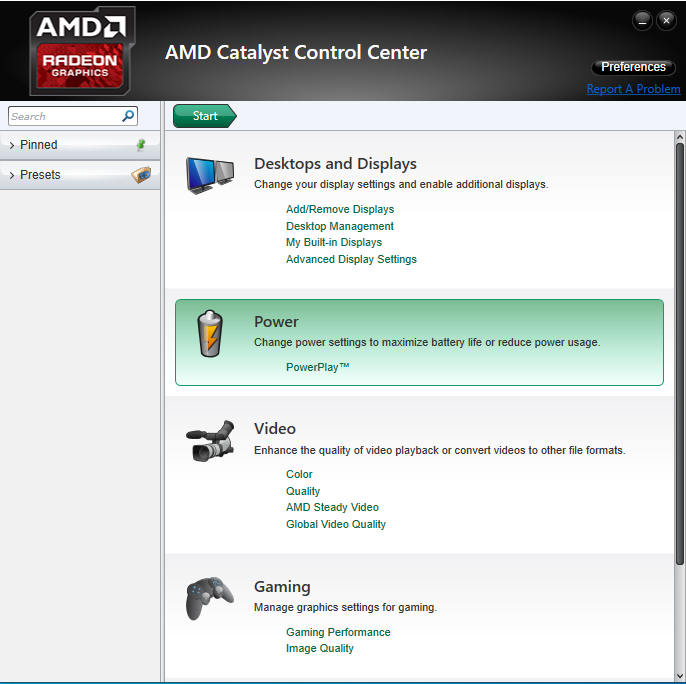 Select Power Select PowerPlay 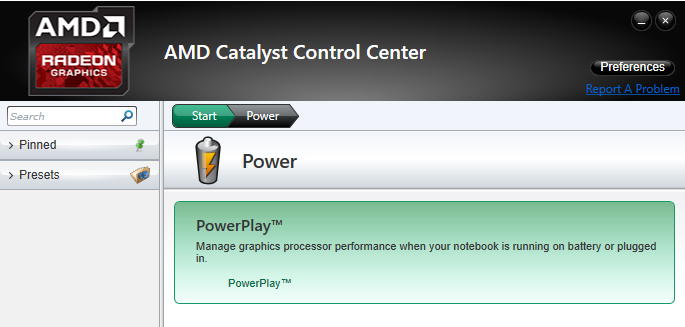 Select PowerPlay Change the Plugged In drop-down to Maximize Performance Slide the Enable Vari-Bright slider to the left to Maximize Quality 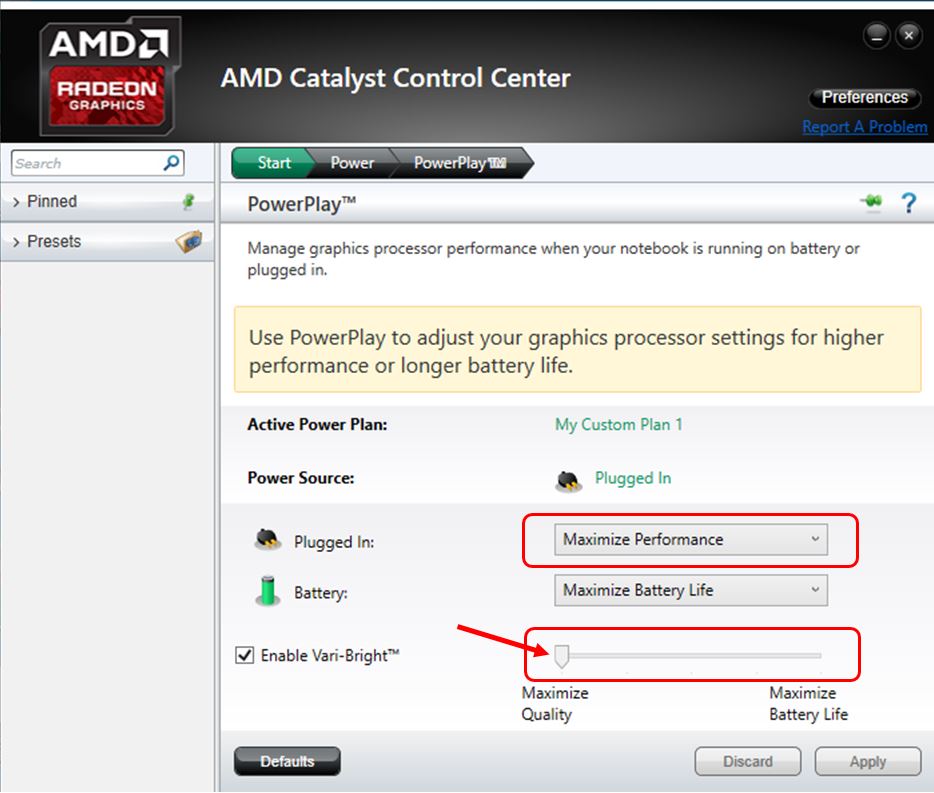 Select Maximize Performance and slider to Maximize Quality At the top of the AMD Catalyst Control Center, click on the green Start arrow button This will bring you back to the main screen. Next, click on the link for Gaming Performance, found under the Gaming section. 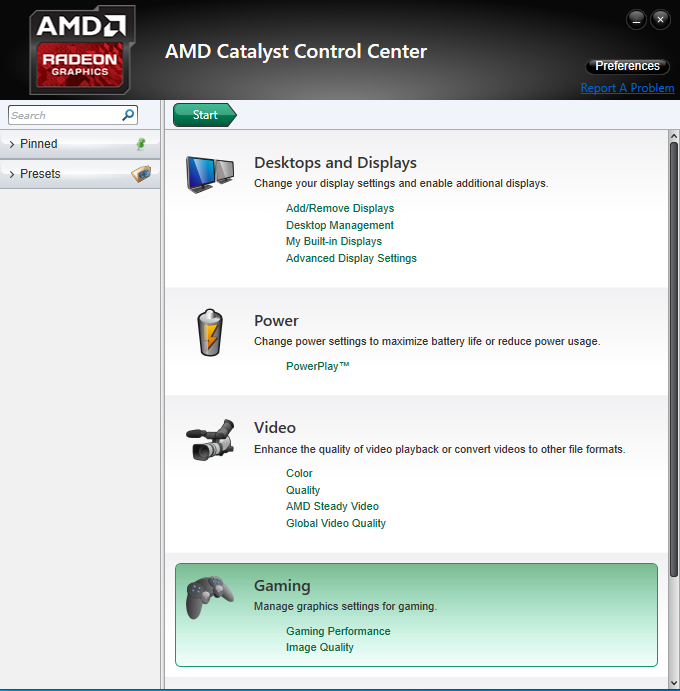 Click on the link for Gaming Performance Next click on Mipmapping 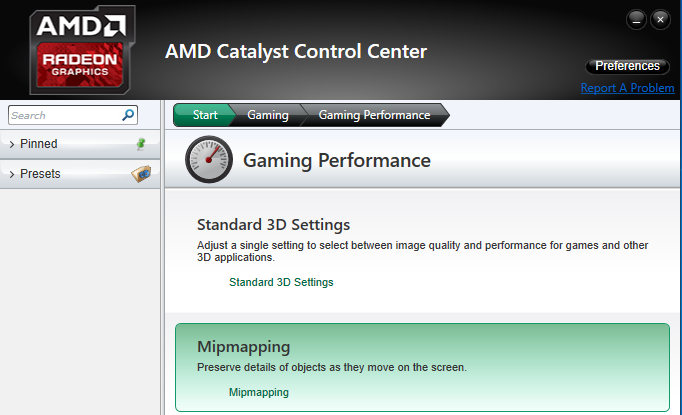 Click on Mipmapping On the Mipmapping screen, slide the slider all the way to the left for High Performance. Click back on the green Start menu arrow at the top again. 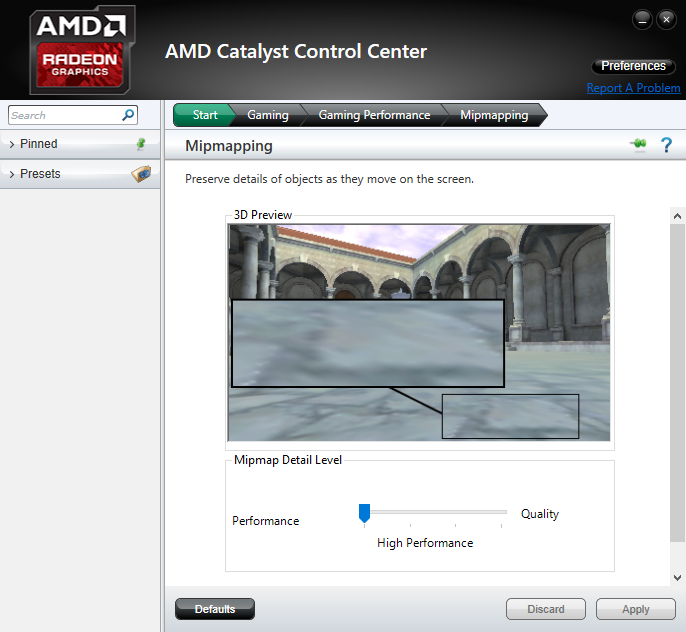 Set slider to far left to Performance Back on the Main Menu, click on the Image Quality link in the Gaming section. Click on Image Quality in the Gaming section Next click on Anti-Aliasing Method 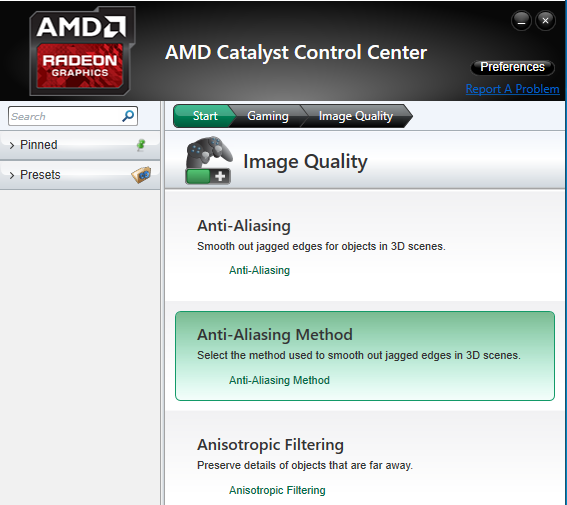 Click on Anti-Aliasing Method Slide the slider all the way to the left to Performance.  Set slider to far left to Performance That's it for the AMD GPU settings. Lets move on to Step 5 and change a few Arena graphics settings. Step 5 (of 5) - Arena Graphics Settings Launch Arena and go into the Graphics Settings You can find the settings located in the upper right corner of the screen after clicking on the gear icon. You will want to test with the same thing on the screen. The game will run slower the further along you get since there are more cards and animations happening. So test either when you keep your hand, or test when you're 5-6 turns in and there's a bunch of stuff on the battlefield. Sparky will time out your game after a while, so maybe every couple of minutes, just click something. I typically Attack All, then cancel, then Attack All again, then Cancel, it keeps the game active while I can play with all of the graphics settings. Also, turn on this little diagnostics tool from inside MTG Arena. To do so, simply press Left Shift and the Period key. You will see an FPS meter in the bottom right hand corner as seen below. 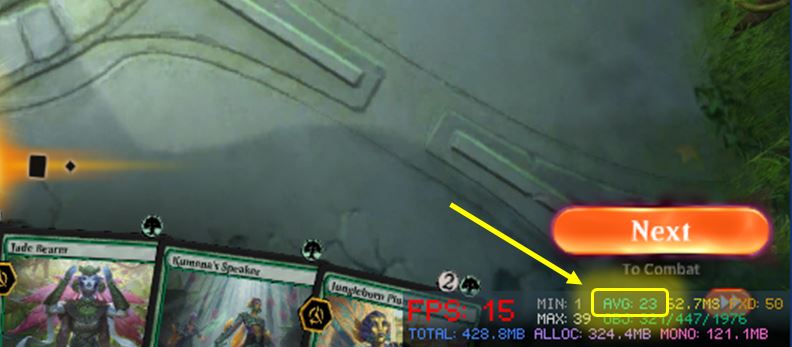 NOTE: After making a change in the Graphics settings, you will need to reset the average for the FPS meter. To do this, just turn it of, and back on again by simply pressing Left Shift + Period keys for off, then press again for back on. This is important to show the change in average FPS, otherwise it's still averaging your FPS from previous settings which will be incorrect for what you are looking for. Set everything to the following settings as seen below. Then start up a game in Practice mode so you can play with all the settings. 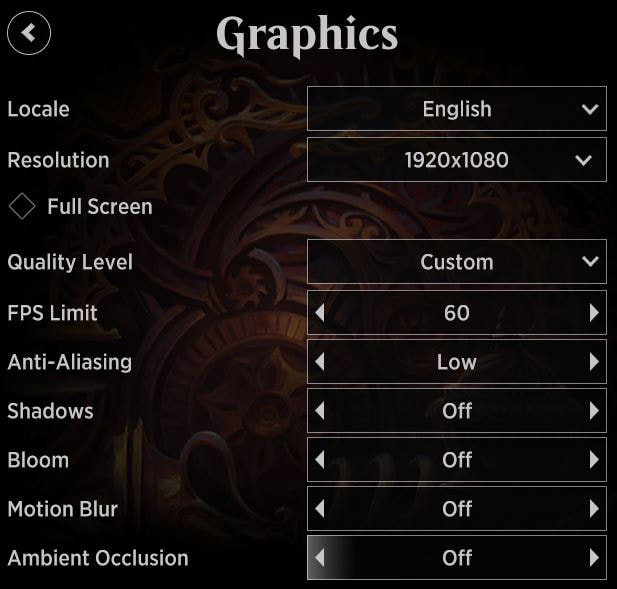 Use these settings! The above settings should be optimal for many people. Here's what everything does to help you tweak your own settings.
I saw a 2-5 FPS improvement from doing all of this. If you start lowering your resolution, you will see in creases from 2-30 fps immediately. The main improvement on the really slow PCs is just going to be lowering your resolution. Going from, say 1920x1080 down to 1366x760 gave an additional 7fps going from 22fps to 29fps and making it very playable at those settings. You will need to find the right combo of resolution and windowed vs full screen mode. Once you find an acceptable resolution, then change Anti Aliasing from Low to High and see if your computer can stomach the extra processing or not. If not, simply turn it back off. What Else can I do that's free? Your PC may be running a tun of stuff in the background that's killing your performance too. This is not hard to disable, but you need to know what you're doing first, so perhaps seek help for some of these suggestions. Disable Arena Trackers I found that untapped.gg, one of the most popular options, made Arena runs 4fps slower on slow PCs. You may want to turn this off. Also, if you are running more than one tracker, keep in mind that all of them are trying to read Arena's log data all at the same time, meanwhile Arena is trying to also write more log data. This kills your disk performance, and wastes processing power. Task Manager Startup Items Check your Task Manager Startup tab  You don't need 80% of what runs in there to be running all the time. Disable all the obvious things an reboot. All of those things will run perfectly fine when you click on their icons. They don't need to be running all the time when you aren't using them. Simply right-click on the Enabled wording after each item, and select Disabled. Once you've gone through this list, reboot. Your PC will probably boot up noticably more quicker too. Turn off Streaming Overlays Apps like OBS, Discord, FRAPS and more are all constantly processing all the data going on all the time while you're playing. These absolutely kill performance. You should be running a powerful computer to be running these while gaming. If you don't have a powerful computer, or even if you do, try closing them all and seeing if things improve. PC Upgrade Options So, I only see a few FPS improvement after all that, now what?
Well if that didn't get you much improvement, I am sorry to say, you will need to spend some money next. This will help determine if you should spend any money or just get a new computer. RAM Upgrade How much RAM do you have? If the answers is less than 8GB, you may want to upgrade your RAM. I saw an average of 4-9 FPS improvement going from 4GB to 8GB RAM. It also cut the game's load screen and match load screen time in HALF! 4GB RAM is anywhere from $10-20 on Amazon, eBay, etc. Upgrading from 4GB to 8GB was the single largest gain in performance for any of these slow PCs that I tested. SSD Upgrade I only tested on Solid State Drive upgrade on one slow laptop. I saw a 1fps improvement across the board, so this really has no effect once the game itself is loaded. Now, the game did load even half as fast as it did with extra ram, and the match load screens were also halved from even the ram upgrade. But once the game started, there was only a 1fps improvement. This is an awesome upgrade for anyone not on an SSD, but not necessary if you're only looking for Arena performance improvement while actually playing the game. SSD's start at $30. Video Card Upgrade For those with Desktops using Integrated Graphics (Intel HD Graphics or similar), you will see a significant improvement by adding in a dedicated video card. WotC's recommended card starts at an nVidia GTX 560, which is still quite old, but can easily be found on eBay for under $30.
5 Comments
For those of you that have deleted your New Player Experience (NPE) decks, or other special pre-constructed (pre-con) decks, you may find that you needed them back at some point. Here's a quick list of all of the per-con decks that have been released for Arena. Please let me know if there are any missing so that I can keep this list updated. Color Challenge / Rotation Proof Mono Color Decks |
 White: Keep the Peace  Red: Goblins Everywhere | 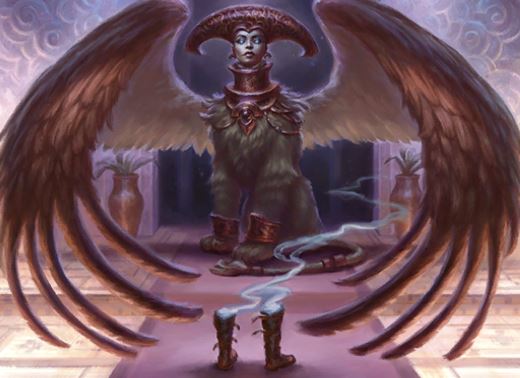 Blue: Aerial Domination | 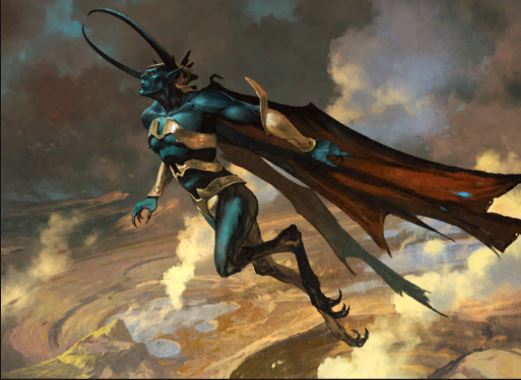 Black: Cold-Blooded Killers 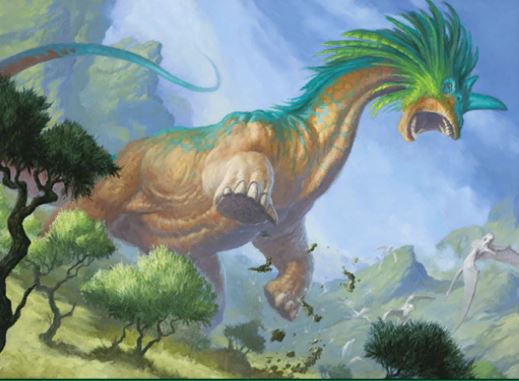 Green: Large and in Charge |
M21 New Player Experience Decklists
September 2020 Rotation
With the release of Zendikar Rising on September 17, 2020, many cards rotated out of standard. Those just starting the game would receive the following decks during their New Player Experience. Those that have already completed the NPE would receive any cards missing from those decks, as well as having those decklists show up in their account.
 Azorius: Starry-Eyed  Golgari: Back for More  Orzhov: Life Skills |  Boros: Company of Knights  Gruul: Stomp, Stomp  Rakdos: Line of Fire  Simic: Massive Menagerie |  Dimir: Mutation Station  Izzet: Spellpower  Selesnya; To Adventure! |
Ravnica Guilds
September 2019 Rotation
These are the current dual color NPE decks given to new users that completed the Account Mastery during the New Player Experience during the M20 core set. Prior to the Mar 12, 2020 update, these were available through the old Account Mastery system.
On Sept 20, 2019, the dual colored decks were also given to all current users that had previously completed the Account Mastery prior to this date, which was the release of Throne of Eldraine.
On Sept 20, 2019, the dual colored decks were also given to all current users that had previously completed the Account Mastery prior to this date, which was the release of Throne of Eldraine.
 Azorius Senate | 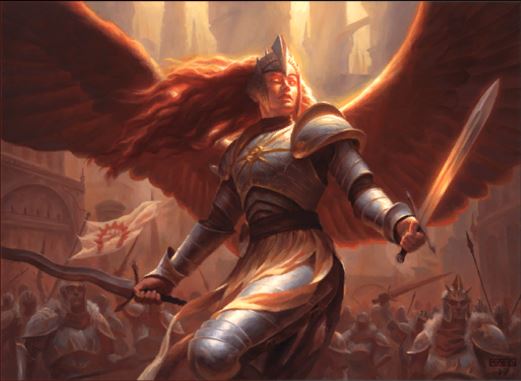 Boros Legion | 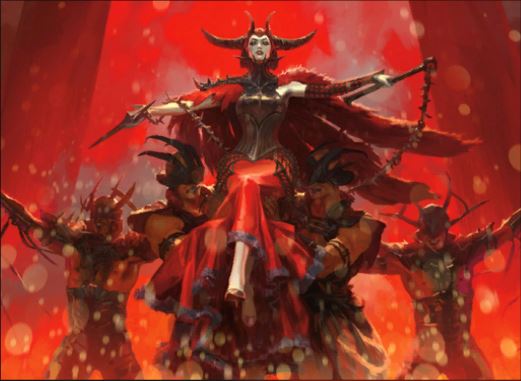 Cult of Rakdos |
 Golgari Swarm | 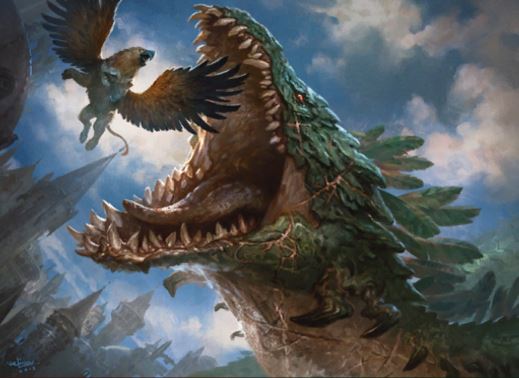 Gruul Clans |  House Dimir |
 Izett League  Simic Combine |  Orzhov Syndicate |  Selesnya Conclave |
Color Challenge
March 2020 - August 2020
Starting March 12, 2020, the New Player Experience was revamped. These are the refreshed mono-color decks available through this system.
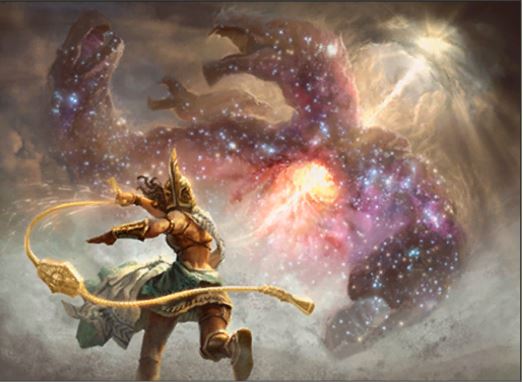
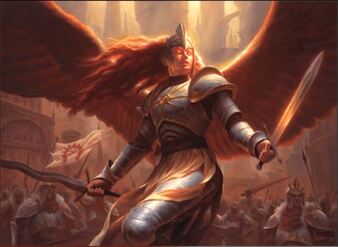
 Angelic Army  Destructive Firepower |  Azure Skies  Forest's Might |  Out for Blood |
M20 Account Mastery
7/12/19 - 3/17/20
Prior to March 17, 2020, these were the old mono-color decks available through the old Account Mastery system. They have been refreshed mid-rotation and are now part of the Color Challenge system for new players.
 Angelic Army  Dome Destruction |  Azure Skies  Forest's Might (M20) | 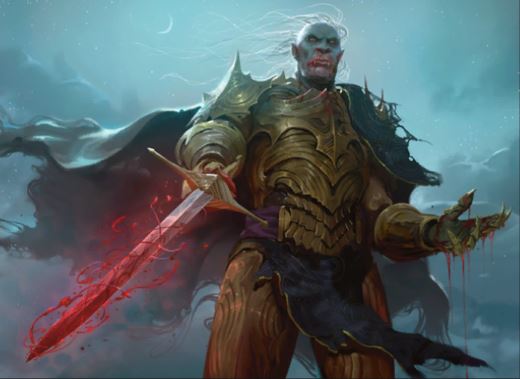 Out for Blood |
Special Pre-Cons
These decks were obtained through codes given out at various times through various places.
 Boros Battalion (Twitch Prime Promo) Available April 2019 - June 26, 2019 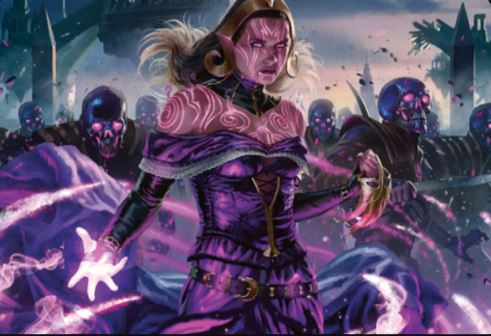 Liliana's Legion (Twitch Prime Promo) Available December 2019 - Feb 11, 2020 | 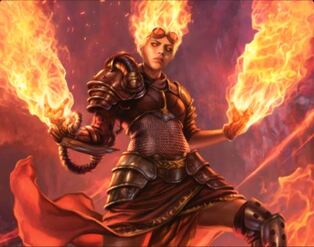 Chandra's Blaze (JeuxVideo Promo) Available for the Magic Celebrity Cup event, 7/11/19-7/18/19. More info HERE  Avenging Angels (GameKnights Promo) Available June 8, 2021 - TBA Code: GameKnights |
M19 New Player Experience
Closed Beta - 7/12/19
These are the decks that were available from closed beta up until the release of M20 on July 12, 2019.
 Arcane Inventions |  Auras of Majesty |  Chaos and Mayhem |
 Forest's Might (M19) |  Dragon's Fire |  Eternal Thirst |
 Graveyard Bash |  Jungle Secrets |  Primal Fury |
 Saproling Swarm |  Strength in Numbers |  Tactical Assault |
 Walk the Plank |  Wing and Claw  Artifacts Attack (replaced by Wing and Claw) |  Wrath of Mages |
For further detailed information on these decks, check out the Magic Arena Wiki
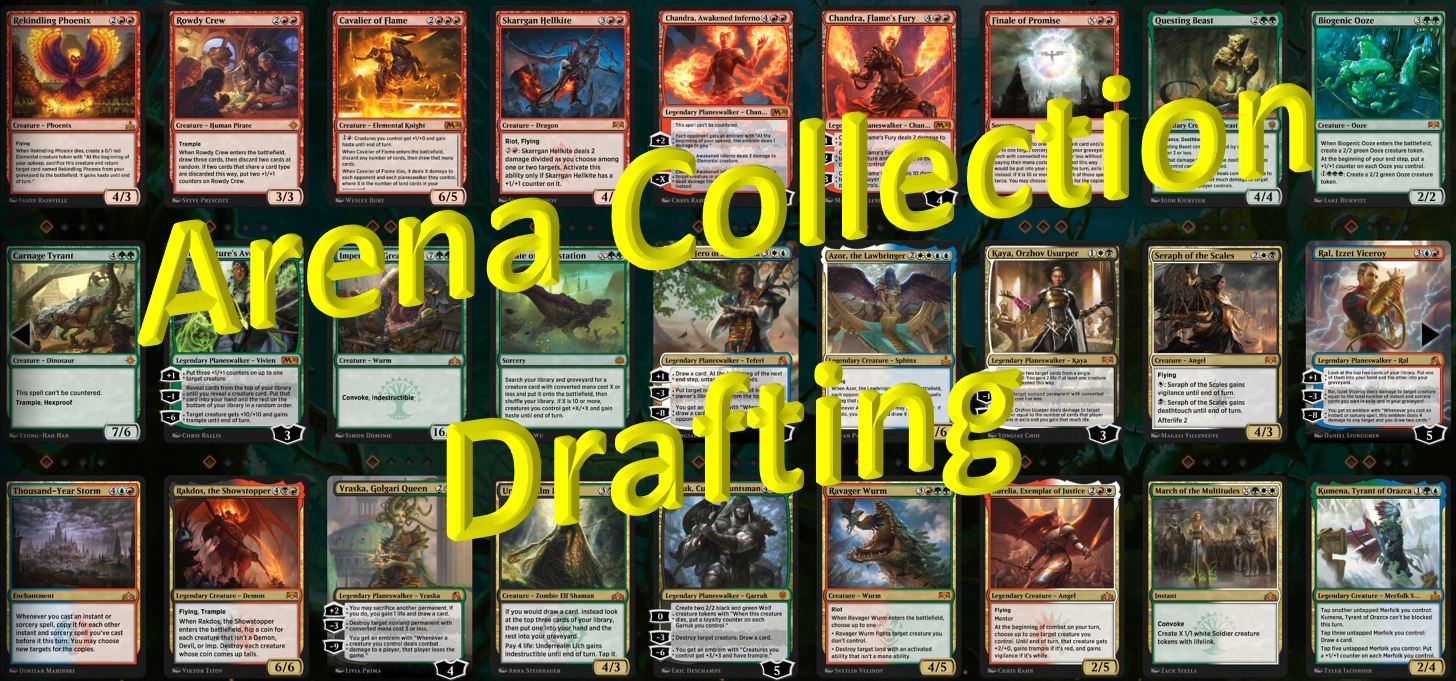
Hooray! Ranked draft is finally here for Throne of Eldraine!
Why is this important? Ranked Draft lets you build a massive set collection using nothing but your F2P Gold! Ranked Draft is typically available two weeks after a new set is released on Arena.
For collection building, there are many opinions on whether or not to open booster packs or waiting for ranked draft to become available with each new set release. For those of us with patience, we wait it out.
Nobody seems to have any solid data pointing in either direction of which method will net you more cards for your collection.
I have been of the opinion that Ranked Draft is the way to go, and is the method that I choose to go each set release. I decided to write down all of my findings and experience this time so that others might be able to see what ranked draft looks like on paper.
I don't like draft, I am New, I am no good at Draft, etc
First of all, this article is not going to go into any win rates or how good you are as a player. In fact, this article will have nothing to do with actually playing draft.
Many people state that they don't wish to play draft, or they aren't good at it. Many new players are intimidated by drafting as well. Because of this, many people will shy away from this method of collection building and use the more costly method of mass booster pack opening.
The good news is, you can still do the draft process without playing the games afterwards and still reap more rewards than from only opening booster packs.
I will state the obvious here. I could be playing the games and getting wins and piling on more gems. But, I don't want to. I don't enjoy it. Lets move past this. It's my gold, and it's not hurting anyone.
And since Arena players seem to love free things, I gave away all of my wins to 66 lucky people.
So, why draft?
When opening booster packs, you will receive a random assortment of cards that you may or may not need or even want. You would have to open many booster packs to even come close to getting what you specifically need.
As in paper magic, we have a saying that opening booster packs is for drafting, not building constructed decks.
If you need certain cards for constructed, you would traditionally just buy the singles you need. Since you can't do that in Arena, the next best thing is to pick them individually during the draft process.
Drafting produces fewer unwanted duplicates in your collection while helping you build your collection faster. Drafting lets you individually pick each individual card you want from multiple booster packs.
The general opinion on the internets is that you don't get as many wild cards while drafting as you do from opening booster packs. While this is certainly true true, I will show you why that may not really matter. There are other aspects of the draft process that are often overlooked.
How I Obtained My Gold
Many new players ask how to amass so much gold. The answer is pretty simple. You just need to play the game and save save save.
Since I drafted M20 in mid July 2019, I have been saving my gold until this very weekend, October 11, 2019. I saved up exactly 110,000 gold. This was enough to partake in 22 Ranked Drafts. I also had 21 un-opened Throne of Eldraine booster packs that I had saved from codes, Mastery Tree progress and returning player rewards.
I play 5 wins per day and make sure that my Daily Quests are all caught up. I don't even flip my Quests for the 750 gold quests unless it's something I really just don't want to do. If I play past 5 wins a day, it's because I just want to play, testing decks, bored, etc. The minimal gold gained past 5 wins a day is not worth grinding for.
Healthy Play
You should play 4 wins per day to maximize your gold returns. You may need to play more depending if you have Daily Quests backed up. Don't let more than 3 quests queue up at a time, or it's a heavy amount of lost rewards.
I recommend only playing past 4-5 wins a day if you just love playing and are having a good time. Otherwise, you will burn yourself out quickly and your money making machine will slow or stop between sets. You want to strike a nice balance between healthy fun play and maximizing your rewards.
Remember that playing when you are not having a good time is the opposite of what you want to be doing. You play for fun. If you want to have more fun, you probably want more cards and to get those cards requires gold. Obtaining gold therefore adds in a work aspect to the game. You need to put in work in order to build your gold to build your collection.
There will be days where you just can't get those minimal wins in. Simply walk away. Go watch TV, watch YouTube, surf the internet. Just do something else to clear your mind. You can't win when you are upset or angry. Once you have calmed down, jump back in with a clear head and knock those wins out.
I find that playing first thing in the morning tends to be easier. I can often go 5-0 and 5-1 almost every day that I start early. If I wait much past noon, or I play in the afternoon/evening, the games drag out and I win significantly less games. I also think better in the mornings with a fresh mind. Your mileage may vary here, so find when you like to play and stick with that schedule.
I personally play for 5 wins per day. This gets me the gold I need and an extra free card reward each day, which can add up over time.
Don't let the game become a chore. Keep it light and have fun.
Gold Acquisition
Here is the quick math for minimum effort gold savings:
4 wins per day minimum (550gold) + Daily Quest (500 gold minimum) = 1,050 gold
~90 days between sets x 1,050 gold = 94,500
You will probably end up with over 100K gold due to 750 gold Daily Quests and those days you play past 5 wins.
M20 Ranked Draft went live July 19. I spent all the gold I had at the time from previous savings and started over at near zero on July 21, when I quit drafting M20. From July 22 to October 11 I was able to save exactly 110,000 gold.
Keep a Log
I keep a spreadsheet of daily play statistics so I can track when and where I got gold, won cards, got free packs ,etc. If you are a stats nerd, I recommend keeping a spreadsheet journal of your daily play.
I also have a column I keep just for notes, such as if I had a bad day playing, what I didn't enjoy, what I did enjoy, what was or wasn't working with my deck. This lets me figure out how to tweak my deck to make it better for more wins.
I also have a column I keep just for notes, such as if I had a bad day playing, what I didn't enjoy, what I did enjoy, what was or wasn't working with my deck. This lets me figure out how to tweak my deck to make it better for more wins.
Booster Packs vs Ranked Draft
Here is the big question everyone asks: Do I spend my gold on Booster Packs or on Ranked Draft?
Let's look at my experience as an example. What do I get for 110,000 gold?
Booster Packs Only
Total Cards = 944
Collection Drafting
Total Cards = 1,100
Now, not all of these cars will be usable. Many will be duplicates lost to the Vault, so you will end up with a smaller number of total usable cards than what you see above.
Let's look at my experience as an example. What do I get for 110,000 gold?
Booster Packs Only
- 110 x 8-card booster packs = 944 random cards
- no duplicate protection except for the rare slot
- 110 Guaranteed rares
- Roughly 100 wild cards (can't verify, calculating from the 50 packs I opened)
Total Cards = 944
Collection Drafting
- 22 Ranked Drafts = 66 x 14-card booster packs = 924 hand picked cards
- Pseudo-duplicate protection for all rarities, you pick exactly what you need
- Guaranteed 66 rares, high chance to receive many more
- Guaranteed 1100 Gems
- Guaranteed 22 x 8-card booster packs (176 random Cards), chance of receiving more
Total Cards = 1,100
Now, not all of these cars will be usable. Many will be duplicates lost to the Vault, so you will end up with a smaller number of total usable cards than what you see above.
My Draft Experience
What exactly does 22 drafts look like on paper? Or the better question is, what did I get for 110,000 gold instead of just opening booster packs.
Here are my results:
Here are my results:
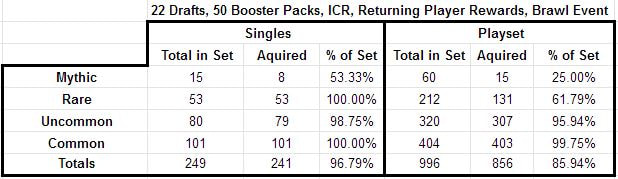
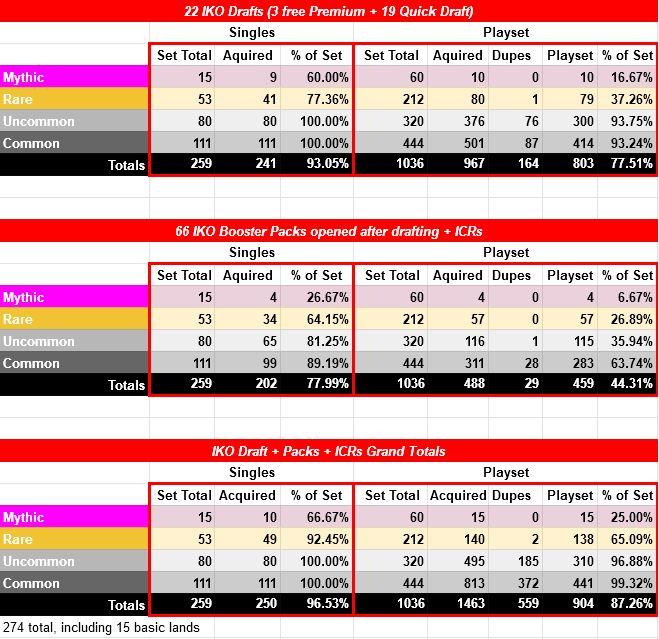
This table shows how many cards I received for my 110,000 gold after drafting and opening all the Eldraine booster packs that I had been saving since release. This also includes all ICRs from daily play as well as the returning player rewards.
This table shows patience and restraint. In order to do this, you must not spend any gold, and must not open any newly released set packs until after you have finished doing the majority of your drafting.
Before drafting, I received 40 mythics, rares and uncommons from Returning Player Rewards, the Eldraine Brawl event rewards, and through daily ICRs while playing the game. ICR's obviously only include Throne of Eldraine cards. I also crafted 2 Torbrans, which these numbers include, for my RDW to hold me over until Ranked Draft went live.
Eldraine booster packs were obtained from free codes, Returning Player Rewards, Mastery Tree rewards, and pack rewards received at the end of each Ranked Draft process. I ended up with 50 free booster packs when all was said and done.
Lets break down what all I received from my experience.
Entire Set
As a F2P player, I now have 85.9% of the entire playset, and 96.8% of all of the singles.
This is the first set I was able to save that much gold for and then do this many drafts. I am extremely pleased with the results and what I received.
Lets break this down further and see what I got that is actually usable. Remember, not every card is useful as there are many unplayable and niche cards that add little to no value to your collection. The bulk of your collection will be made up of all the workhorse common and uncommon cards. There are many bad rares, and you should only be concerned with the ones you intend to play with rather than how many you can get.
Commons
Common playsets really hit home for me, as I enjoy the Pauper format and buy these for roughly $20 every set release from my local game store. I also put together pauper playsets, draft cubes and decks and sell them.
I have entire common playsets of most sets going back to the mid 90's.
Uncommons
Uncommons are where much of the magic in Magic happens.
Rares
I was lucky enough to pull the entire set of rares, though I only have about half of the playset.
While many rares are powerful and can do cool things, I don't typically focus on them. The rares I need in many decks are so few compared to the commons and uncommons.
I ended up getting 4 red rares I really wanted, 1 x Torbran, 2 x Fervent Champion and 1 x Castle Embereth. I was hoping for more Fervent Champions and more Castle Embereths to upgrade my Cavalcade deck with.
I am excited to build some new decks with all of the rares I received. There are a lot of fun new possibilities for brewing now.
Mythics
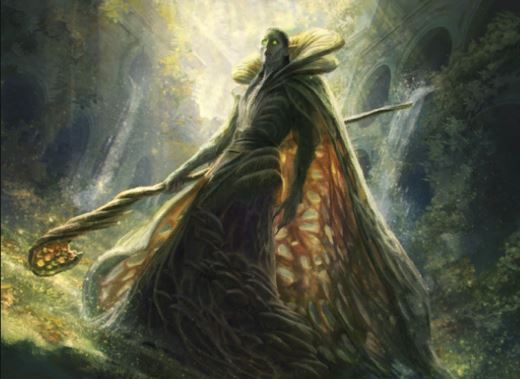
I am excited to brew some decks with a few of these. Questing Beast and Garruk were awesome pulls for things I had ideas for.
This table shows patience and restraint. In order to do this, you must not spend any gold, and must not open any newly released set packs until after you have finished doing the majority of your drafting.
Before drafting, I received 40 mythics, rares and uncommons from Returning Player Rewards, the Eldraine Brawl event rewards, and through daily ICRs while playing the game. ICR's obviously only include Throne of Eldraine cards. I also crafted 2 Torbrans, which these numbers include, for my RDW to hold me over until Ranked Draft went live.
Eldraine booster packs were obtained from free codes, Returning Player Rewards, Mastery Tree rewards, and pack rewards received at the end of each Ranked Draft process. I ended up with 50 free booster packs when all was said and done.
Lets break down what all I received from my experience.
Entire Set
- 241/249 singles obtained
- 856/996 cards obtained for full playset
As a F2P player, I now have 85.9% of the entire playset, and 96.8% of all of the singles.
This is the first set I was able to save that much gold for and then do this many drafts. I am extremely pleased with the results and what I received.
Lets break this down further and see what I got that is actually usable. Remember, not every card is useful as there are many unplayable and niche cards that add little to no value to your collection. The bulk of your collection will be made up of all the workhorse common and uncommon cards. There are many bad rares, and you should only be concerned with the ones you intend to play with rather than how many you can get.
Commons
- 101/101 singles obtained
- 403/404 cards obtained for full playset
Common playsets really hit home for me, as I enjoy the Pauper format and buy these for roughly $20 every set release from my local game store. I also put together pauper playsets, draft cubes and decks and sell them.
I have entire common playsets of most sets going back to the mid 90's.
Uncommons
- 79/80 singles obtained
- 307/320 cards obtained for full playset
Uncommons are where much of the magic in Magic happens.
Rares
- 53/53 singles obtained
- 131/212 cards obtained for full playset
I was lucky enough to pull the entire set of rares, though I only have about half of the playset.
While many rares are powerful and can do cool things, I don't typically focus on them. The rares I need in many decks are so few compared to the commons and uncommons.
I ended up getting 4 red rares I really wanted, 1 x Torbran, 2 x Fervent Champion and 1 x Castle Embereth. I was hoping for more Fervent Champions and more Castle Embereths to upgrade my Cavalcade deck with.
I am excited to build some new decks with all of the rares I received. There are a lot of fun new possibilities for brewing now.
Mythics
- 8/15 singles obtained
- 15/60 cards obtained for full playset
I am excited to brew some decks with a few of these. Questing Beast and Garruk were awesome pulls for things I had ideas for.
Booster Pack Stats

This chart shows the total progress gained towards a collection if you were to only open booster packs. Duplicates have alraedy been removed, of which there were only 11 commons.
I am more going to look at this as someone buying 50 packs for 50K Gold or spending $50 on the pre-release packs.
These booster packs were all obtained for free via codes, mastery tree progress, returning player rewards and Ranked Draft rewards.
I opened each pack, recorded the cards received, and tallied up duplicates. The numbers on this chart only include the cards opened from these 50 booster packs. This is as clean of a data set as I could get for a snapshot of what opening 50 booster packs looks like.
Even though I opened all of these packs after drafting, the rare numbers should still be the same. This is due to the fact that I still haven't opened enough packs to possibly start getting duplicate rares.
As you can see, 50 packs will get you only 67% of the set, and 37% of the entire playset.
Ranked Draft vs Booster Packs
Let me state something that doesn't seem to be as obvious out there with all of the misinformation spreading around: VAULT progress still works with drafted cards. All of those common and uncommon duplicates still give you vault progress, just as they do when opening booster packs.
You won't receive rare duplicate protection while drafting, but the chances of getting more than 5 rares or mythics is pretty, well, rare for this amount of drafts.
You also won't receive as many wild cards while drafting, since those are all obtained while opening regular booster packs en masse. This seems to be the main sticking point for the pro-booster-pack-openers. Looking at the data below though, this may not be a big deal to some people, depending on their goals.
Crack Packs After Draft
It is importnat to finish doing all the drafting you are going to do before opening any booster packs. This gives you better odds at not drafting duplicate rares. Once you have completed all the drafting you had planned to do for the new set, you can now crack open all those booster packs you have been saving.
Opening all of these booster packs will have rare duplicate protection active. Since you just finished collecting a good portion of the rares while drafting, your rare pool will be smaller, thus letting the "random" rare slot focus more on what you don't alraedy have. This will give you better results as you will now start to fill in many of your rare playsets.
You will also receive a ton of wild cards simply from opening all of these packs. This has nothing to do with drafting, and will happen any time you open a regular Arena 8-card booster pack. It's just an extra bonus to note after you finished all that drafting.
Below is a chart I put together with what you can expect to see when a new set is released. This chart assumes you have zero cards from the new set. I removed all of the cards I previously obtained from these numbers to make it as fresh a start from zero as I could.
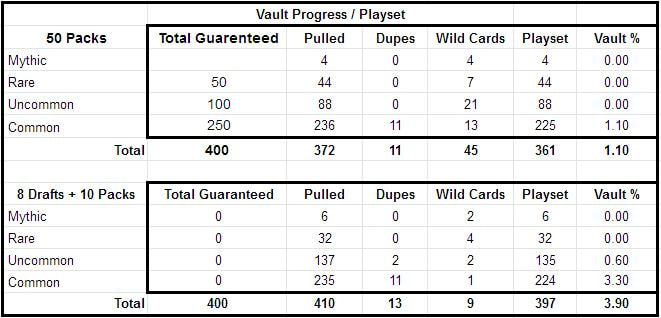
I chose 8 drafts since this equals the same amount of cards in 50 booster packs
Booster Pack Data
The 50 booster pack opening is the same data from the standalone booster pack opening section above.
50 Booster Packs = 400 Guaranteed cards. I only ended up with 372 cards due to many being wild cards, which is not a bad thing, it can either help complete your set, or you can use them for other sets.
I only ended up with 361 usable cards for my collection, but received 45 wild cards in the process.
Ranked Draft Data
The 8 drafts that I used for this chart were the first 8 drafts that I did, along with the first 10 booster packs earned from rewards. I include the booster packs because they are part of the price of entry for the draft and add to your total collection after drafting. This is meant so show total value in drafting vs just opening booster packs. For zero wins, you are guaranteed 1 booster pack per draft with the chance of receiving two. I received an extra pack on two different drafts, totaling 10 booster pack rewards in all.
Here I ended up with more usable cards, 397 total for my collection, but received far fewer wild cards, only 9.
Note that 2 of my 13 duplicates were my mistake. I picked cards I alraedy had as my draft tracker somehow missed a few cards I had full playsets of already from the Brawl event. The duplicates would have been exactly the same as if opening packs in this case, with 11 total duplicates.
Comparison
50 Packs = 361 usable cards + 45 wild cards = 406 Total Cards
8 Drafts = 397 usable cards + 9 wild cards = 406 Total Cards
This was surprising to me. It looks like they are exactly the same for total cards received for the new set if you used your wild cards for missing Eldraine cards.
Unfortunately you can't scale this since the randomization of booster packs prevents you from figuring out what duplicates you will or won't get.
- 50 booster packs = 400 cards opened
- 8 drafts + 8 Booster Packs = 400 cards opened
Booster Pack Data
The 50 booster pack opening is the same data from the standalone booster pack opening section above.
50 Booster Packs = 400 Guaranteed cards. I only ended up with 372 cards due to many being wild cards, which is not a bad thing, it can either help complete your set, or you can use them for other sets.
I only ended up with 361 usable cards for my collection, but received 45 wild cards in the process.
Ranked Draft Data
The 8 drafts that I used for this chart were the first 8 drafts that I did, along with the first 10 booster packs earned from rewards. I include the booster packs because they are part of the price of entry for the draft and add to your total collection after drafting. This is meant so show total value in drafting vs just opening booster packs. For zero wins, you are guaranteed 1 booster pack per draft with the chance of receiving two. I received an extra pack on two different drafts, totaling 10 booster pack rewards in all.
Here I ended up with more usable cards, 397 total for my collection, but received far fewer wild cards, only 9.
Note that 2 of my 13 duplicates were my mistake. I picked cards I alraedy had as my draft tracker somehow missed a few cards I had full playsets of already from the Brawl event. The duplicates would have been exactly the same as if opening packs in this case, with 11 total duplicates.
Comparison
50 Packs = 361 usable cards + 45 wild cards = 406 Total Cards
8 Drafts = 397 usable cards + 9 wild cards = 406 Total Cards
This was surprising to me. It looks like they are exactly the same for total cards received for the new set if you used your wild cards for missing Eldraine cards.
Unfortunately you can't scale this since the randomization of booster packs prevents you from figuring out what duplicates you will or won't get.
If the numbers are the same, why Still draft?
I do believe that drafting is still the way to go if you have enough to spend on 20 drafts vs 100 booster packs.
When opening booster packs, think about the sheer number of duplicates you will start to receive later on that you have no control over. These will only go into the main vault, and be counted for very little in the end.
When collection building while drafting, you can keep on picking through each pack to select those last few cards you don't have yet, thus not needlessly wasting common and uncommon slots on useless vault progress. I would rather have the card than gaining .1%-.3% progress for a small handful of wild cards.
I feel that if I have all the cards to build nearly anything I want, then I will have very little use for wild cards, or I can save those wild cards for older sets or just some really special deck build that needs more rares and mythics.
I also enjoy the process of selecting each and every card that goes into my collection. I enjoy looking at the artwork of each card, reading the card. Becoming familiar with the cards that I carefully pick out.
Even if the comparison above shows the same numbers at a lower volume, you will still come out a head when drafting because of the gem rewards.
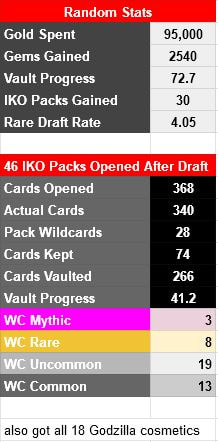
Random Stats

Some random stats I collected. The most useful are probably the wild cards gained once I opened all the booster packs at the end.
I don't include wildcards in with my total card counts since they most likely won't be used for Eldraine, and thus can't be counted as Eldraine cards.
The gems will come in handy, and put me 1/3 into the next Mastery Pass. I guess I could look at it this way, I can still get one free mastery pass every 3 sets, even if I don't play any of the draft games for more gems.
Since I didn't want to play out my draft games, I took someone's suggestion and instead gave away wins. I queued up all 66 times and immediately conceded, giving my draft opponent a free win. I hope that helped those folks out on their way to greater riches.
A random stat I forgot to put on a chart was that my rare draft rate was averaged at 3.9 rares per draft. I ranged from 3-6 rares per draft.
Value for Money
kIf both methods might possibly net the same amount of usable cards, what is the better value to spend your hard earned gold on?
Using the same data from the previous section:
The clear winner is by far the Ranked Draft option in my books.
Using the same data from the previous section:
- 50K Gold = 50 Packs = 400 cards = 361 usable cards + 45 wild cards = 406 Total Cards
- 40K Gold = 8 Drafts = 400 cards = 397 usable cards + 9 wild cards = 406 Total Cards + 400 gems
The clear winner is by far the Ranked Draft option in my books.
In Conclusion
I hope that you found this lenghty article of some use. The numbers even surprisd me somewhat for the booster pack output being the same as the draft output.
The obvious choice here should be to save your gold for Ranked Draft. The more gold you have, the better the returns for Ranked Draft will be.
The obvious choice here should be to save your gold for Ranked Draft. The more gold you have, the better the returns for Ranked Draft will be.
Many players think that virtual game items have no real world value. And they're absolutely right!
The value you get from your purchased virtual items are strictly to let you enjoy the game more, be it changing the way something looks, using a more powerful item, or simply for bragging rights. That virtual item you bought brought you some kind of joy.
However, what if there was a way that you could parallel your virtual items with real world items to find a real world value?
After all, you most likely did spend real money on Magic: The Gathering Arena. Even if you did not, you can look at it as if someone gave you a large collection for free, just for playing.
Since there actually is a direct comparison to a real world product in this virtual game environment, then this makes it easy to calculate what your in game virtual items are virtually worth.
If you have not yet read my previous article on Throne of Eldraine Season Rewards and Real World Value, then check out that article HERE
While that article goes very in depth on how values are calculated, fortunately you won't need to do any math at all to figure your collection value out. All that is needed is an Arena tracker to export your collection, a quick cleanup of the data, and then you can import it into another collection system to give you the values.
Let's get started!
TL:DR version
- Use a tracker that has a collection manager and that can export your collection to a file
- Cleanup your output file so it's just 2 columns, Quantity on the left, Card name on the right. Save as a TXT file.
- Fix TXT file so each row is "Number [space] CardName", make sure there's no tabs or commas between them.
- Import into EchoMTG's deck list feature. It will make one huge deck and display the total value.
Getting Started
This is not difficult if you are somewhat computer savvy, but if you are not very technical, you may want to skip this project.
I am in no way sponsored or paid by any of the companies whose products I will be referring you to. I simply use them myself.
Things you will need:
I am in no way sponsored or paid by any of the companies whose products I will be referring you to. I simply use them myself.
Things you will need:
- MTG Arena installed with an already established account
- Tracker that can export your entire collection. I use MTGArena.Pro
- A comparison of others can be found HERE
- Something to edit a spreadsheet with, I use Google Sheets in this example.
- Notepad, or other simple text editor
- EchoMTG Account, make sure you can log into the website (Free account)
Installing a Tracker
There are many trackers available for Arena.
You can find a quick table of features of the various trackers HERE to choose which one you want. Just make sure it includes a Collection Tracker and/or Browser.
I use MTGArena.PRO. It's the most powerful one of all the trackers I've tested.
For a full write-up of how to install MTGArena.Pro, click HERE (COMING SOON)
Make sure that your tracker has synced itself with its website counterpart. To check this, log into the website for your tracker and check your card collection inventory to make sure everything is showing up correctly.
Exporting your Collection
Once your MTGArena.Pro client has synced itself, then you may now log into the website.
Their site is located here: https://mtgarena.promtgarena.pro
Once you log in:
Their site is located here: https://mtgarena.promtgarena.pro
Once you log in:
- At the top of the site, click on My Arena --> Collection
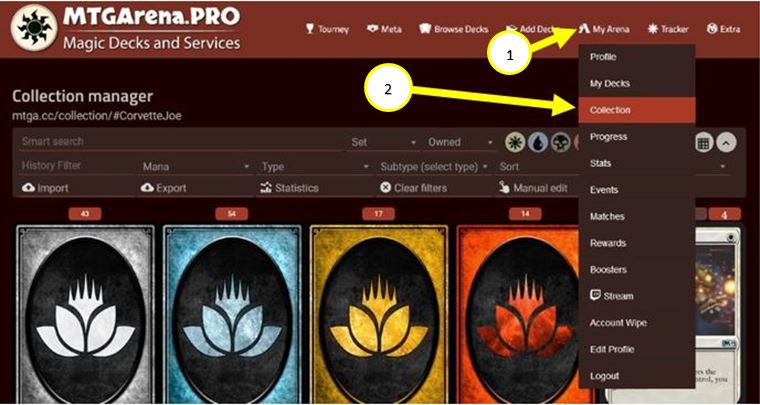
Select My Arena--> Collection
- At the top of the Collection Manager, select the field that says Display and change it to Owned.
- Next, look on the top right of the collection manager and click on the little circular icon with the little down arrow in it. This will expand the search and filtering features of the Collection Manager
- Next, click on the Export button

Change Display to Owned; Click the menu expansion, Click Export
An Export window will pop up, asking you to select a format to download to.
- Click on MTGGoldfish CSV
- You can either save it or go ahead and open it with a spreadsheet application.
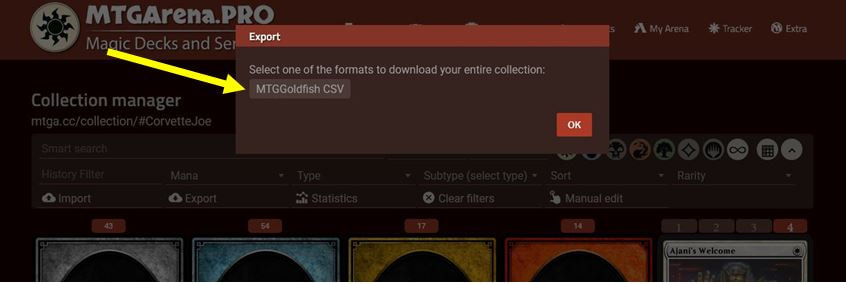
Click on MTGGoldfish CSV
Cleaning up the Data
Before we can import this into another system for pricing, we will need to clean up the data first. You may be asking, "But why can't I just import this into MTGGoldfish?". It is because MTGGoldfish will not let you bulk import a collection unless you pay for a premium membership. Since we want to find this out for free, we will be using another system.
Once the file is opened, we can see what MTGArena.Pro exported.
You should see a spreadsheet with a few columns, such as the card name, the set it is from and the quantity.
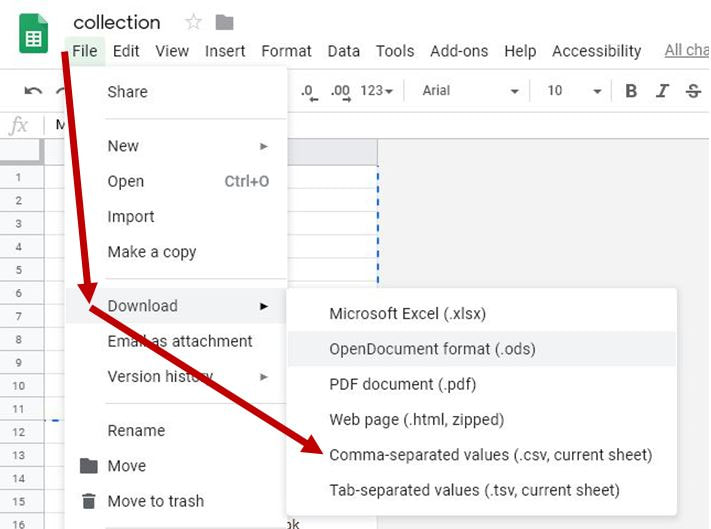
- Open the collection.csv file in your favorite spreadsheet application. For the purposes of being free, I will be using Google Sheets as an example. You are free to use Excel, Libra Office or any other spreadsheet software.
Once the file is opened, we can see what MTGArena.Pro exported.
You should see a spreadsheet with a few columns, such as the card name, the set it is from and the quantity.
The only two columns we are concerned with are Card and Quantity.
- Delete the other columns.
- Next, you need to move the quantity column in front of the card column.
- Next, you can delete the header row that says Quantity and Card.
If you wish to sort alphabetically and remove all the basic lands, you can. You may also remove the lands later after importing it into the pricing website.
- Once completed, save this as a CSV file (Comma Separated Values).
- Let us call it "collection.csv"
We have one more cleanup step to perform.
Open collections.csv in a simple text editor, such as Notepad.
You will something like this:
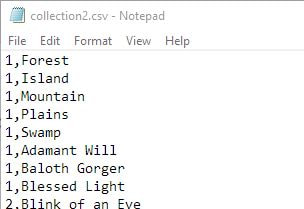
Note the commas between the card names. We need to remove all of these commas using the Replace tool in Notepad.
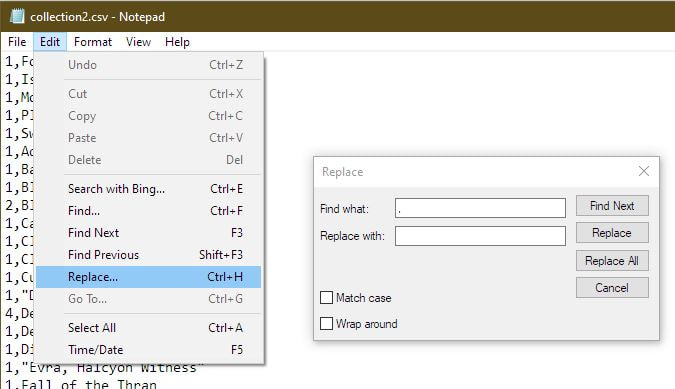
- Click Edit--> Replace
- In the Find What field, type in a single comma
- In the Replace With field, type in a single space (just hit the space bar once)
- Then click the Replace All button
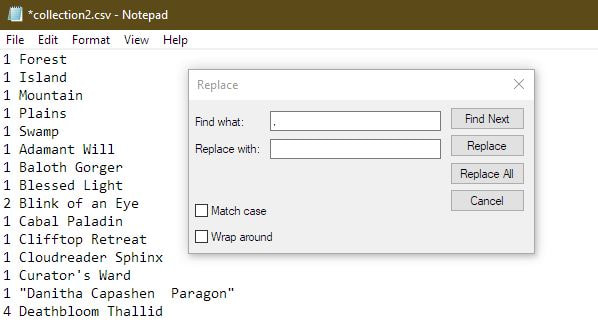
- Save this file as "collection.txt" and close it.
Now we need to log into EchoMTG.
EchoMTG is a collection tracker for the physical MTG card-collecting world. It tracks and bases all of its values on TCGPlayer.
Here is the address for EchoMTG: https://www.echomtg.com
The free version only allows you to import 350 cards into its collection database. But there is a cool feature called Lists/Decks that allow for unlimited cards, without adding them to your collection. This will also show you the value of this list/deck.
- On EchoMTG, on the left hand menu, click on Lists/Desks
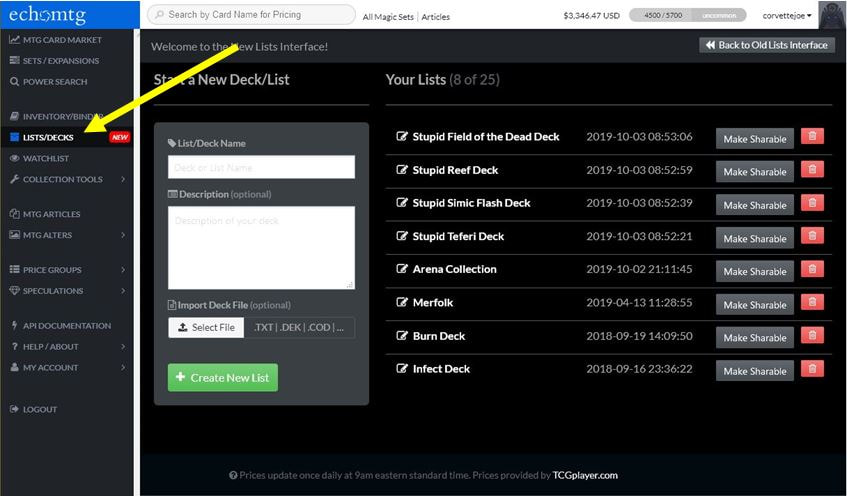
Give your List/Deck a name in the field above
Click on the Select File button, then find where you saved your collection.txt file
Click on the Select File button, then find where you saved your collection.txt file
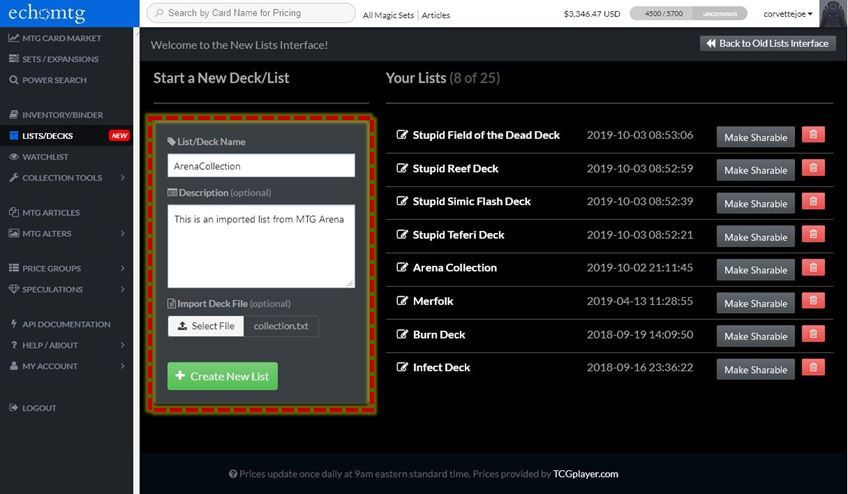
- Click on the Create New List button
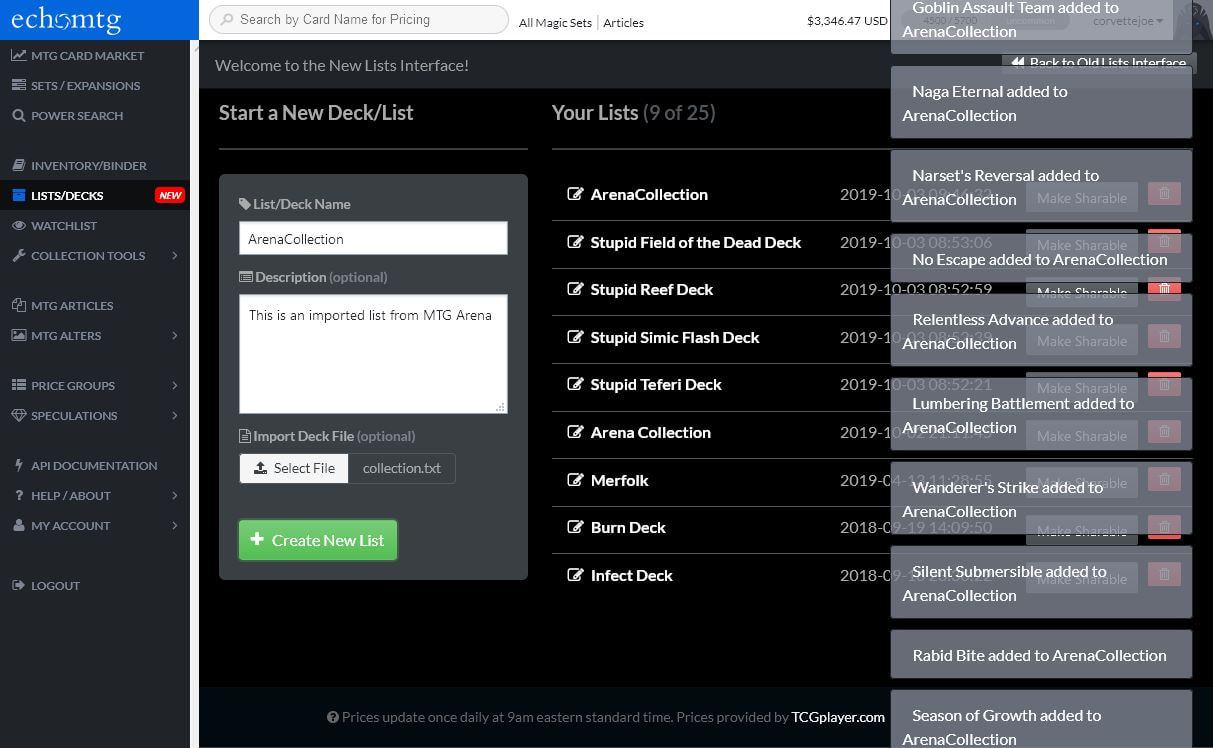
You can now click on your newly created list. Give it a few seconds for the card names to populate. Remember, there is probably 1000's of cards in here.
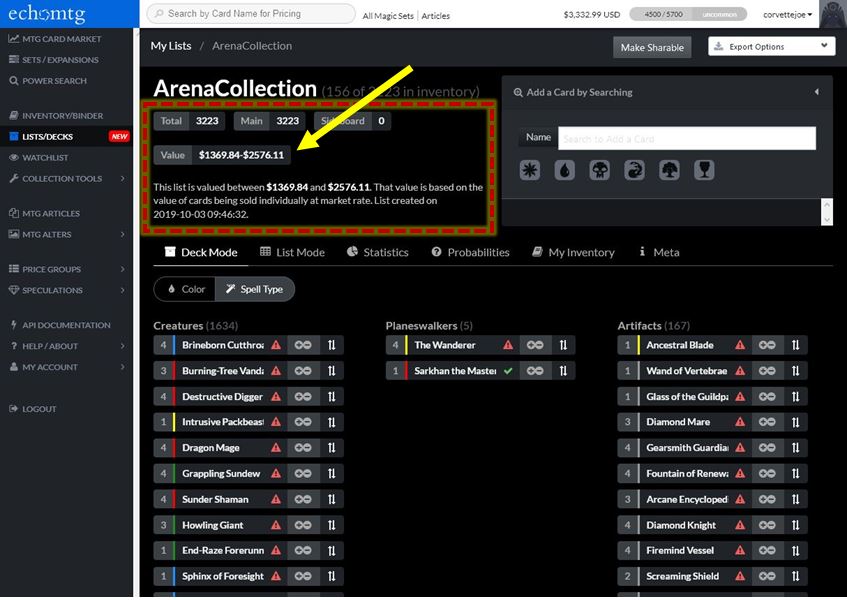
As you can see from the image above, as of this writing, my MTG Arena virtual collection is worth virtually somewhere between $1,369-$2,576.
Remove Basic Lands
Due to the basic lands being imported, it automatically selected some of the vintage lands, which, in total, added about 150 cards to my list, totaling about $75 in value. Therefore, I would also just subtract this from whatever final value I came up with. Basic lands in Standard have little to no value. You could add in each land you have, but it is just not worth the effort.
You could remove the basic lands from the spreadsheet earlier in the process, or once imported into EchoMTG, you can slowly click the - (minus sign) next to each of the 5 basic lands and remove them all. It all depends how tech savvy you are.
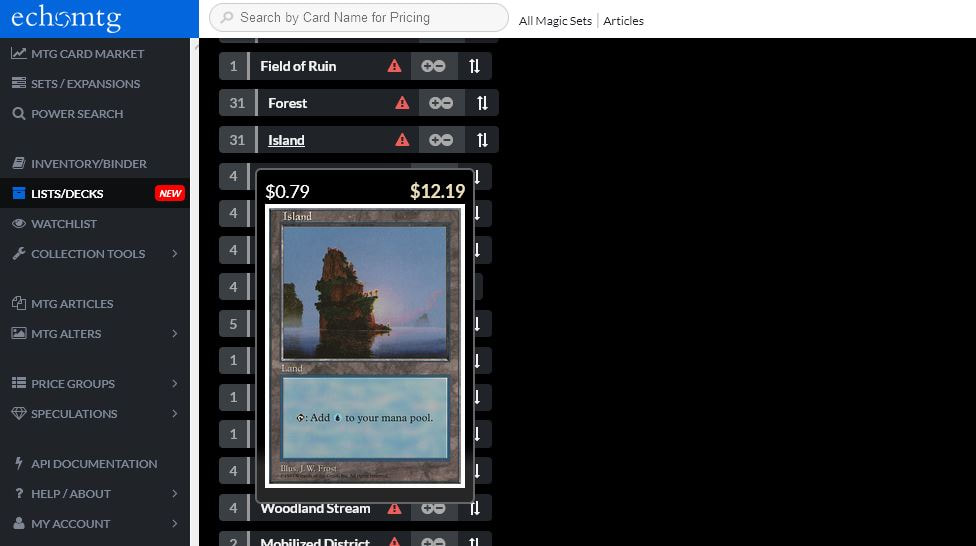
The easier option is to just mouse over each of the basic lands and see what their value is. Looking at my example image below, you can see that it EchoMTG chose to import a Fifth Edition basic Island, which is worth quite a bit more than any basic land in Standard.
For this example, multiply $.79 x 31 cards = $24.49 and subtract that from your total value.
Do this for each of the other basic lands as well.
You could remove the basic lands from the spreadsheet earlier in the process, or once imported into EchoMTG, you can slowly click the - (minus sign) next to each of the 5 basic lands and remove them all. It all depends how tech savvy you are.
The easier option is to just mouse over each of the basic lands and see what their value is. Looking at my example image below, you can see that it EchoMTG chose to import a Fifth Edition basic Island, which is worth quite a bit more than any basic land in Standard.
For this example, multiply $.79 x 31 cards = $24.49 and subtract that from your total value.
Do this for each of the other basic lands as well.
Speaking of lands, if you have the full art basic lands for Unhinged or Zendikar,those are worth roughly $1 on average in the real world.
Figure you probably bought 24 of each of them in real life, 24 of each full art basic lands (120 cards total) is worth another $60-$120. Double this if you have both sets.
Figure you probably bought 24 of each of them in real life, 24 of each full art basic lands (120 cards total) is worth another $60-$120. Double this if you have both sets.
In Conclusion
Pricing for EchoMTG is pulled from TCGPlayer. The values shown are between lowest market value and the average market value. Lowest value typically lists damaged or high play cards as well, so this may not be entirely accurate for near mint cards. Keep in mind the Average price includes those that have listings that are multiple times more than a card is worth, which can skew that number as well. You should probably just take the average of the two values for a more real world representation of what your collection is worth.
This pricing does not take your card styles into account either. Since the card styles are essentially "foils" in Arena, you can value them in this manner. Though, they now look like the extended art cards from Throne of Eldraine, so this would signifigantly increase the value over a foil.
I hope you enjoyed this article. It was certainly fun to research and write! If you would like to see more articles such as this, please leave me a comment or contact me with more ideas.
Article updated 11/27/19 to reflect new pricing calculations and to shorten the article. All values explained in What Does Everything Cost? Real World Values Explained
Throne of Eldraine has arrived on Magic: The Gathering Arena this week. The peasants rejoice!
Today's article will be about Real World Value for the Mastery Tree. I have calculated the values for both Free to Play and Mastery Pass players.
The Throne of Eldraine (ELD) season will go a little longer than Core Set 2020 did. ELD will run for 110 days total, starting on 9/26/16 and allegedly ending on 1/14/20 (110 days from 9/26).
I will be basing the Mastery Tree totals on what I actually see in game, since Wizards of the Coast's (WotC) own press release has incorrect numbers in it.
Mastery Tree - Throne of Eldraine (Free to Play)
The new Mastery Tree is even more generous than the previos M20 tree. This is because of how weekly booster packs were removed from weekly win tracks, and instead spread out over the course of the new Mastery Tree.
With every even-numbered level, you will receive 1 Throne of Eldraine booster pack for free, up to level 92. This totals 46 free booster packs. You also receive 5 free orbs spread out over a few of the odd-numbered levels, up to level 69.
46 Booster Packs x $1.11 = $51.06
5 Orbs x $2.08 = $10.40
Throne of Eldraine Mastery Tree = $61.51 in free value
Returning Players (Free to Play)
This also part of the F2P path. You don't need to spend any money to receive these rewards.
WotC offered players that logged in prior to 9/26/19 an extra bonus that was received post patch for ELD.
In addition to the rewards above, returning players will also receive the following extra free bonuses in the Mastery Tree.
Returning Player Rewards = $6.66 in free value
Mastery Pass - Throne of Eldraine (3400 Gems)
The Mastery Pass was a big hit for M20, so it will be returning for all future sets. The rewards are quite generous, especially if you play a lot of draft and have a lot of reward gems. Even if purchased for around $20, this is still well worth the money.
The key to purchasing and using the Mastery Pass is that you need to play every day in order to advance through all of the levels to reap all of the rewards. If you don't plan to play much, you should probably skip the Mastery Pass.
The nice thing about this pass is that you can purchase it at any time, even on the last day. This is good for those that aren't sure how much they will play. They can then see how far they get before spending the money on the pass. The rewards are retro-active, so you will receive everything from the past, up to the level you are currently at at the time of purchase.
Lets see what all we got for the Throne of Eldraine Mastery Pass:
Throne of Edraine Mastery Pass = $182.40 in value
In Conclusion
Wizards of the Coast has been very generous with it's Free to Play player base. For those that are enjoying themselves and would like to support the game, please consider purchasing the Mastery Pass, as it's an exceptionally good value if you are an active player.
I hope this article has been of some use to you. Please leave any questions or comments below.
The new Mastery Tree is even more generous than the previos M20 tree. This is because of how weekly booster packs were removed from weekly win tracks, and instead spread out over the course of the new Mastery Tree.
With every even-numbered level, you will receive 1 Throne of Eldraine booster pack for free, up to level 92. This totals 46 free booster packs. You also receive 5 free orbs spread out over a few of the odd-numbered levels, up to level 69.
46 Booster Packs x $1.11 = $51.06
5 Orbs x $2.08 = $10.40
Throne of Eldraine Mastery Tree = $61.51 in free value
Returning Players (Free to Play)
This also part of the F2P path. You don't need to spend any money to receive these rewards.
WotC offered players that logged in prior to 9/26/19 an extra bonus that was received post patch for ELD.
In addition to the rewards above, returning players will also receive the following extra free bonuses in the Mastery Tree.
- 2 Throne of Eldraine Booster Packs x $1.11 = $2.22
- 4 Miscellaneous Booster Packs x $1.11 = $4.44
- 10 Random Uncommon Cards x $? = $0
Returning Player Rewards = $6.66 in free value
Mastery Pass - Throne of Eldraine (3400 Gems)
The Mastery Pass was a big hit for M20, so it will be returning for all future sets. The rewards are quite generous, especially if you play a lot of draft and have a lot of reward gems. Even if purchased for around $20, this is still well worth the money.
The key to purchasing and using the Mastery Pass is that you need to play every day in order to advance through all of the levels to reap all of the rewards. If you don't plan to play much, you should probably skip the Mastery Pass.
The nice thing about this pass is that you can purchase it at any time, even on the last day. This is good for those that aren't sure how much they will play. They can then see how far they get before spending the money on the pass. The rewards are retro-active, so you will receive everything from the past, up to the level you are currently at at the time of purchase.
Lets see what all we got for the Throne of Eldraine Mastery Pass:
- 5 Throne of Eldraine Booster Packs x $1.11 = $5.55
- 15 Misc. Booster Packs from previous Standard sets x $1.11 = $16.65
- 25 Card Styles x $2.08 = $52
- 10,000 Gold x $.0011 = $11
- 2,000 Gems x $.0058 = $11.60
- 10 Random Mythic Cards x ? = $0
- 3 Random Rare Cards x ? - $0
- 25 Orbs for Card Styles x $2.08 = $52
- 2 Card Sleeves x $5.62 = $11.24
- 1 Avatar x $3.04 = $3.04
- 1 Pet = $19.32
- + 1 Random Uncommon past Lvl 110 for every level after x ? = $0
Throne of Edraine Mastery Pass = $182.40 in value
In Conclusion
Wizards of the Coast has been very generous with it's Free to Play player base. For those that are enjoying themselves and would like to support the game, please consider purchasing the Mastery Pass, as it's an exceptionally good value if you are an active player.
I hope this article has been of some use to you. Please leave any questions or comments below.
If this does not automatically redirect you, then please click the link above.
OLD GALLERY BELOW HAS BEEN REMOVED...
OLD GALLERY BELOW HAS BEEN REMOVED...
Get the PDF of this article: Click Here
This guide will instruct you how to play Magic: The Gathering Arena on an iOS device, using Steam Link.
Since Magic: The Gathering Arena (MTG Arena) came out, we have been begging for a mobile version. After all, Hearthstone is on both iOS and Android and works very well. I’m sure it will come to mobile eventually. It is still in “open beta” at this time, so the MTG Arena developers are still working on perfecting the game.
Recently, Valve released Steam Link for iOS, which will allow us to play MTG Arena on our iOS devices. What this means is finally we get a full touch screen experience on our iPads and iPhones.
What is Steam Link?
Steam Link is a utility developed by Valve Software, who developed Steam as well as notable titles such as Half-Life, Portal and Left 4 Dead.
In 2015, Valve released a device called a Steam Link. This small box connected to your living room TV. You could connect game controllers, mice and keyboards to it. Then, over your home network, it would access your entire Steam Library from your gaming PC.
How it worked was, it streamed all of the video and audio content from your PC to your living room. It then sent the input devices, such as a gamepad, or a mouse and keyboard, back to your PC. What you experienced was full PC gameplay, in your living room, with no lag, and no need to hook your PC up to your TV.
A couple years later, Valve decided to discontinue the Steam Link devices in favor of developing the Steam Link software to run on mobile devices, Raspberry Pi, certain smart TV’s and even low end computers. Unfortunately, those using iOS were left out in the cold.
It was not until May of 2019 that Valve finally release Steam Link on iOS.
Installing Steam on PC
You will first need to install Steam on your PC.
While I will not go into detail on how to install Steam, you may find plenty of How To guides and help directly from Steam’s website. Steam is available for Mac as well, but since MTG Arena only runs on Windows at this time, then you will need to make sure to install Steam on a Windows PC.
You will also need to sign up for a free Steam account to use their service.
You can find the download link to their software here: https://store.steampowered.com/about/
Many of us are gamers and already use Steam, so the focus on this guide will be how to get MTG Arena working using Steam and the Steam Link app.
Adding MTG Arena to Steam
Since MTG Arena is not a title available from Steam, you will need to manually add it to your Steam Library.
We will assume you already have MTG Arena installed, and have been playing it. If you have not, go ahead and install MTG Arena, log in, and make sure it is fully updated.
I will also assume that you have already installed Steam on your PC, signed up for an account, and are able to see the main library screen now. For those of you that already use steam, just navigate to the Library screen.
1 - Navigate to the Steam Library
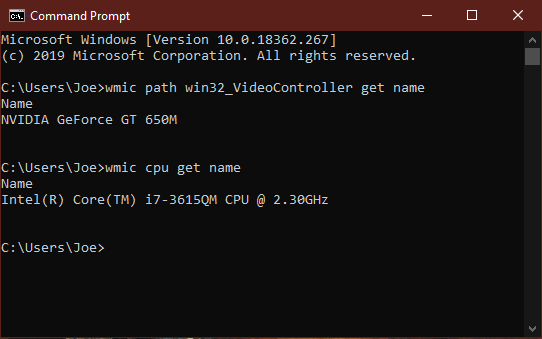
Add A Game button
2 - Click on the Add A Game button in the bottom left corner of the main Library window.
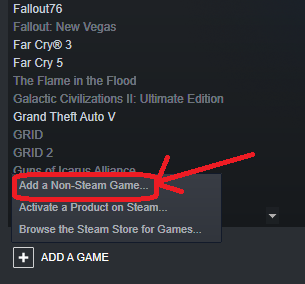
Add a Non-Steam Game...
3 - Next, it should scan your PC for a list of everything installed. Once it has finished, scroll through the list and look for “MtgaLauncher”.
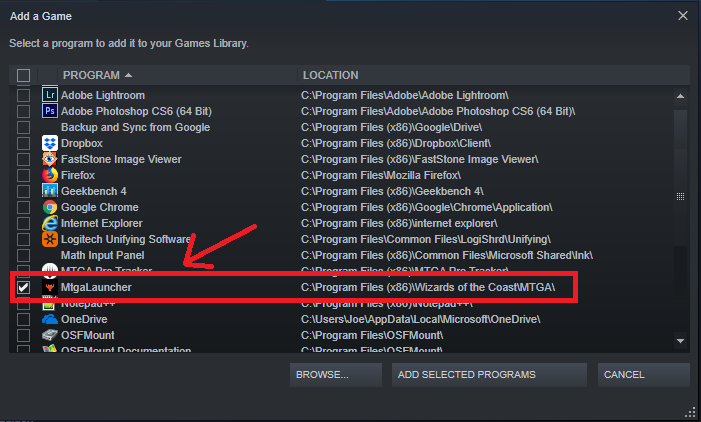
Select MtgaLauncher
4 - Select MtgaLauncher and click the “Add Selected Programs” button.
You should now see MtgaLauncher in Steam as one of the games you may play.
Go ahead and click on the Play button to test it out and make sure it is ready to play when launched via Steam. Exit MTG Arena once you see that it works.
You should now see MtgaLauncher in Steam as one of the games you may play.
Go ahead and click on the Play button to test it out and make sure it is ready to play when launched via Steam. Exit MTG Arena once you see that it works.
Install Steam Link on iOS
I will be walking you through installing Steam Link on iOS using my iPad Mini 4.
1 - Go to the App Store and search for “steam link”
1 - Go to the App Store and search for “steam link”
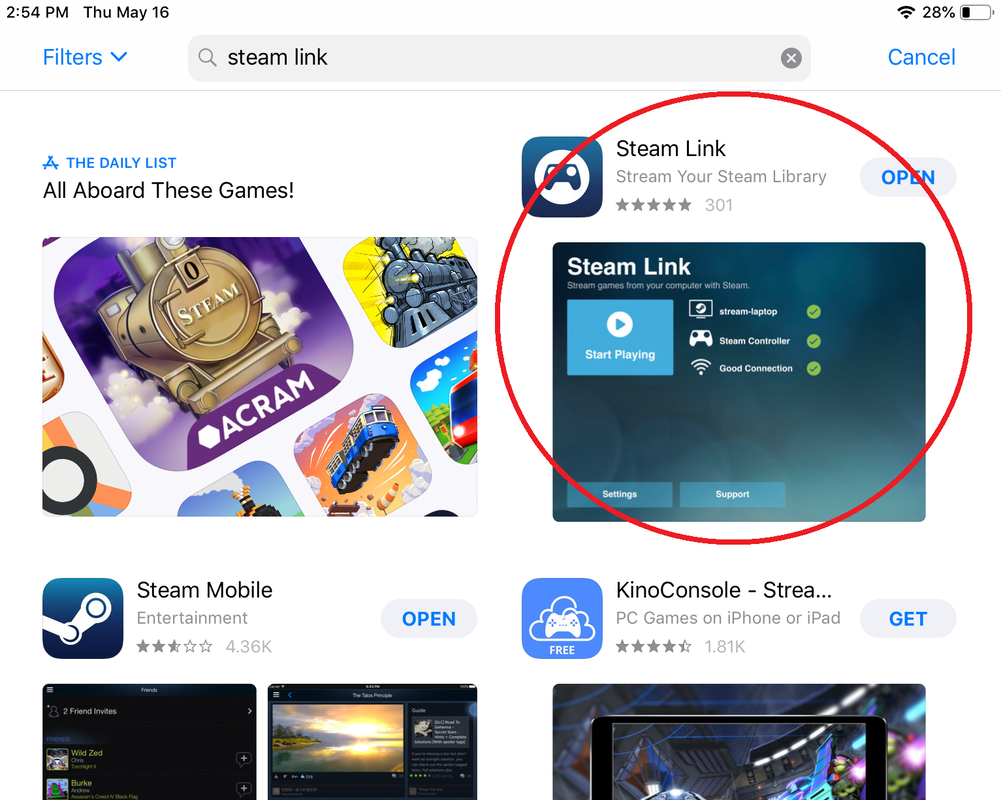
Steam Link in iOS Apps Store
2 - Install Steam Link.
Once the install is completed, we will need to link Steam on your PC with Steam Link on your device.
Once the install is completed, we will need to link Steam on your PC with Steam Link on your device.
Linking Steam Link with Steam
Important Note: In order to use Steam Link, you must have both the Host PC (your Windows PC with Steam) and the Client Device (your iOS device) on the same network. This means both of them need to using your network within your home or office. This will not link outside of you’re the location of where your PC lives. You may have your PC wired into your home router, and your iOS device may be on wireless, so long as they are the same network within your home. I will not go into details of home networking, as it falls outside of the scope of this document.
1 - Looking at Steam on your Windows PC, in the upper left corner, click on the menu called Steam, then select Settings.
If you do not see Settings, you may have Family Sharing turned on and will need to disable this before you can change Steam’s Settings. Search Google for how to disable Family Sharing
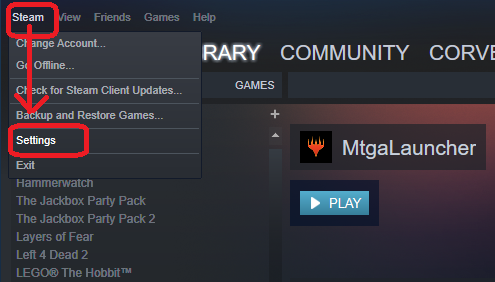
Steam Settings
2 - Select the In-Home Streaming menu.
3 - Make sure Enable Streaming is checked
3 - Make sure Enable Streaming is checked
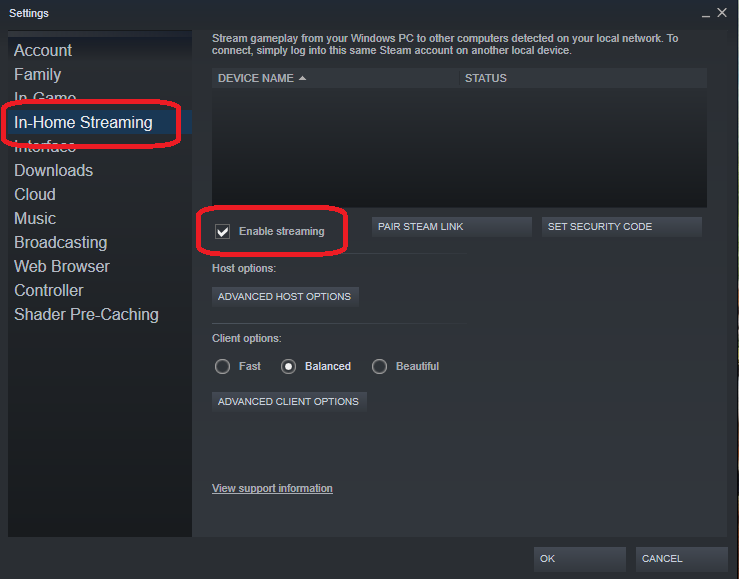
Enable Streaming
4 - Click OK and go back to the main Steam Library. This should be all you need to do.
Now, switch back over to your iOS device.
5 - On your iOS Device, launch the Steam Link app.
Now, switch back over to your iOS device.
5 - On your iOS Device, launch the Steam Link app.
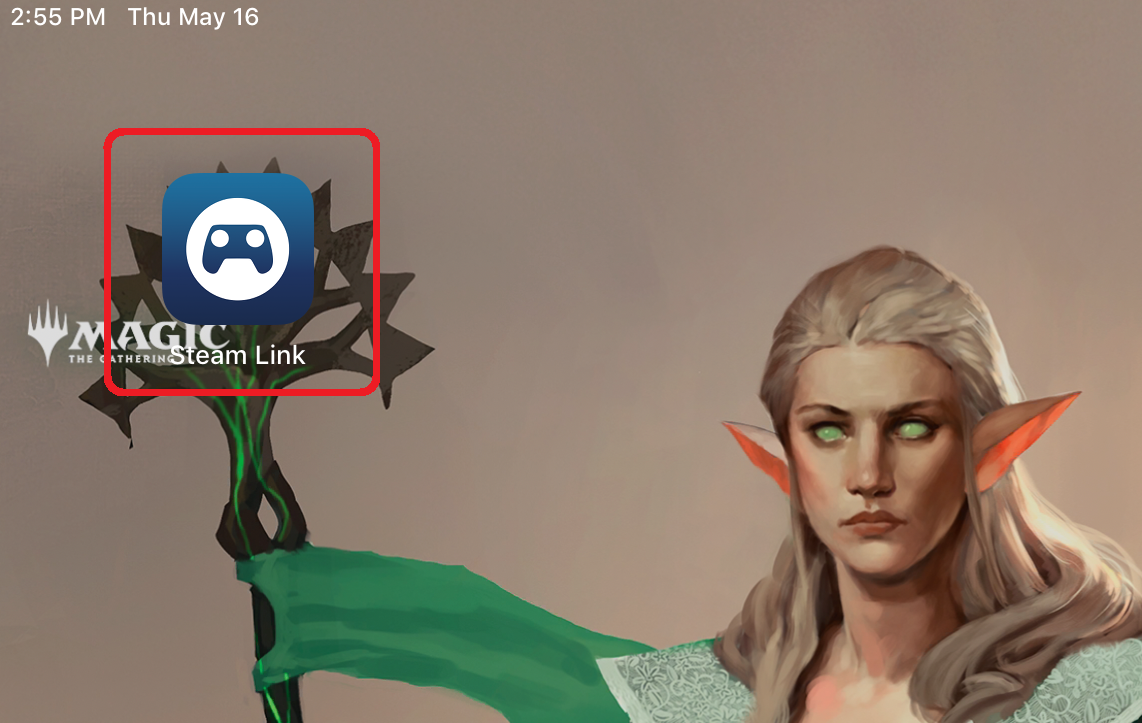
Steam Link Icon
6 - Tap the big Get Started button on the Welcome screen.
Steam Link Welcome Screen
7 - Tap Use Touch Control on the Pair Controller screen.
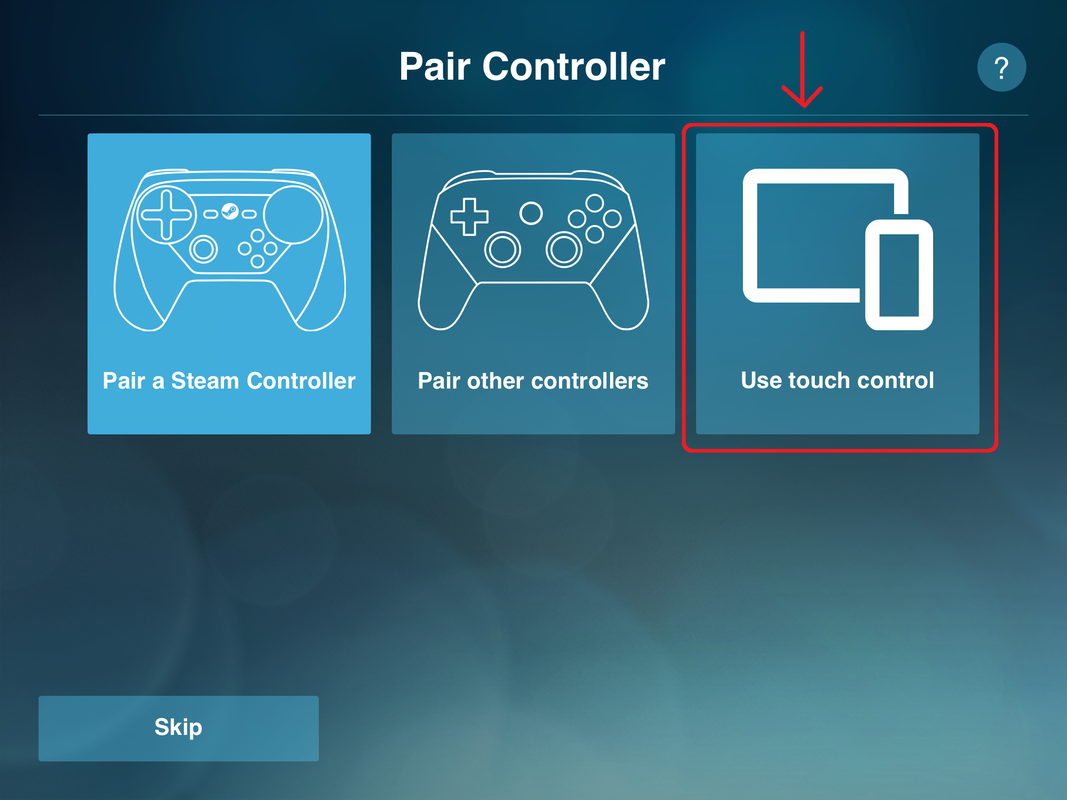
Use touch control
8 - Next, it will run a test to make sure your network is fast enough for the best experience.
Make sure your device is on your home WiFi, and not still connecting to your cellular service.
Make sure your device is on your home WiFi, and not still connecting to your cellular service.
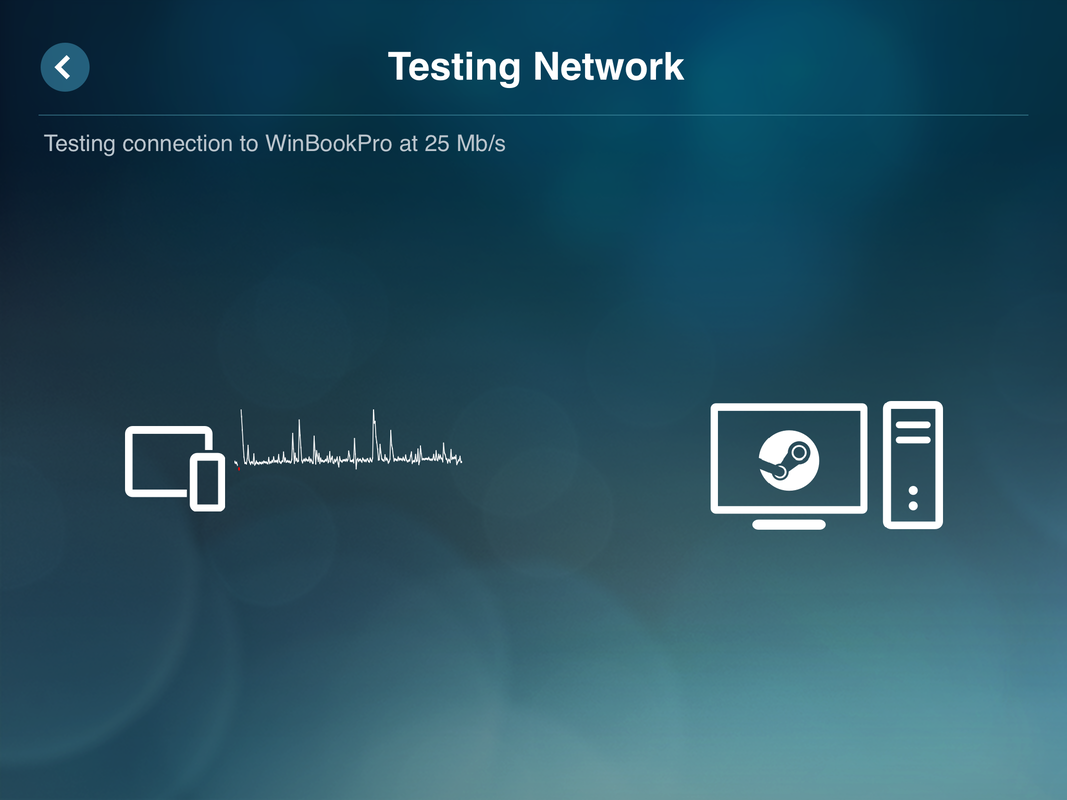
Testing network connection
9 - Once it has completed, it will notify you of your speed and if it is in an acceptable range or not.
Tap OK.
Tap OK.
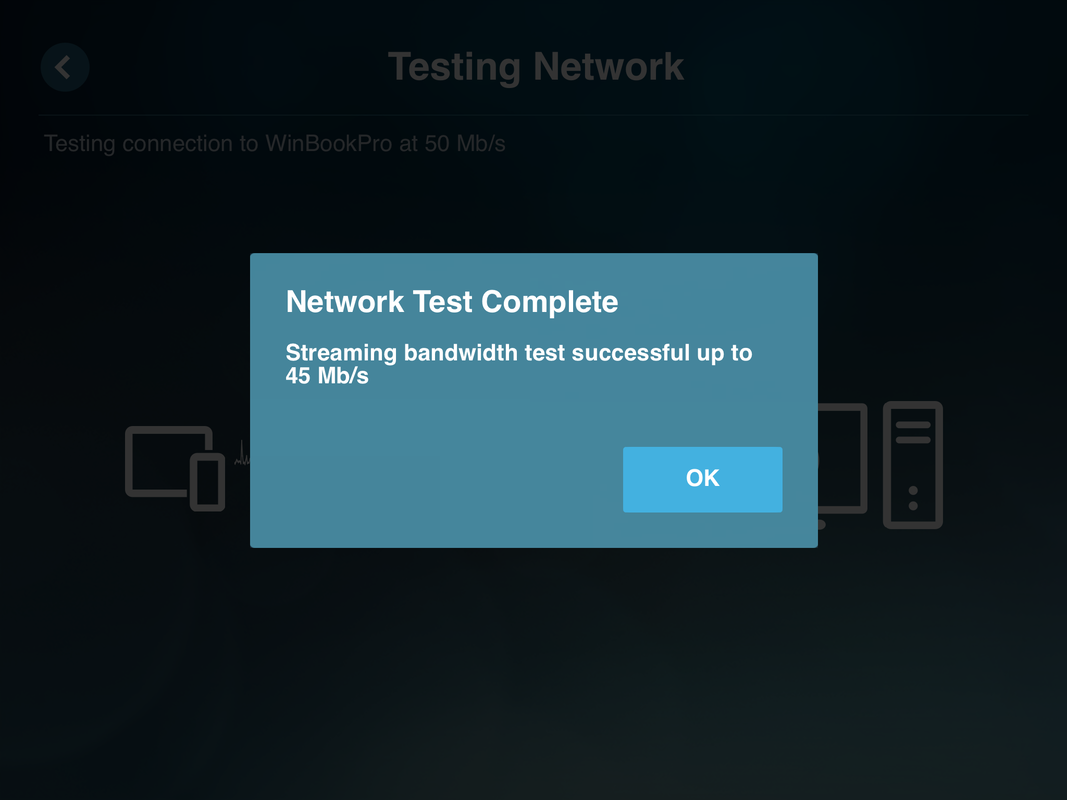
Successful completion screen
10 - Next it will attempt to look for your Windows PC with Steam running on it.
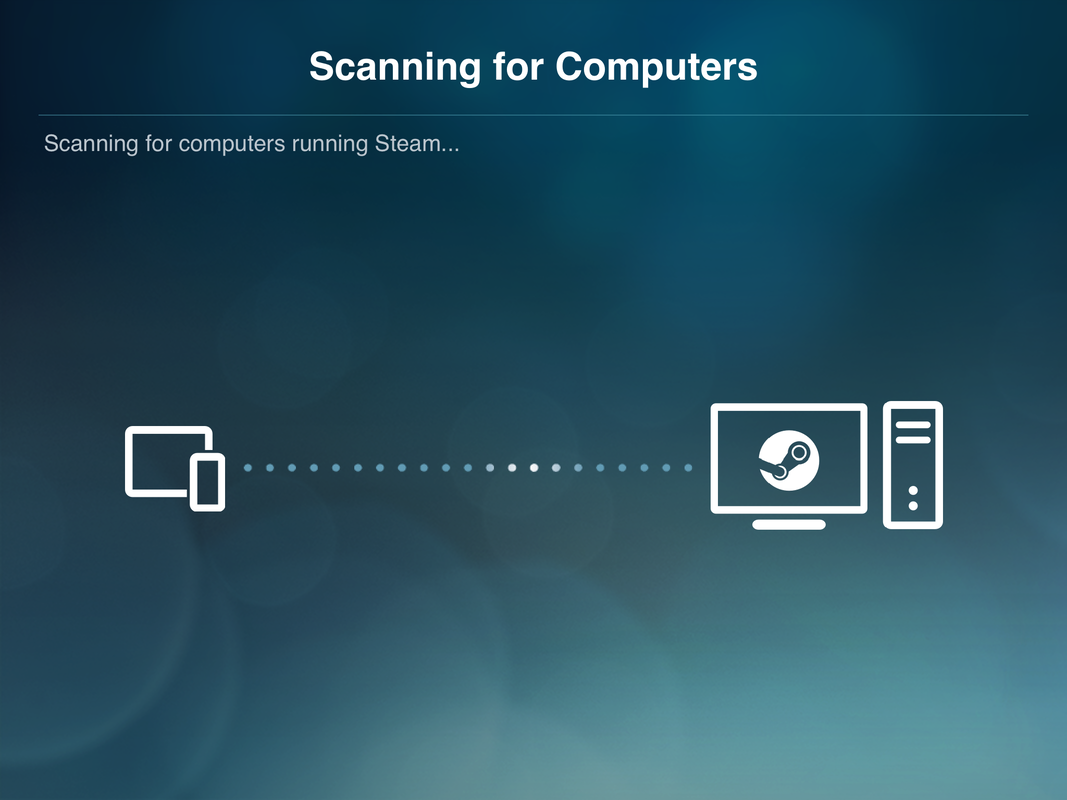
Scanning for your Steam PC on your home network
11 - Once it finds the PC, it will display it on the screen. Select the PC name.
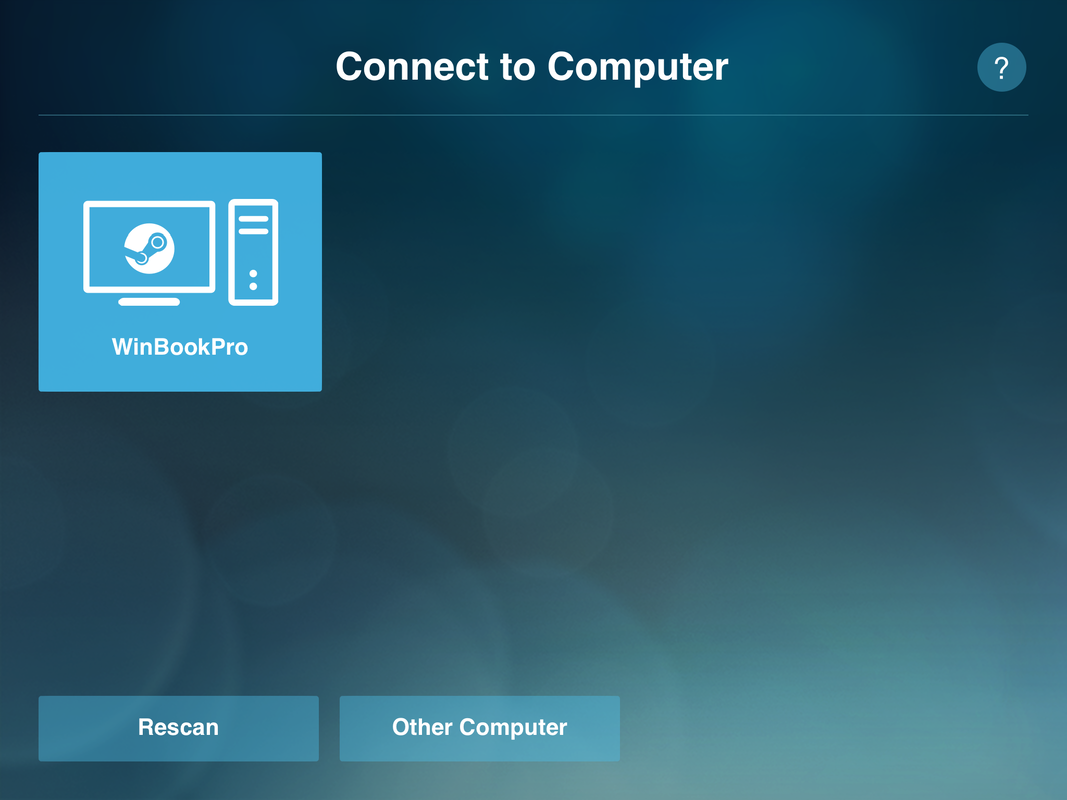
Select your Steam computer
12 - Once you are back on the main home screen, tap the Start Playing button.
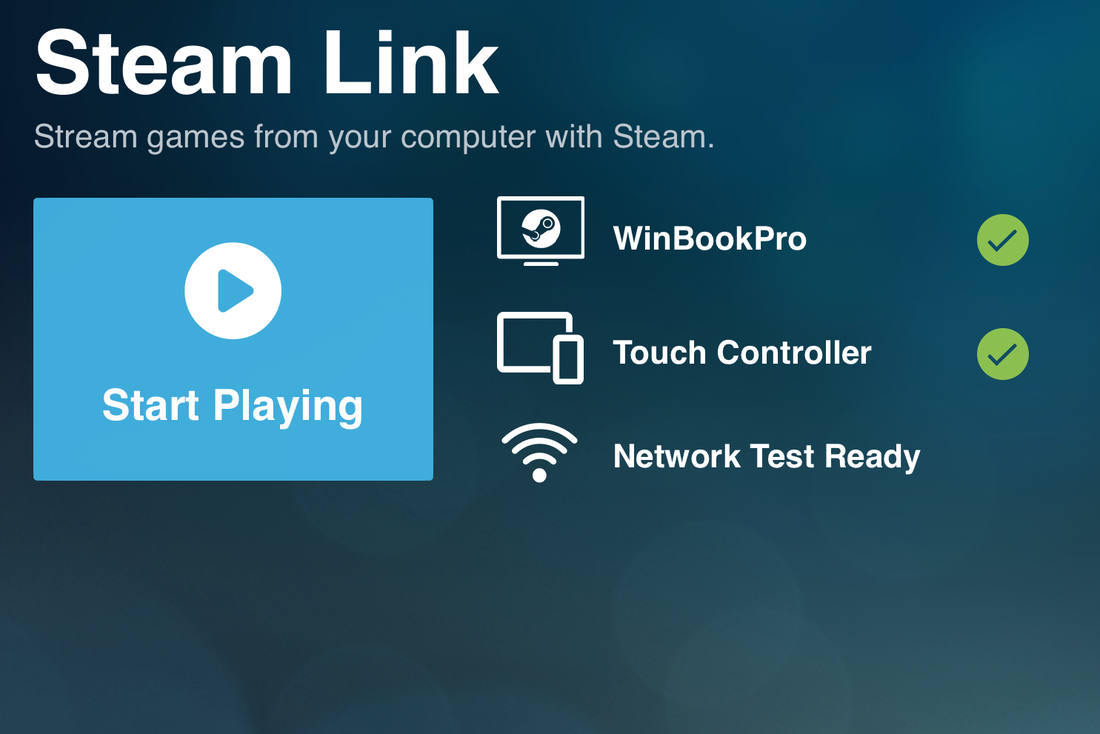
Start Playing!
13 - You will be presented with a list of touch controls, just click Continue.
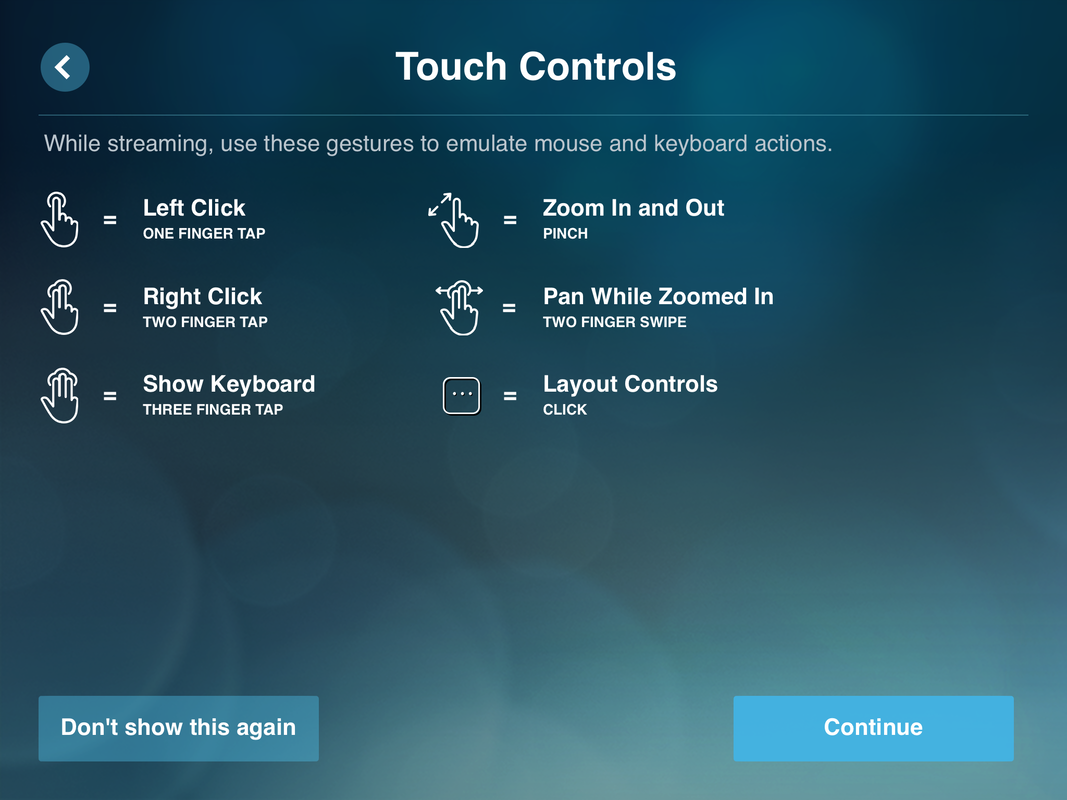
Note these settings, then click Continue
Watch your PC’s screen. It should launch the Steam Big Picture Mode. Both your PC and Device screen should look identical.
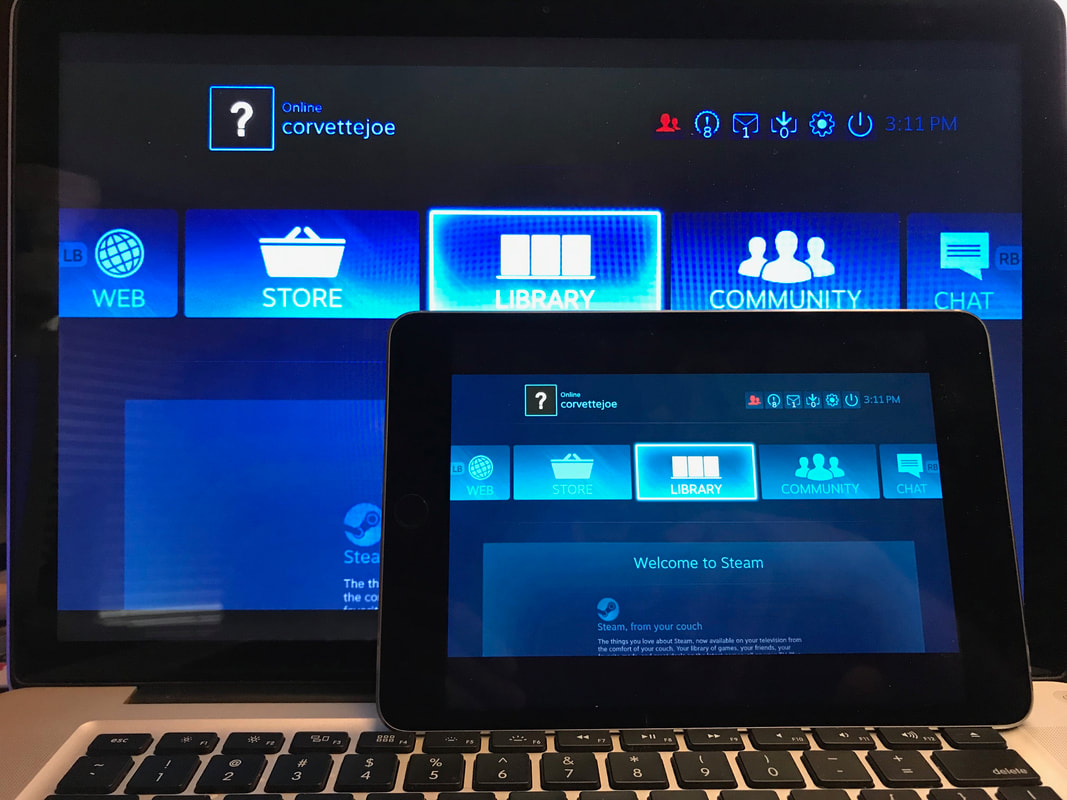
My Laptop with Steam running, with my iPad connected to it via Steam Link
14 - Select Library
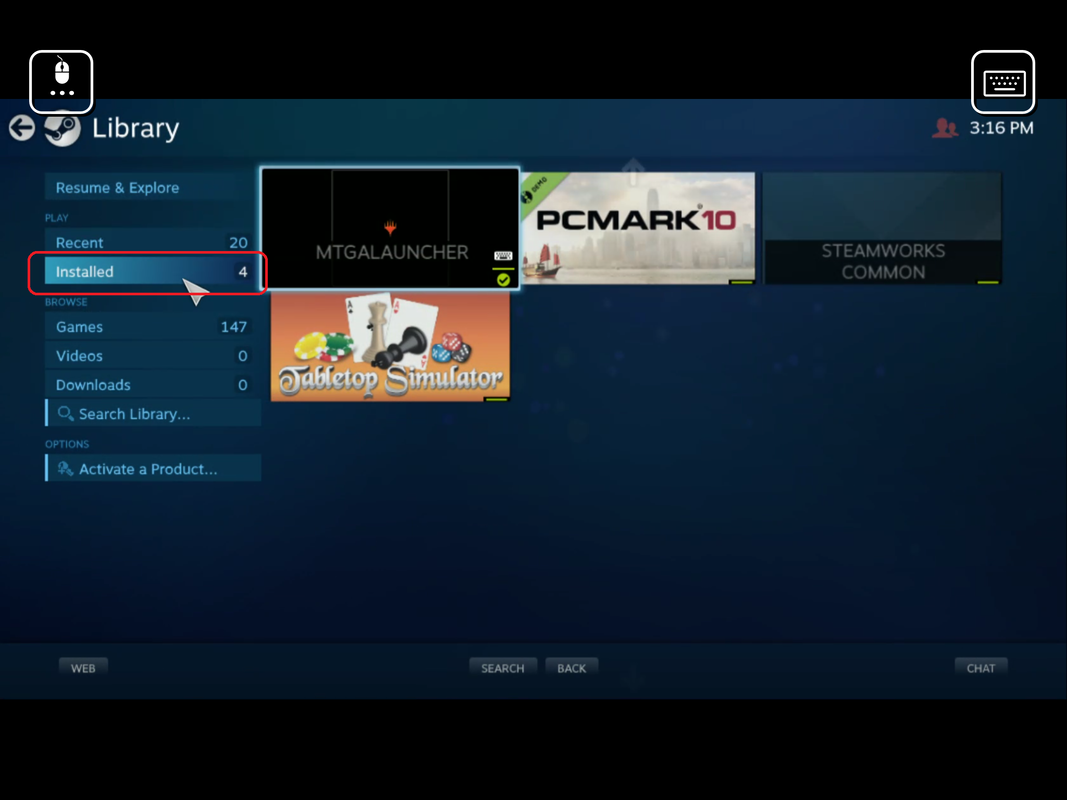
Looking for MTGA Launcher
15 - Select the Installed menu on the left.
You should see MTGALAUNCHER listed here. If not, try to resolve the issue on your Windows PC. It will be a lot easier than trying to deal with it via the touch screen.
16 - Tap MTGALAUNCHER
You should see MTGALAUNCHER listed here. If not, try to resolve the issue on your Windows PC. It will be a lot easier than trying to deal with it via the touch screen.
16 - Tap MTGALAUNCHER
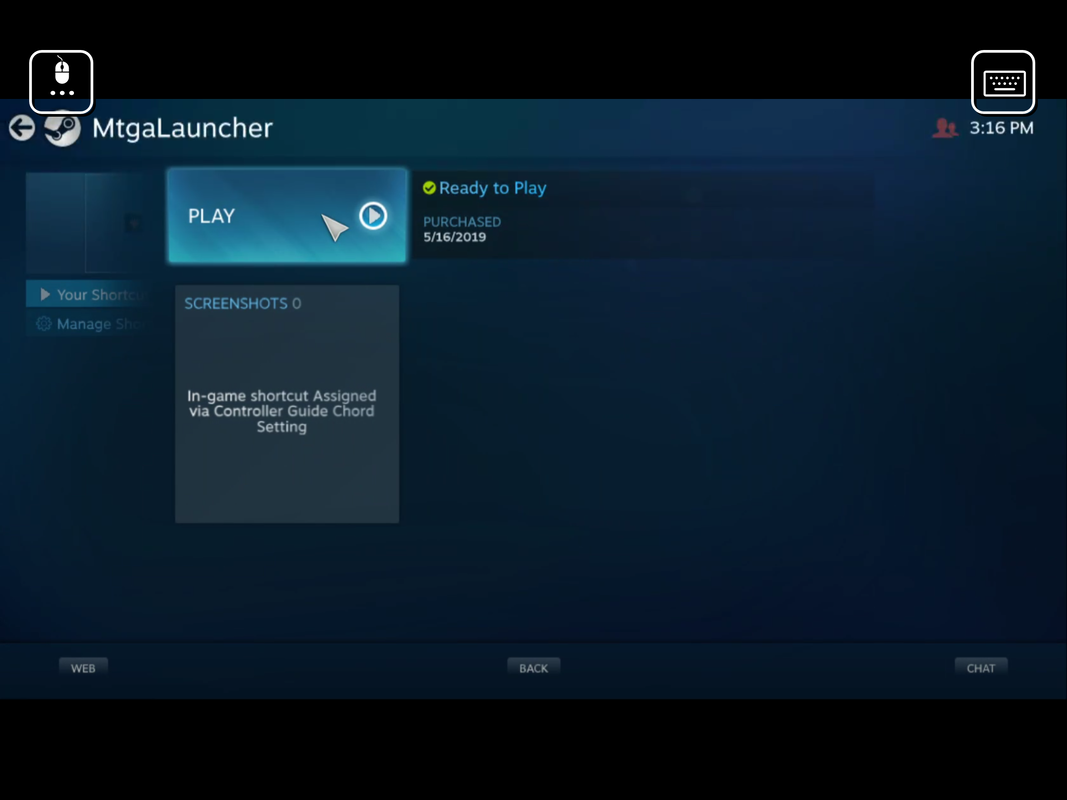
The final Play button!
17 - Tap Play. The game should launch.
If the Play button will not click correctly, look on your PC, and click the Play button with your mouse to help it out. This happened to be once, and after I helped it a little, it did not have any issues after that and worked perfectly.
- If it launches with a gamepad overlay on top of your game
- Tap the mouse icon in the top left of the screen and Change Mode.
- Select Mouse
- Tap the mouse icon in the top left of the screen and select Layout Controls.
- Tap Edit Layout
- Drag the overlay buttons you do not want to the upper left corner where the mouse icon was, it will change to a garbage can. Drop the overlay buttons on top.
If the Play button will not click correctly, look on your PC, and click the Play button with your mouse to help it out. This happened to be once, and after I helped it a little, it did not have any issues after that and worked perfectly.
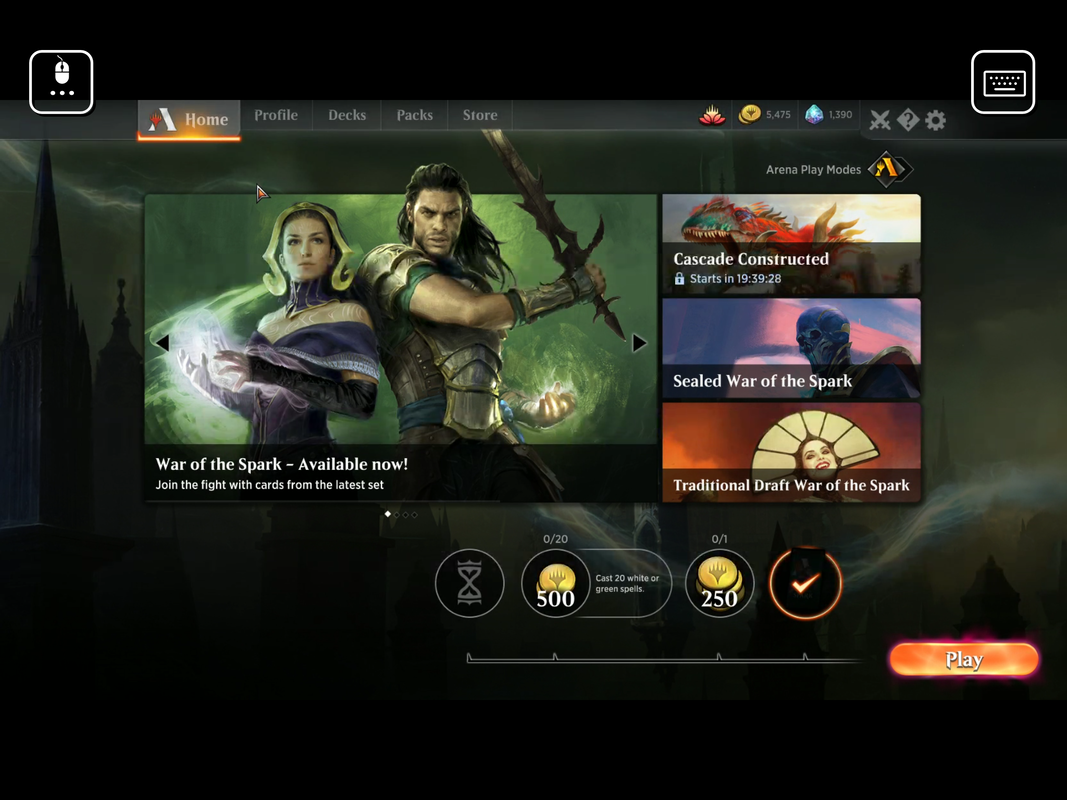
Now, here is the wonky part. Since this system is not made for a touch screen through Steam Link, it may not perfectly. Be patient until you figure out what you are doing wrong if it does not work right away.
Touching the cards on the screen works for the most part, but selecting them to read what is on them does not work that well since part of your finger covers up the card text. If you know your cards well, this will not matter at all.
Touching the cards on the screen works for the most part, but selecting them to read what is on them does not work that well since part of your finger covers up the card text. If you know your cards well, this will not matter at all.
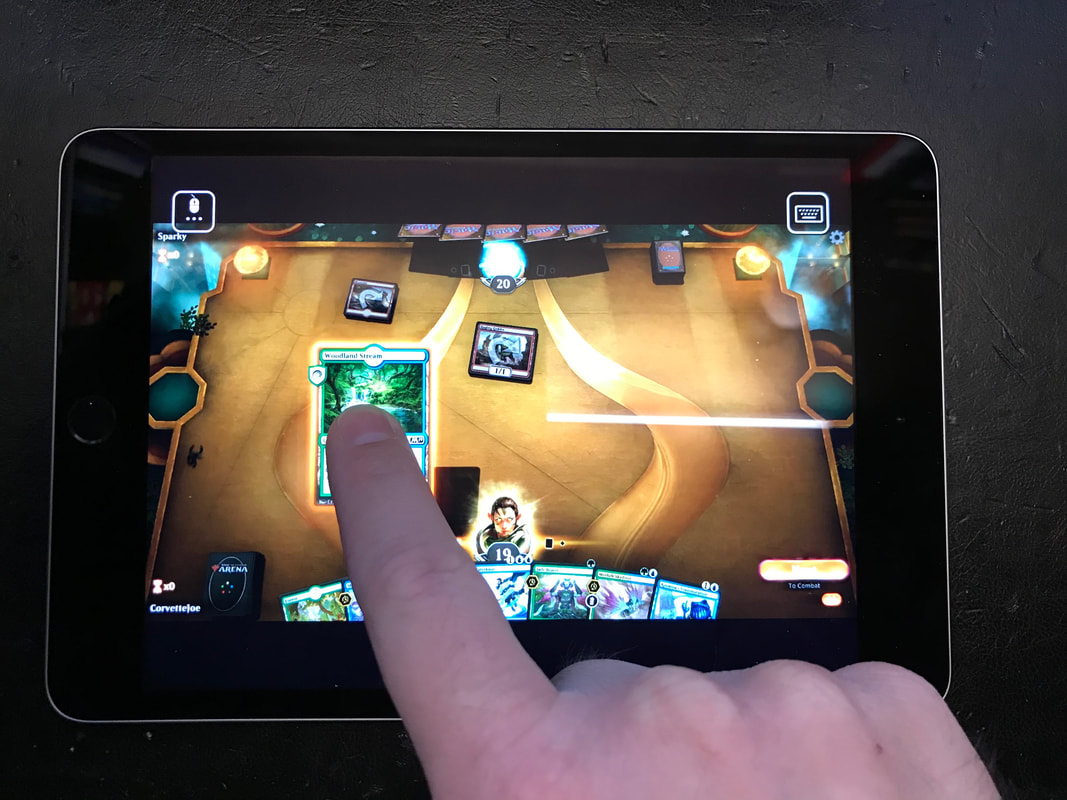
This will matter even more if you are playing on a smartphone, as your fingers will be covering up even more of the card from the smaller screen.
I played one game with it against Sparky, and it worked pretty well. I think this would come alive on a larger tablet than the one I have. I am using an iPad Mini 4. While the 8in screen is large enough, it is just barely large enough. I do not think I would really play this on my phone this way.
I played one game with it against Sparky, and it worked pretty well. I think this would come alive on a larger tablet than the one I have. I am using an iPad Mini 4. While the 8in screen is large enough, it is just barely large enough. I do not think I would really play this on my phone this way.
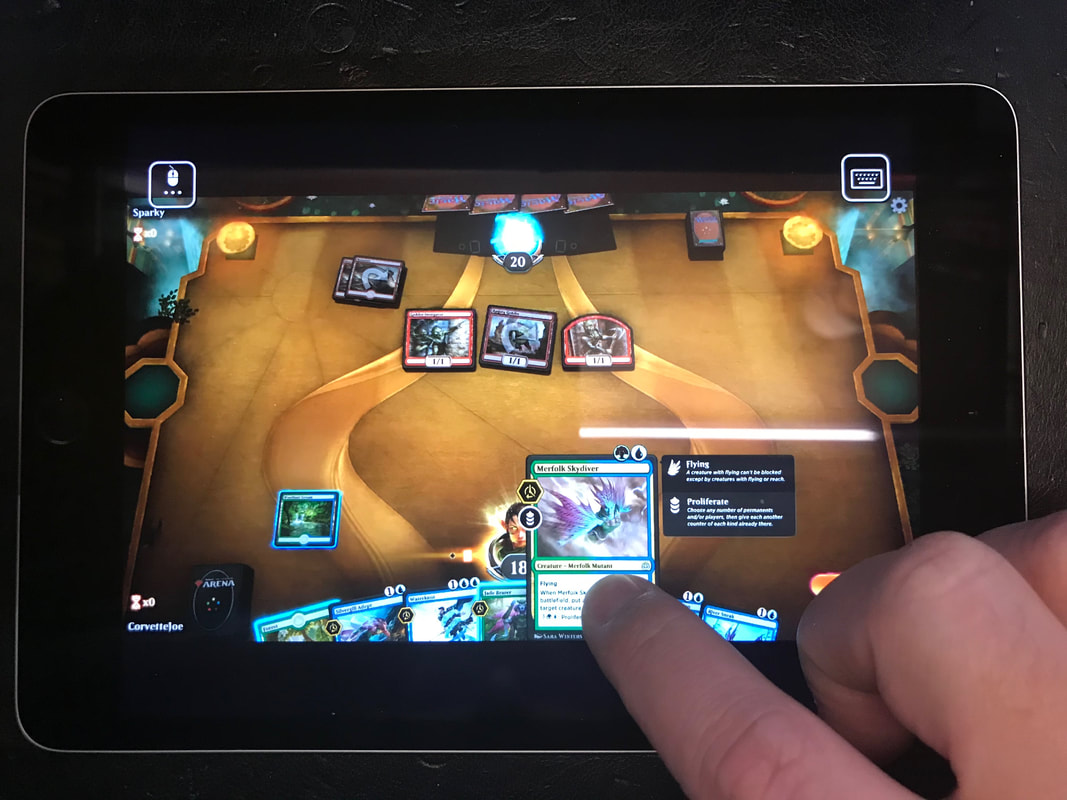
I would really like to have a cheap Windows 10 tablet for the best experience, but this works for now, and it is satisfying enough to use.
Categories
All
Biking
Budget
Diablo Immortal
Energy Drinks
Fallout 76
Food
Free Games
MTG
MTG Arena
PC
Tabletop Provisions
Archives
August 2022
February 2022
August 2021
June 2021
April 2021
March 2021
February 2021
January 2021
September 2020
August 2020
July 2020
June 2020
April 2020
March 2020
February 2020
January 2020
December 2019
November 2019
October 2019
September 2019
June 2019
May 2019
April 2019
 RSS Feed